- 11 -
FUNCTIONS
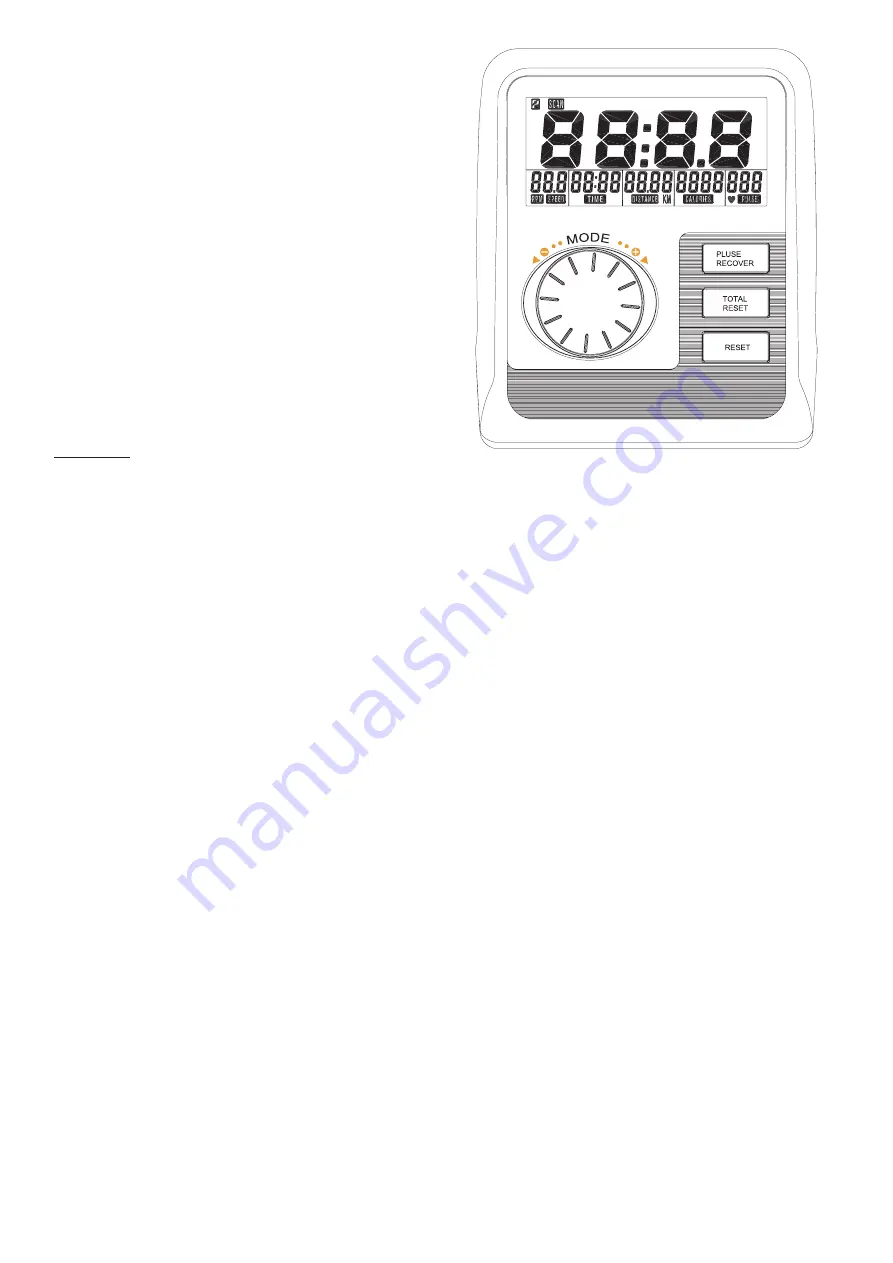
SCAN
Automatically Scans Through Each Function In Sequence Of Every 6 Seconds. The Display
loop Is SCAN-SPEED-RPM(IF HAVE)-TIME-DISTANCE-CALORIE-PULSE-SCAN on the mainscreen.
SPEED DISPLAYS CURRENT TRAINING SPEED, THE MAXIMUM IS 99.9KM/ML.
RPM(IF HAVE) Displays Current Rotation Per Minute. RPM and SPEED will Switch To Another Displayevery 6 Seconds
after Exercise Starts.
TIME Accumulates Total Working Time From 00:00 Up To 99:59. You May Also Preset The Targettime Before
training By Turning The Round Button. Each Setting Is 1:00 Minute. As Soonas The Target Time Is Achieved,
time Starts To Count Up Immediately And The Monitor Starts To Alarm For 8 Seconds.
DISTANCE Accumulates Training Distance From 0.00 To The Maximum 99.99km/ml With Each Incre-ment 0.01km/ml.
you May Also Preset The Targetdistance Before Training By Turningthe Round Button. Each Setting Is 0.5
km/ml. As Soon As The Target Distance Is Achieved,distance Starts Counting Up Immediately And The
monitor Starts To Alarm For 8 Seconds.
CALORIE Accumulates Calories Consupmtion During Training From 0 To The Maximum 9999 Calwith Each Increment
1 Cal. You May Also Preset The Target Calorie Before Training Byturning The Round Button. Each Setting Is
10 Cal. As Soon As The Target Calorie Is Achieved, Calorie Starts Counting Up Immediately And The Monitor
starts To Alarmfor 8 Seconds. (This Data Is A Rough Guide For Comparison Of Different Exercise Sessions
which Can Not Be Used In Medical Treatment)
PULSE The Monitor Will Display The User's Heart Rate While Exericing. You Will See Your Current Heart Rate (Bpm)
display On The Lcd During Exercising. Whenyou Start To Exercise,you Have To Hold On Grips With Both
Hands,after 30 Seconds Toto Max. 1 Minute, The Pulse Figure Will Display On The Lcd. If You Hold On The
Grip Withone Hand Only, The Pulse Figure Display Will Become Unstable. For The Pulse Readoutaccuracy
Reason, We'll Suggest You To Hold On Both Hands During Exercising. You May Also Preset Target Pulse
To Assist Training. As Soon As Your Current Heart Rate Isexceed The Target Figure, The Monitor Starts To
Alarm To Remind The User.
RECOVERY After Exercising For A Period Of Time, Keep Holding On Grips And Press "Recovery"button,the Monitor
will Stop All The Function Display Except "Time" Which Will Keepcounting From 00:60 - 00:59 - 00:58 -
down To 00:00. As Soon As 00:00 Is Achieved,thebottom Area Of Lcd Will Show Your Heartrate Status
with Grade F1,f2, To F6. F1 Is Thebest, And F6 Is The Worst.the User May Keep Exercising To Improve
the Heart Rate Statusstatus (Recovery Result) Day By Day From F6 Up To F1.
** Press the "recovery" button again o return to the main frame display.
NOTE :
1. Without any singnal been transmitted into the monitor for 4 minutes, the monitor will shut off and have room
temperature display. You may press mode button or start pedalling to have all function data appear back again.
2. Battery spec: r6p sum3 aa 1.5v x 2 pcs
FUNCTION BUTTON
:
MODE Press "mode" (round) button to select each
function display on the main screen and
the same one blinking on the bottom field.
UP/DOWN To turn the button clockwise or
anticlockwise for function datas setting
on TIME, DISTANCE, CALORIES, PULSE.
RESET The user may use reset key for single
reset each function: TIME, DISTANCE,
CALORIES, PULSE, or hold on for 4 seconds
to reset all function values while presetting.
(when the user replace batteries, all function
values may also be reset to zero.)
RECOVERY Press the button to have recovery function
work after exercising for a while.
TOTAL RESET Press the button to reset all function datas.


