The Bathmaster* Xtra Reclining Bath Lift
2
English
Nederlands
Français
Deutsch
Italiano
Español
Do the following
• Assess suitability of the unit to lift the individual. Judging the suitability
of any patient lifting device for the individual circumstances is the
responsibility of the healthcare professional or caregiver. The
circumstances that must be considered include the following: size and
weight of patient; his or her upper body strength, balance,
coordination, cognition, and hip flexibility; and the possibility of spasm.
• Read these instructions completely before attempting to use the
Bathmaster Xtra. Become familiar with the operation of the unit before
using it to lower or raise a person.
• Keep these instructions where people using the unit can have access
to them.
• Inspect the unit before each use to be sure it is free from damage and
excessive wear. Annual inspections by trained technicians are
recommended.
• Ensure that the feet of the unit and bath surface are completely clean,
dry and free from oil, foam and soap residue.
• Ensure that all four rubber feet are securely in place before placing the
unit in the bath.
• Ensure that the drive mechanism is securely attached to the base
before operating the unit.
• Always use a cover on the unit.
• Adjust the reclining mechanism through the seat opening, and not
from behind the seat.
• Have the unit in the lowest position before reclining the back.
• Ensure that the connector is completely dry before plugging it into the
recharger or the unit. (Operation and safety of the unit are not affected
if the hand controller cable or connector falls into the water.)
• During operation, be sure that the seat, back, and side flaps can move
freely, without obstruction. Be sure the user’s feet are in front of the
seat and the hands are away from the side flaps and the seat whilst
lowering and raising the unit. Also be sure the cables will not be
tangled or pulled by movement of the unit.
• In case of an emergency, stop operation of the unit immediately by
pulling apart the hand controller connector.
• If storing the unit for more than one week, fully charge the battery pack
prior to storage and again before the next use. Ensure that the unit is
completely dry before storing it.
• Lift the unit from the base, without holding onto the drive mechanism.
• Use only with accessories, hand controller, and rechargers that are
recommended by Homecraft AbilityOne.
Do not do the following
• Do not exceed the lifting capacity of the unit—142 kg (22 stone, 312 lb.).
• Do not use the unit as a support whilst standing.
• Do not use the unit on an incline of greater than 5°.
• Do not use the unit if metal parts of the connectors or cables are
exposed.
• If the unit is disassembled, do not operate the hand controller until the
backrest and drive mechanism are attached to the base.
• Do not use the unit after the low-battery light on the hand controller
has illuminated. Recharge it before use.
• Do not recharge the battery in the bathroom or near any source of
water.
• When sitting on the seat of the Bathmaster Xtra do not push against
the bath, such that the front of the bath lift is raised off the floor of the
bath, as this will make the bath lift unstable.
General use
The Bathmaster Xtra is a patient bathing device intended to help people
get into and out of a bath. This fully powered, self-contained bath seat
requires no plumbing or electrical installation.
The unit, which stands on two sucker feet and two dimpled feet, is easily
positioned in most standard baths. It folds compactly, providing
convenient carrying and storage. The backrest may be removed for easier
fitting into and removal from the bath.
Replacement components and accessories are available.
Standard components
The Bathmaster Xtra includes the following components:
• Stainless steel and polypropylene unit
• Removable seat cover
• Hand controller containing battery pack with LED low-battery
warning light
• Battery recharger
• Side flap protectors
• User instructions
Charging the battery
The hand controller must be charged prior to first use and whenever it is
low on power. Charging the battery should be done away from the
bathroom and other sources of water.
The light on the battery pack illuminates when the charge is low. When the
light goes on, enough power remains for one complete lift. However, the
unit will not lower into the bath.
To charge the battery, disconnect the cable of the hand controller from the
unit. Ensure that the connector is dry, connect the cable of the battery
pack to the cable of the recharger, and plug the recharger into an
electrical outlet. The light on the recharger illuminates when the hand
controller and recharger are connected correctly, and it remains
illuminated even when the battery is fully charged (on European
rechargers, the light pulses when charging is complete).
A complete charge takes approximately 15 hours; the battery can be left
continuously connected to the recharger. It is recommended that the hand
controller be placed on charge following each use and left on continuous
charge so it is ready when needed.
Improving battery performance
If the capacity of the hand controller has noticeably reduced (i.e., the unit
provides fewer lifts than expected per full charge), it may need
reconditioning. To recover the full capacity of the battery, use the following
procedure:
1. Remove the Bathmaster Xtra from the bath.
2. Operate a cycle once or twice with a person on the seat.
3. Operate the unit repeatedly up and down, without a person on the seat
until the motor stops of its own accord (other than at the top or bottom
limits of travel).
4. Recharge the hand controller for 15 hours.
5. Repeat steps 2 through 4 four more times.
Preparing the unit for use
1. Check the hand controller to ensure that there is sufficient power to
complete a full cycle. The LED low-battery warning light on the hand
controller illuminates to indicate that enough power remains for one
complete lift only. If necessary, recharge the battery prior to use.
2. Remove the backrest from the base by tilting the backrest forward
until the hinge is aligned with the slot in the base hinge and then lifting
it off the unit. Apply the seat cover as follows:
a. Hook the front of the seat cover over the front of the seat of the
unit.
b. Raise the side flaps and slip the cover over them, one at a time.
c. Pull the tabs on the back of the seat cover over the backrest
hinges.
d. Slip the top of the backrest cover over the top of the backrest and
loop the elasticated bottom around the lower end of the backrest.
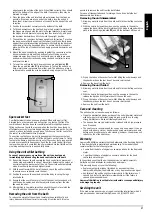
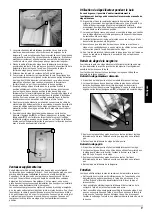
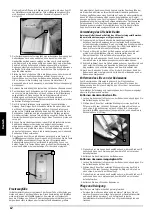
Notice the opening in the seat cover that gives access to the metal
release (labelled
A
in the photo), allowing the back to recline or fold
onto the unit.
3. The side flap protectors enable the side flaps to move smoothly up
and down without catching beneath the handles on the bath. If they
are needed, clip the protectors into place on the handles with the short
A


