background image

J-2 

Appendix J 

4. Internet 

Newsgroups. 

They are a great source of information and many people there can 

offer help. ABIT's Internet News group, 

alt.comp.periphs.mainboard.abit

, is an ideal 

forum for the public to exchange information and discuss experiences they have had with 
ABIT products. Many times you will see that your question has already been asked before. 
This is a public Internet news group and it is reserved for free discussions. Here is a list of 
some of the more popular ones: 

alt.comp.periphs.mainboard.abit 
comp.sys.ibm.pc.hardware.chips 
alt.comp.hardware.overclocking 
alt.comp.hardware.homebuilt 
alt.comp.hardware.pc-homebuilt 

5.  Ask your reseller.

 Your ABIT authorized distributor should be able to provide the fastest 

solution to your technical problem. We sell our products through distributors who sell to 
resellers and stores. Your reseller should be very familiar with your system configuration 
and should be able to solve your problem much more efficiently than we could. After all, 
your reseller regards you as an important customer who may purchase more products and 
who can urge your friends to buy from him or her as well. They integrated and sold the 
system to you. They should know best what your system configuration is and your 
problem. They should have reasonable return or refund policies. How they serve you is 
also a good reference for your next purchase. 

6. Contacting 

ABIT.

 If you feel that you need to contact ABIT directly you can send email 

to the ABIT technical support department. First, please contact the support team for the 
branch office closest to you. They will be more familiar with local conditions and 
problems and will have better insight as to which resellers offer what products and 
services. Due to the huge number of emails coming in every day and other reasons, such 
as the time required for problem reproduction, we will not be able to reply to every email. 
Please understand that we are selling through distribution channels and don't have the 
resources to serve every end-user. However, we will try to do our best to help every 
customer. Please also remember that for many of our technical support team English is a 
second language, you will have a better chance of getting a helpful answer if your 
question can be understood in the first place. Be sure to use very, simple, concise 
language that clearly states the problem, avoid rambling or flowery language and always 
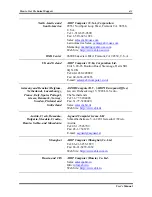
list your system components. Here is the contact information for our branch offices: 


NF7 Series 

Summary of Contents for NF7

Page 1: ...NF7 Series NF7 NF7 M NF7 S NF7 S2 NF7 S2G Socket 462 System Board User s Manual 4200 0316 10 Rev 1 01 ...

Page 2: ...al or consequential damages arising from any defect or error in this manual or product Product names appearing in this manual are for identification purpose only and trademarks and product names or brand names appearing in this document are the property of their respective owners This document contains materials protected under International Copyright Laws All rights reserved No part of this manua...

Page 3: ...l Switches Indicators Headers 2 9 6 Infrared Device Header NF7 NF7 S NF7 M 2 10 7 Additional USB Port Headers 2 11 8 Additional IEEE1394 Port Headers NF7 S 2 12 9 Front Panel Audio Connection Header 2 13 10 Internal Audio Connectors 2 15 11 Accelerated Graphics Port Slot 2 16 12 Floppy Disk Drive Connector 2 17 13 IDE Connectors 2 18 14 Serial ATA Connectors NF7 S NF7 S2 NF7 S2G 2 20 15 Status Ind...

Page 4: ...IDIA nForce Chipset Driver A 1 Appendix B Install Integrated GPU Driver NF7 M B 1 Appendix C Install USB 2 0 Driver C 1 Appendix D Install LAN Driver NF7 S2G D 1 Appendix E Install Serial ATA Driver NF7 S E 1 Appendix F BIOS Setup for NVRAID NF7 S2 NF7 S2G F 1 Appendix G ABIT EQ The Hardware Doctor Utility G 1 Appendix H FlashMenu BIOS Update Utility H 1 Appendix I Troubleshooting Need Assistance ...

Page 5: ...l DDR Dual DDR architecture combines two independent 64 bit memory controllers Dual DDR 400 provides up to 6 4GB s bandwidth for system memory 4 Memory Three 184 pin DIMM slots Supports 3 DIMMs DDR 200 266 333 Max 3GB Supports 2 DIMM DDR 400 Max 2GB Supports DDR 400 only when using an add on VGA card NF7 M 5 Audio Onboard 6 Channel AC 97 CODEC Professional digital audio interface supports optical ...

Page 6: ...NF7 S2G 2 x Serial port connectors 1 x Parallel port connector NF7 NF7 S 1 x Serial port connector 1 x Parallel port connector 1 x VGA Connector NF7 M 4 x USB 1 x RJ 45 LAN connector NF7 S2 NF7 S2G 2 x USB 1 x RJ 45 LAN connector NF7 NF7 S NF7 M 10 SATA 150 RAID NF7 S NF7 S2 NF7 S2G Onboard Silicon Image Sil 3112A SATA PCI Controller NF7 S Supports SATA 150 NV RAID NF7 S2 NF7 S2G Supports 2 channe...

Page 7: ... 10 100M NF7 S2G nForce2 Ultra 400 RAID MCP NV SATA RAID 6 ch Audio GbE The Serial ATA controller only supports Ultra DMA ATA100 or higher hard drive Do not use hard drives under this specification or it won t work This motherboard supports the standard bus speeds of 66 MHz 100 MHz 133 MHz that are used by specific PCI processor and chipset specifications Exceeding these standard bus speeds is not...

Page 8: ...1 4 Chapter 1 1 2 Layout Diagram NF7 NF7 S NF7 Series ...

Page 9: ...Introduction 1 5 1 3 Layout Diagram NF7 M User s Manual ...

Page 10: ...1 6 Chapter 1 1 4 Layout Diagram NF7 S2 NF7 S2G Ver 0 22 NF7 Series ...

Page 11: ... the tip of the spacers and insert them into the slots After doing this to all the slots you can slide the board into position aligned with slots After the board has been positioned check to make sure everything is OK before putting the chassis back on ATTENTION To prevent shorting the PCB circuit please REMOVE the metal studs or spacers if they are already fastened on the chassis base and are wit...

Page 12: ...ce to insert CPU it only fit in one direction Close the CPU release lever 3 Remove the plastic film adhesive on the heatsink Make sure the stepped portion of the heatsink is facing toward the end of the socket that reads Socket 462 Put the heatsink faces down onto the processor until it covers the processor completely 4 Push down the short end of the retaining clip first to lock up with the center...

Page 13: ... power cord before installing or removing memory modules 1 Locate the DIMM slot on the board 2 Hold two edges of the DIMM module carefully keep away of touching its connectors 3 Align the notch key on the module with the rib on the slot 4 Firmly press the module into the slots until the ejector tabs at both sides of the slot automatically snaps into the mounting notch Do not force the DIMM module ...

Page 14: ...refer to WARNING Always power off the computer and unplug the AC power cord before adding or removing any peripheral or component Failing to so may cause severe damage to your motherboard and or peripherals Plug in the AC power cord only after you have carefully checked everything ATX Power Input Connectors 1 This motherboard provides two power connectors to connect to an ATX12V power supply NF7 N...

Page 15: ... by using a powerful fan with heatsink The system is capable of monitoring the speed of the CPU fan CPUFAN1 CPU Fan CHAFAN1 SYSFAN1 System Fan PWRFAN1 Auxiliary Fan NF7 NF7 S NF7 M NBFAN1 Chipset Fan NF7 S2 NF7 S2G WARNING These fan connectors are not jumpers DO NOT place jumper caps on these connectors NF7 NF7 S NF7 M NF7 S2 NF7 S2G User s Manual ...

Page 16: ... memory Pin 1 2 shorted default Normal operation Pin 2 3 shorted Clear CMOS memory WARNING Turn the power off first including the 5V standby power before clearing the CMOS memory Failing to do so may cause your system to work abnormally or malfunction NF7 NF7 S NF7 M NF7 S2 NF7 S2G NF7 Series ...

Page 17: ... NF7 M KBPWR1 Pin 1 2 shorted default Enable wake up function support at Keyboard Mouse port Pin 2 3 shorted Disable wake up function support at Keyboard Mouse port USBPWR1 Pin 1 2 shorted default Enable wake up function support at USB1 port Pin 2 3 shorted Disable wake up function support at USB1 port User s Manual ...

Page 18: ...ult Enable wake up function support at USB2 port USBPWR2 Pin 1 2 shorted Disable wake up function support at USB1 port Pin 2 3 shorted default Enable wake up function support at USB1 port USBPWR3 Pin 1 2 shorted Disable wake up function support at FP USB1 port Pin 2 3 shorted default Enable wake up function support at FP USB1 port USBPWR4 Pin 1 2 shorted Disable wake up function support at FP USB2...

Page 19: ...ause the LED not lighting but a wrong connection of the switches could cause system malfunction NF7 NF7 S NF7 M NF7 S2 NF7 S2G HLED Pin 1 3 Connects to the HDD LED cable of chassis front panel RST Pin 5 7 Connects to the Reset Switch cable of chassis front panel SPK Pin 15 17 19 21 Connects to the System Speaker cable of chassis SLED Pin 2 4 Connects to the Suspend LED cable if there is one of cha...

Page 20: ...2 10 Chapter 2 6 Infrared Device Header NF7 NF7 S NF7 M This header connects to an optional IR device attached to chassis This motherboard supports standard IR transfer rates NF7 Series ...

Page 21: ... additional USB 2 0 ports connection through an USB cable designed for USB 2 0 specifications NF7 NF7 S NF7 M NF7 S2 NF7 S2G Pin Pin Assignment Pin Pin Assignment 1 VCC 2 VCC 3 Data0 4 Data1 5 Data0 6 Data1 7 Ground 8 Ground NF7 NF7 S NF7 M NF7 S2 NF7 S2G 9 NC 10 NC User s Manual ...

Page 22: ... Port Headers NF7 S These headers each provide one additional IEEE1394 port connection through an extension cable and bracket Pin Pin Assignment Pin Pin Assignment 1 TPA0 2 TPA0 3 GND 4 GND 5 TPB0 6 TPB0 7 12V 8 12V 9 NC 10 GND NF7 Series ...

Page 23: ... cable provided with the chassis To use the audio connector at rear panel disconnect the extension cable attach the jumpers back at pin 5 6 and pin 9 10 default setting NF7 NF7 S NF7 M Pin Pin Assignment Pin Pin Assignment 1 Audio Mic 2 Ground 3 Audio Mic Bias 4 VCC 5 Speaker Out Right Channel 6 Speaker Out Right Channel Return 7 X 8 NC 9 Speaker Out Left Channel 10 Speaker Out Left Channel Return...

Page 24: ...2G Pin Pin Assignment Pin Pin Assignment 1 Audio Mic 2 Ground 3 Audio Mic Bias 4 VCC 5 Speaker Out Right Channel 6 Speaker Out Right Channel Return 7 X 8 NC 9 Speaker Out Left Channel 10 Speaker Out Left Channel Return NF7 Series ...

Page 25: ...Hardware Setup 2 15 10 Internal Audio Connectors This connector connects to the audio output of internal CD ROM drive or add on card NF7 NF7 S NF7 M NF7 S2 NF7 S2G User s Manual ...

Page 26: ...erated Graphics Port Slot This slot supports an optional AGP graphics card up to AGP 8X mode ATTENTION This motherboard does not support 3 3V AGP cards Use only 1 5V or 0 8V AGP cards NF7 NF7 S NF7 M NF7 S2 NF7 S2G NF7 Series ...

Page 27: ... ribbon cable into the FDC1 connector The colored edge of the ribbon cable should be aligned with pin 1 of FDC1 connector 2 Install the other end s of ribbon cable into the disk drive connector s The colored edge of the ribbon cable should be also aligned with pin 1 of disk drive connector The endmost connector should be attached to the drive designated as Drive A NF7 NF7 S NF7 M NF7 S2 NF7 S2G Us...

Page 28: ...o the connectors on hard drives If you want to connect two hard drives together through one IDE channel you must configure the second drive to Slave mode after the first Master drive Please refer to the drives documentation for jumper settings The first drive connected to IDE1 is usually referred to as Primary Master and the second drive as Primary Slave The first drive connected to IDE2 is referr...

Page 29: ...Hardware Setup 2 19 NF7 S2 NF7 S2G User s Manual ...

Page 30: ...trolled by Silicon Image PCI Chip To enable the SATA1 and SATA2 controller the item Serial ATA Controller must be kept enabled default setting in the BIOS menu of Onboard PCI Device NF7 S2 NF7 S2G SATA1 and SATA2 are controlled by South Bridge To enable the SATA1 and SATA2 controller the item Serial ATA must be kept enabled default setting in the BIOS menu of OnChip PCI Device NF7 Series ...

Page 31: ...tup 2 21 15 Status Indicators LED1 5VSB This LED lights up when the power supply is connected with power source LED2 VCC This LED lights up when the system power is on NF7 NF7 S NF7 M NF7 S2 NF7 S2G User s Manual ...

Page 32: ...plementation of an I2 C bus I2 C is a multi master bus which means that multiple chips can be connected to the same bus and each one can act as a master by initiating a data transfer If more than one master simultaneously tries to control the bus an arbitration procedure decides which master gets priority NF7 NF7 S NF7 M NF7 Series ...

Page 33: ...s communication protocol COM1 Connects to external modem mouse or other devices that support this communication protocol COM2 Connects to external modem mouse or other devices that support this communication protocol NF7 NF7 S VGA1 Connects to monitor input NF7 M OPT1 This connector provides an S PDIF out connection through optical fiber to digital multimedia devices NF7 NF7 S NF7 M User s Manual ...

Page 34: ...2 Mic In Connects to the plug from external microphone Line In Connects to the line out from external audio sources F L F R Front Left Front Right Connects to the front left and front right channel in the 5 1 channel or regular 2 channel audio system LAN Connects to Local Area Network U1 USB1 USB2 USB Port Connectors Connects to USB devices such as scanner digital speakers monitor mouse keyboard h...

Page 35: ...ssis Only when it failed by these two methods can you restart the system by powering it off and then back on After pressing Del key the main menu screen appears NOTE In order to increase system stability and performance our engineering staffs are constantly improving the BIOS menu The BIOS setup screens and descriptions illustrated in this manual are for your reference only may not completely matc...

Page 36: ...he multiplier and external clock in certain circumstances may cause CPU damage Setting the working frequency higher than the PCI chipset or processor specs may cause abnormal memory module functioning system hangs hard disk drive data lose abnormal functioning of the VGA card or abnormal functioning with other add on cards Using non specification settings for your CPU is not the intention of this ...

Page 37: ...vailable Disabled Enabled The default setting is Disabled When set to Disabled the system uses the most stable CPU FSB parameters If you choose enabled the system will use overclocked CPU FSB parameters Power Supply Controller This option allows you to switch between the default and user defined voltages Leave this setting to default unless the current voltage setting cannot be detected or is not ...

Page 38: ...us speed is supported but not guaranteed CPU Interface Two options are available Optimal Aggressive The default setting is Optimal When set to Optimal the system uses the most stable CPU FSB parameters If you choose Aggressive the system will use overclocked CPU FSB parameters Memory Frequency This item allows you to set the DRAM frequency When set to By SPD the BIOS will read the DRAM module SPD ...

Page 39: ...lt setting is 2 5 You can select SDRAM CAS Column Address Strobe latency time according your SDRAM specification Power Supply Controller This option allows you to switch between the default and user defined voltages Leave this setting to default unless the current voltage setting cannot be detected or is not correct The option User Define enables you to select the following voltages manually CPU C...

Page 40: ...7 M NF7 S2 NF7 S2G Date mm dd yy This item sets the date you specify usually the current date in the format of Month Date and Year Time hh mm ss This item sets the time you specify usually the current time in the format of Hour Minute and Second IDE Primary Channel 1 Master Slave IDE Secondary Channel 2 Master Slave IDE Channel 3 4 Master Click Enter key to enter its submenu NF7 Series ...

Page 41: ...sing If you want to define your own drive by yourself set it to Manual and make sure you fully understand the meaning of the parameters Please refer to the instruction manual provided by the device s manufacturer to get the setting right Access Mode This item selects the mode to access your IDE devices Leave this item to its default Auto setting to detect the access mode of your HDD automatically ...

Page 42: ...s default Disabled setting if you are not using this Japanese standard floppy drive Video This item selects the type of video adapter used for the primary system monitor EGA VGA Enhanced Graphics Adapter Video Graphics Array For EGA VGA SVGA and PGA monitor adapters CGA 40 Color Graphics Adapter Power up in 40 column mode CGA 80 Color Graphics Adapter Power up in 80 column mode Mono Monochrome ada...

Page 43: ...amount of base memory installed in the system The value of the base memory is typically 640K for system with 640K or more memory size installed on the motherboard Extended Memory This item displays the amount of extended memory detected during system boot up Total Memory This item displays the total memory available in the system User s Manual ...

Page 44: ...lows you to select the booting priority of CD ROM devices NOTE This item appears only if you install CD ROM devices to your computer Virus Warning NF7 NF7 S NF7 M When set to Enabled the BIOS will monitor the boot sector and partition table of the hard disk drive If there is any attempt of writing to the boot sector or partition table of the hard disk drive the BIOS will halt the system and an err...

Page 45: ...ery time the system boots or only when enters the BIOS setup Setup The password is required only when accessing the BIOS Setup System The password is required each time the computer boots up To disable security select Set Supervisor Password at main menu and then you will be asked to enter the password Do not type anything and just press the Enter key and it will disable security Once security is ...

Page 46: ... its default setting Delay IDE Initial This item allows the BIOS to support some old or special IDE devices by prolonging this delay time A larger value will give more delay time to the device for which to initialize and to prepare for activation Full Screen LOGO Show NF7 S2 NF7 S2G This item determines to show the full screen logo when booting NF7 Series ...

Page 47: ...ycles between an activate command and a precharge command to the same bank RAS to CAS delay Seven options are available from 1 to 7 This item is to set SDR DDR SDRAM RAS to CAS delay It can define the SDRAM ACT to Read Write command period Row precharge delay Seven options are available from 1 to 7 This item controls the idle clocks after issuing a precharge command to the DRAM CAS Latency Time Th...

Page 48: ... 0 50 AGP Spread Spectrum Two options are available Disabled 0 50 The default setting is 0 50 CPU Thermal Throttling Eight options are available Disabled 87 5 75 0 62 5 50 0 37 5 25 0 12 5 The default setting is 50 0 Enhance PCI Performance Two options are available Disabled Enabled The default setting is Disabled This item can improve the PCI transmission performance CPU Disconnect Function When ...

Page 49: ...ling Eight options are available Disabled 87 5 75 0 62 5 50 0 37 5 25 0 12 5 The default setting is 50 0 System BIOS Cacheable Two options are available Disabled or Enabled When you select Enabled you get faster system BIOS executing speed via the L2 cache Video RAM Cacheable Two options are available Disabled or Enabled When you select Enabled you get faster video RAM executing speed via the L2 c...

Page 50: ...d Input Output mode allows the BIOS to tell the controller what it wants and then let the controller and the CPU perform the complete task rather than having the BIOS issue a series of commands to affect a transfer to or from the disk drive Auto The BIOS will select the best available mode after checking your disk drive Mode 0 4 You can select a mode that matches your disk drive s timing Do not us...

Page 51: ...efetching IDE Bus Master This option enables or disables the IDE bus mastering capability under the DOS environment Back to Integrated Peripherals Setup Menu OnChip PCI Device Click Enter key to enter its submenu USB Controller Three options are available Disabled V1 1 V2 0 V1 1 The default setting is V1 1 V2 0 If you choose to disable this item the USB Keyboard Support and USB Mouse Support items...

Page 52: ...ler Back to Integrated Peripherals Setup Menu Onboard PCI Device For NF7 S Only Click Enter key to enter its submenu Serial ATA Controller This option enables or disables the onboard Silicon Image SIL3112A SATA controller SATA RAID ROM This item allows you to use the boot ROM of onboard Serial ATA RAID to boot up system Back to Integrated Peripherals Setup Menu Init Display First This item selects...

Page 53: ...smission Delay Two options are available Enabled and Disabled The default setting is Enabled Set IR transmission delays 4 character time 40 bit time when SIR is changed from RX mode to TX mode IR Function Duplex Two options are available Full and Half The default setting is Half Select the value required by the IR device connected to the IR port Full duplex mode permits simultaneous two direction ...

Page 54: ...EPP 1 9 When the mode selected for the parallel port mode is EPP the two EPP version options are available ECP Mode Use DMA Two options are available 1 3 The default setting is 3 When the mode selected for the parallel port mode is ECP the DMA channel selected can be Channel 1 or Channel 3 For NF7 S2 NF7 S2G IDE Function Setup Click Enter key to enter its submenu IDE RAID This item allows you to e...

Page 55: ... you to use the boot ROM instead of a disk drive to boot up the system and access the local area network directly Back to Integrated Peripherals Setup Menu Onchip IDE Device Click Enter key to enter its submenu OnChip IDE 1 IDE 2 Controller This item allows you to enable or disable the primary and secondary IDE controller Select Disabled if you want to add a different hard drive controller User s ...

Page 56: ...ey to enter its submenu USB Controller Three options are available Disabled V1 1 V2 0 V1 1 The default setting is V1 1 V2 0 If you choose to disable this item the USB Keyboard Support and USB Mouse Support items will not be able to select in Integrated Peripherals menu USB KB Storage Support This item allows you to select BIOS for using USB keyboard or USB storage device in DOS environment or OS i...

Page 57: ...t 1 Six options are available Disabled 3F8 IRQ4 2F8 IRQ3 3E8 IRQ4 2E8 IRQ3 AUTO The default setting is 3F8 IRQ4 Onboard Parallel Port Sets the I O address and IRQ of the onboard parallel port Four options are available Disabled 378 IRQ7 278 IRQ5 3BC IRQ7 Default setting is 378 IRQ7 Parallel1 Port Mode Four options are available SPP EPP ECP ECP EPP The default setting is ECP EPP mode EPP Mode Selec...

Page 58: ...pherals Setup Menu Init Display First This item selects to initialize AGP or PCI Slot first when the system boots PCI Slot When the system boots it will first initialize PCI AGP When the system boots it will first initialize AGP NF7 Series ...

Page 59: ...ME of PCI Two options are available Disabled or Enabled The default setting is Disabled When set to Enabled any event affecting from PCI card PME will awaken a system that has powered down Wakeup by Ring Two options are available Disabled or Enabled The default setting is Disabled When set to Enabled any event affecting from Modem Ring will awaken a system that has powered down Wakeup by Alarm NF7...

Page 60: ...er on the system Any KEY Use any keyboard keys to power on the system BUTTON ONLY Use only the power button to power on the system Keyboard 98 Use the power on button on the Keyboard 98 compatible keyboard to power on the system NOTE To enable this Power On function the wake up header of KBPWR1 and USBPWR1 must be set to Enabled position Please refer to the configuration of Wake up Header KBPWR1 a...

Page 61: ... On When power returns after an AC power failure the system s power will be powered on automatically Last State When power returns after an AC power failure the system will return to the state where you left off before power failure occurs If the system s power is off when AC power failure occurs it will remain off when power returns If the system s power is on when AC power failure occurs the sys...

Page 62: ...Extended System Configuration Data contains the IRQ DMA I O port memory information of the system This is a specification and a feature specific to the Plug Play BIOS Resources Controlled By This item configures all of the boot and Plug and Play compatible devices Auto ESCD The system will automatically detect the settings Manual Choose the specific IRQ resources in the IRQ Resources menu IRQ Reso...

Page 63: ...ers from 0 to 255 are available with the default setting at 32 This item can let you set the PCI latency clock delay time Which means you can set how many clocks you want it delay PIRQ_0 Use IRQ No PIRQ 3 Use IRQ No This item specifies the IRQ number manually or automatically for the devices installed on PCI slots For the relations between the hardware layout of PIRQ the signals from the south bri...

Page 64: ...Q Resources Click Enter key to enter its submenu This item sets each system interrupt to either PCI Device or Reserved Back to PnP PCI Configurations Setup Menu PCI VGA Palette Snoop This item determines whether the MPEG ISA VESA VGA cards can work with PCI VGA or not Disabled MPEG ISA VESA VGA cards do not work with PCI VGA Enabled MPEG ISA VESA VGA cards work with PCI VGA Assign IRQ for VGA This...

Page 65: ...you want it delay PIRQ 0 Assignment PIRQ 3 Assignment This item specifies the IRQ number manually or automatically for the devices installed on PCI slots For the relations between the hardware layout of PIRQ the signals from the south bridge chipset INT means PCI slot IRQ signals and devices please refer to the table below Signals PCI 1 PCI 2 PCI 3 PCI 4 PCI 5 SATA PIRQ_0 Assignment INT C INT D IN...

Page 66: ...f CPUFAN out of order system will force to shutdown to protect the processor not overheat CPU Shutdown Temperature Shutdown Temperature Five options are available Disabled 60 140 65 149 70 158 75 167 The default setting is Disabled You can set the processor shutdown temperature here If the processor temperature exceeds the settings value system will force to shutdown to protect the processor not o...

Page 67: ... your add on card I O address to avoid using these addresses 3 9 Load Fail Safe Defaults This option loads the BIOS default values for the most stable minimal performance system operations 3 10 Load Optimized Defaults This option loads the BIOS default values that are factory settings for optimal performance system operations 3 11 Set Password This option protects the BIOS configuration or restric...

Page 68: ...3 34 Chapter 3 3 34 Chapter 3 NF7 Series NF7 Series ...

Page 69: ...ating system For those of other OS please follow its on screen instruction Insert the Driver Utility CD into CD ROM drive it should execute the installation program automatically If not double click the execution file at the main directory of this CD to enter the installation menu After entering the installation menu move your curser to Drivers tab Click nVidia nForce Chipset Driver The following ...

Page 70: ...A 2 Appendix A Click Continue Anyway 6 Click Continue Anyway 7 8 Choose Yes I want to restart my computer now and click Finish to complete setup NF7 Series ...

Page 71: ... the installation program automatically If not double click the execution file at the main directory of this CD to enter the installation menu After entering the installation menu move your curser to Drivers tab Click Integrated GPU Driver The following screen appears 1 Click Next 2 Choose Yes I want to restart my computer now and click Finish to complete setup 3 When system restarts and enters th...

Page 72: ...Appendix B B 2 NF7 Series ...

Page 73: ...t service pack first from Microsoft s web site To install the USB 2 0 driver for Windows 9x and ME please insert the Driver Utility CD into CD ROM drive It should execute the installation program automatically If not double click the execution file at the main directory of this CD to enter the installation menu The following screen appears Click USB 2 0 Driver and then follow the on screen instruc...

Page 74: ...Appendix C C 2 NF7 Series ...

Page 75: ... CD into CD ROM drive It should execute the installation program automatically If not double click the execution file at the main directory of this CD to enter the installation menu The following screen appears Click VIA Ethernet Driver and then follow the on screen instruction to complete the driver installation User s Manual ...

Page 76: ...D 2 Appendix D NF7 Series ...

Page 77: ...n instruction Insert the Driver Utility CD into CD ROM drive it should execute the installation program automatically If not double click the execution file at the main directory of this CD to enter the installation menu After entering the installation menu move your curser to Drivers tab Click Serial ATA Driver The following screen appears 1 Click Next 2 Click Continue Anyway Click Yes 3 Click Ne...

Page 78: ... complete setup 8 Check Device Manager Silicon Image SiI 3112 SATARaid Controller is successfully installed 9 To run the SATARaid application click Start All Programs SATARaid 10 This is the SATALink configuration menu For more information on how to operate please refer to the Help menu NF7 Series ...

Page 79: ...s will first be erased Please backup the hard disk data before starting to create the RAID array If you want to create a RAID 1 mirroring array please make sure which hard disk is the source disk and which one is the destination disk If you make a mistake you may copy the blank data to the source disk which will result in both hard disks becoming blank Option 1 Create RAID set This item allows you...

Page 80: ...o the disk includes drive connection information Primary Channel Secondary Channel If after a disk failure the replacement disk was previously part of a RAID set or used in another system it may have conflicting metadata specifically in reference to the drive connection information If so this will prohibit the RAID set from being either created or rebuilt In order for the RAID set to function prop...

Page 81: ...ss Del key to enter BIOS Setup main menu Use the arrow key to select Integrated Peripherals then press Enter key 2 The Integrated Peripherals setup menu appears as shown above Use the arrow key to select the IDE Function Setup then press Enter key 3 4 The IDE Function Setup menu appears Enable IDE RAID item then enable the disks that you want to use as RAID disks Press F10 key to save the configur...

Page 82: ...ks by pressing the right arrow key The first disk in the list is moved and the next disk in the list is selected and ready to be moved Continue pressing the right arrow key until all the disks that you want to use as RAID array disks appear in the Array Disks block The figure shown below illustrates the Define a New Array window after two disks have been assigned as RAID1 array disks Completing th...

Page 83: ...about the array that you selected such as Striping Block used RAID Mode Striping Width Disk Model Name and disk capacity If you want to mark this disk as empty and wipe out all its contents press C key At the prompt press Y key to wipe out all the data otherwise press N key Press Enter key again to go back to the previous window and then press F10 key to exit the RAID setup NOTE The information sh...

Page 84: ...F 4 Appendix F NF7 Series ...

Page 85: ...ts in this section are based on Windows XP operating system For those of other OS please follow its on screen instruction Insert the Driver Utility CD into CD ROM drive it should execute the installation program automatically If not double click the execution file at the main directory of this CD to enter the installation menu After entering the installation menu move your curser to ABIT Utility t...

Page 86: ...pendix G 5 Execute the ABIT EQ by entering the Windows Menu Start All Programs ABIT ABIT EQ 6 This screen appears ABIT EQ shows you the status of Voltage Fan Speed and Temperature readings as well NF7 Series ...

Page 87: ...section are based on Windows XP operating system For those of other OS please follow its on screen instruction Insert the Driver Utility CD into CD ROM drive it should execute the installation program automatically If not double click the execution file at the main directory of this CD to enter the installation menu After entering the installation menu move your curser to ABIT Utility tab Click Fl...

Page 88: ...lashMenu by entering the Windows Menu Start All Programs ABIT FlashMenu 6 This FlashMenu screen appears You can easily update the BIOS from clicking Update From File One Click LiveUpdate or LiveUpdate Step by Step button NF7 Series ...

Page 89: ...cover the hardware default status and then make the motherboard working again No need to bother returning the motherboard to where you bought from or go through an RMA process Step 1 Switch off the power supply unit and then switch it on again after one minute If there is no power switch on the power supply unit disconnect its power cord for one minute and then connect it back Press and hold the I...

Page 90: ...y to start the system each time you insert a card until the system will not start Keep the VGA card and the interface card that caused the problem inserted on the motherboard remove any other cards or peripheral and start again If you still cannot start note the information related to both cards in the add on Card space provided and don t forget to indicate the motherboard model version BIOS ident...

Page 91: ...E1 Master Example In the HDD space check the box in the Brand space write Seagate in the Specifications space write ST31621A 1 6GB 8 CD ROM Drive Indicate the brand and specifications of your CD ROM drive Specify if it uses IDE1 or IDE2 and check in case you give no indication we will consider that your CD ROM is IDE2 Master Example In the CD ROM drive space check the box in the Brand space write ...

Page 92: ...me Phone Number Contact Person Fax Number E mail Address Model BIOS ID Motherboard Model No DRIVER REV OS Application Hardware Name Brand Specifications CPU HDD IDE1 IDE2 CD ROM Drive IDE1 IDE2 System Memory ADD ON CARD Problem Description NF7 Series ...

Page 93: ...ts have the best quality and compatibility In case you need service or technical support please understand the constraint we have and always check with the reseller who sold the product to you first To expedite service we recommend that you follow the procedures outlined below before contacting us With your help we can meet our commitment to provide the best service to the greatest number of ABIT ...

Page 94: ...tegrated and sold the system to you They should know best what your system configuration is and your problem They should have reasonable return or refund policies How they serve you is also a good reference for your next purchase 6 Contacting ABIT If you feel that you need to contact ABIT directly you can send email to the ABIT technical support department First please contact the support team for...

Page 95: ...any and Benelux Belgium Netherlands Luxembourg France Italy Spain Portugal Greece Denmark Norway Sweden Finland and Switzerland AMOR Computer B V ABIT s European Office Jan van Riebeeckweg 15 5928LG Venlo The Netherlands Tel 31 77 3204428 Fax 31 77 3204420 Sales sales abit nl Web Site http www abit nl Austria Czech Romania Bulgaria Slovakia Croatia Bosnia Serbia and Macedonia Asguard Computer Ges ...

Page 96: ...ently it is likely that you have a defective component Please contact the reseller from whom you bought the product You should be able to get RMA service there 8 Reporting Compatibility Problems to ABIT Because of tremendous number of email messages we receive every day we are forced to give greater weight to certain types of messages than to others For this reason any compatibility problem that i...

Reviews: