

Add:
1501 Industrial Way N, Toms River, NJ 08755
Phone:
866-222-8866
E-mail:
info@abovealllighting.com
Web:
www.AboveAllLighting.com ©2016 ABOVE ALL Lighting, Inc. All rights reserved
2
MT LED AREA LIGHT / FLOOD LIGHT
Instructions Manual
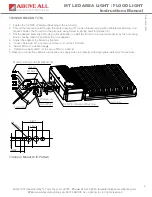
1. Remove the Crosshead Screw A (2) on the Arm Door.
2. Loosen the (M8) Socket Head Screw B on the Arm with supplied Hex Wrench and take off the Slider.
3. Thread the luminaire cord through the Arm. Fasten the Arm to the luminare using M6 Bolt D, Spring and Flat Washer
(4) with a Wrench of aperture of 7/16’’ (not supplied).
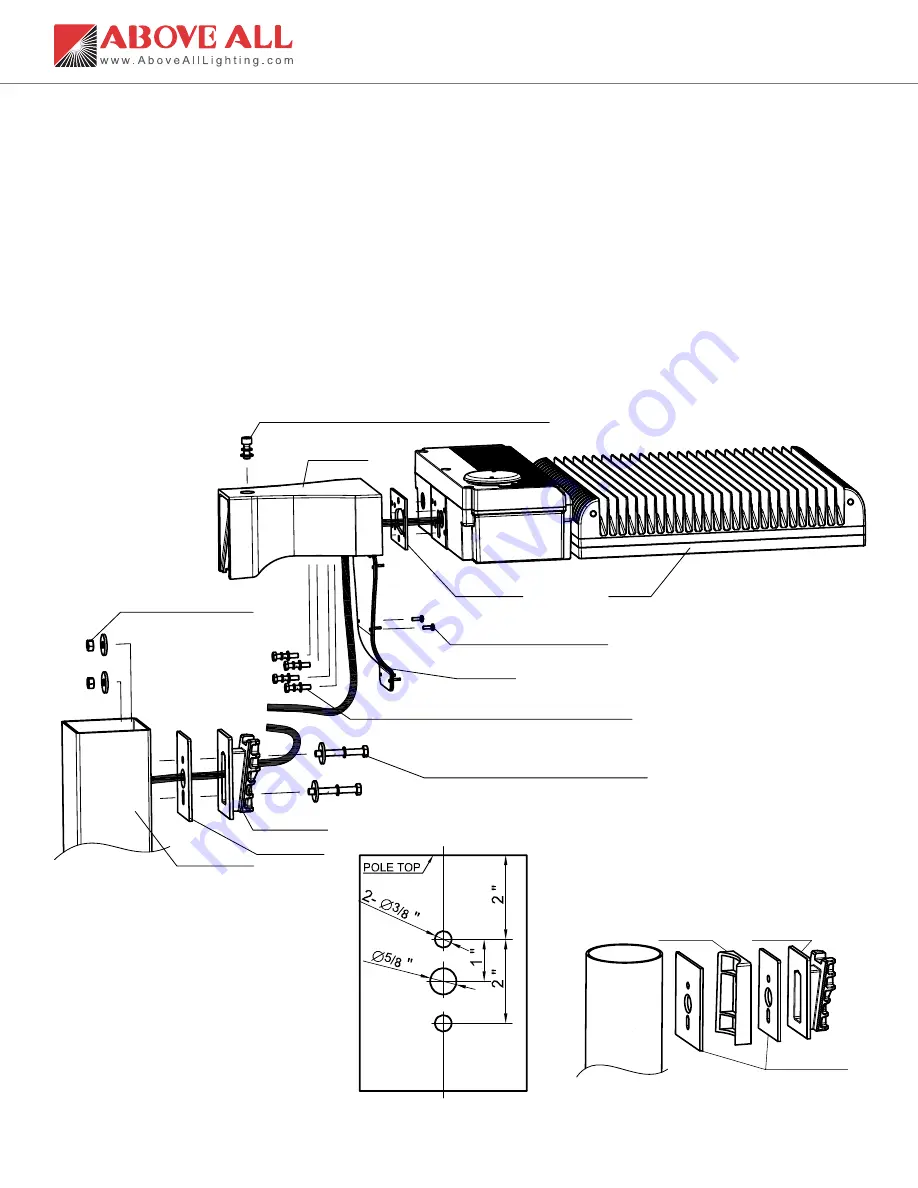
4. Drill the pole according to the drill pattern. Fix the Slider and Gasket B to the Pole with Bolt C (2), Spring and Flat
Washer (4) and Nut (2). Thread the AC power cord through Pole and Slider.
5.
Slide the Arm into the Slider and fix them with removed (M8) Socket Head Screw B, Flat and Spring Washer.
6. Make necessary wire connections inside the Arm and squeeze all the wires in the Arm.
7. Replace the Arm Door and tighten Crosshead Screw A (2).
ARM MOUNT
Notes:
1.
The Arm (AR), Slip Fitter (SF) and Trunnion (TR) are field installed, need to be bought separately.
2. If fxture is furnished with photocell receptacle, please make sure install the photocell or shorting cap.
WARNING
Risk of injury or damage. Make certain power is OFF before installing or maintaining fixture.
(M8) Socket Head Screw B, Flat and Spring Washer
M6 Bolt D, Spring and Flat Washer (4)
Bolt C, Spring and Flat Washer (2)
Nut and Flat Washer (2)
Gasket A
Slider
Gasket B
Square Pole
Arm Door
Crosshead Screw A (2)
Luminaire
Arm
Gasket A
Slider
Gasket B (2)
Pole Mount Drill Pattern
For Round Pole


