background image

Product Familiarization & Installation Guide - Installation Instructions

Abseco

®

 AFi Series Smart Switch - AFI-4M1S1P

Page 6

Installation Instructions

1.

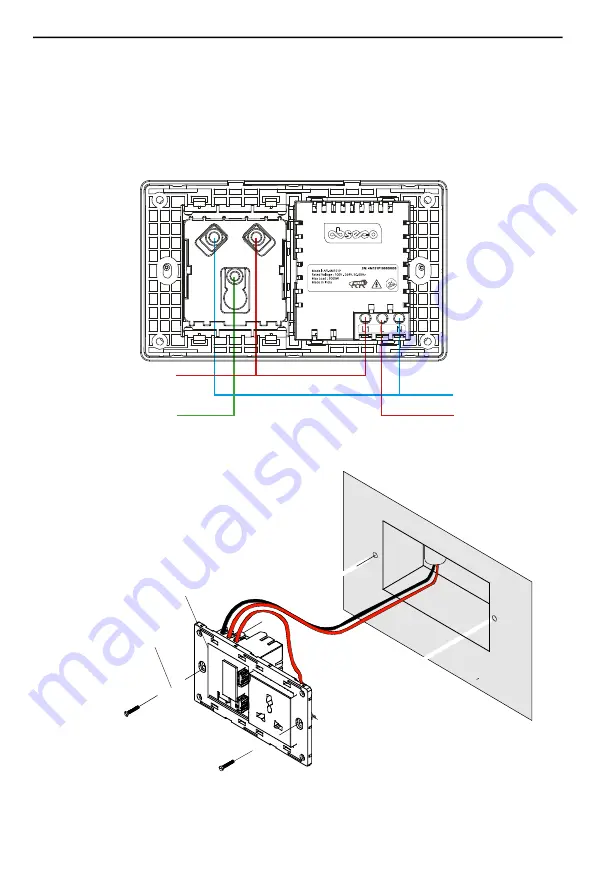
Connect the electrical wires to the terminals of the switch module as shown in 

the wiring diagram for either 1-Way or 2-Way installation.

2.

Insert the switch module into the switch mount box and secure with 2 screws.

3.

Align and position the front touch panel (face plate) onto the switch module.

L1 (Line-out)

Ground

L (Line-in)

N (Neutral)

MAIN

SWITCH

MODULE

SCREW

(2 PLACES)

Summary of Contents for AFI-4M1S1P

Page 1: ...International Pvt Ltd www abseco in Product Familiarization Installation Guide Abseco AFi Series Smart Switch AFI 4M1S1P Revision No Initial Issue Dated Aug 01 2021 Printed in India Abseco Internatio...

Page 2: ...cribes Trademarks ABSECO the Abseco logo and AFi Series are property of Abseco International Pvt Ltd The Works with Google Assistant logo is a trademark of the Google Inc Amazon Alexa Works with Amazo...

Page 3: ...allation and use before installation use of the product All instructions and safety precautions detailed in this guide must be strictly followed Observe all warnings and instructions marked on the pro...

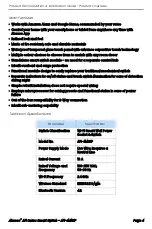
Page 4: ...erload and surge protection Functional module design to easily replace your traditional mechanical switch Separate indicators for on off status and touch switch illumination for ease of detection duri...

Page 5: ...oduct Overview Abseco AFi Series Smart Switch AFI 4M1S1P Page 5 Parts Identification Power Connection Terminals POWER CONNECTION TERMINALS REAR ENCLOSURE TOUCH PANEL INDICATOR LIGHT ON OFF TOUCH SWITC...

Page 6: ...he electrical wires to the terminals of the switch module as shown in the wiring diagram for either 1 Way or 2 Way installation 2 Insert the switch module into the switch mount box and secure with 2 s...

Page 7: ...es Smart Switch AFI 4M1S1P Page 7 Figure 2B Wiring Diagram 2 Way Installation 4 Carefully press the touch panel by applying even force on all sides until it is seated securely on the switch module Mak...

Page 8: ...ation Installation Guide Installation Instructions Abseco AFi Series Smart Switch AFI 4M1S1P Page 8 5 After installation switch on the main electrical power supply and verify that the touch switch is...

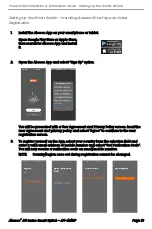
Page 9: ...nstall it 2 Open the Abseco App and select Sign Up option You will be presented with a User Agreement and Privacy Policy screen Read the user agreement and privacy policy and select Agree to continue...

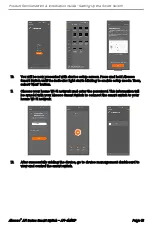
Page 10: ...4 The permissions necessary for the App to function correctly will be selected by default If you are agreeing to give App the necessary permissions select Go to App 1 After successfully logging in yo...

Page 11: ...he map Select Save after making sure the location is correct 7 You can choose the default room names suggested by the App or click Add Room to add a room with custom name NOTE A maximum of 25 characte...

Page 12: ...bseco Smart Switch until the indicator light starts blinking to enable setup mode Then select Next button 11 Choose your home Wi Fi network and enter the password This information will be synced with...

Page 13: ...Product Familiarization Installation Guide Setting Up the Smart Switch Abseco AFi Series Smart Switch AFI 4M1S1P Page 14...

Page 14: ...the smart switch are correct Refer to Wiring Diagram given in Installation Instructions Light bulb not turning on when smart switch is turned on indicator light on smart switch is ON The light bulb is...

Page 15: ...smart switch is installed is satisfactory If your smartphone indicates a weak Wi Fi signal in that location than the smart switch will likely have a weak signal as well Smart switch is successfully ad...

Page 16: ...bseco International Pvt Ltd Additional information on this product and answers to frequently asked questions can be found at our Website Official Website www abseco ltd Service Email Address care abse...

Reviews: