background image

ESC Features

:  

• Water-proof and dust-proof, suitable for all-weather condition races.
• Small size with built-in capacitor module.

• Three running modes: Forward /Brake, Forward/Brake/Reverse and Forward /Reverse, fits for various vehicles.
• Great current endurance capability. 

• Great built-in BEC output capacity.
• Automatic throttle range calibration, easy to use.
• Easy to set the ESC parameters with jumpers.

• Multiple protections: Low voltage cut-off protection for battery / Over-heat protection / Throttle signal loss protection.

ESC Specification: 

Fwd. Cont. /Peak Current: 

60A/360A 

Voltage Range: 

2-3S LiPo or 5-9 NiMH 

Motor Limit 2S or 6 NiMH: 

540/550 Motor ≥12T or RPM<30000 @7.2V 

Motor Limit 3S or 9 NiMH: 

540 or 550 Size Motor: ≥18T or RPM< 20000 @7.2V 

Resistance:   

Forward 0.001Ω, Reverse 0.002Ω 

BEC Output:  

3A / 6V (Switch Mode) 

Dimension/Weight:  

36.5x32x18 mm / 39g 

Cooling Fan:  

Without cooling fan 

Set the ESC parameters:


How to set: 
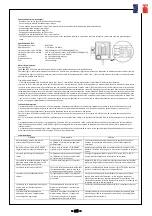
1060-BRUSHED ESC uses the jumper cap to set running mode & battery type.  
Way to set: We suggest users use the tweezers to set parameters by plugging / unplugging the jumper cap (as shown in the picture beside); For example, if want 

set the battery type to the “LiPo” mode, you only need to plug the jumper cap into left two pins of the battery pin header. 

Programmable items: 


1. Running Mode: 3 Options (Fwd / Br / Rev, Fwd / Br, Fwd / Rev). “Fwd / Br / Rev” is the default option (Fwd=Forward, Br=Brake, Rev=Reverse) 

“Fwd / Br / Rev” mode indicates the vehicle can go forward, backward and brake. This mode uses “Double-click” method to make the vehicle reverse. When

moving the throttle stick from the neutral zone to backward zone for the 1st time, the ESC begins to brake the motor and the motor slows down but still running,
so the backward action is NOT performed immediately. When the throttle stick is moved to the backward zone again, if the motor speed slows down to zero (i.e.

stopped), the backward action will happen. This “Double-click” method prevents mistakenly reversing action when the brake function is frequently used in
steering. Therefore, this mode is often used in daily practice. For the “Fwd / Br” mode, the vehicle can go forward and brake, but no reversing, so this mode is
often used in competition. And the “Fwd / Rev” mode uses “Single-click” method to make the vehicle reverse, when moving the throttle stick from neutral zone

to backward zone, the vehicle 
reverses immediately, so this mode is usually used for rock crawling. 

2. Battery Type: Lipo or NiMH, the “Lipo” is the default option.

Protection Features: 

1. Low Voltage Cutoff Protection: If the voltage of battery pack is lower than the threshold for 2 seconds, the ESC will enter the protection mode, so the motor
speed will be lowered (when voltage is lower than the 1st trigger point) till stopped (when voltage is lower than the 2nd trigger point). When the car stops, the

red LED blinks to indicate the low voltage cut-off protection has been activated. 
2S LiPo: When voltage is below 6.5V, the output power will be halved. When the voltage is lower than 6.0V, the output will be cut off and won’t be resumed 
again. 

3S LiPo: When voltage is below 9.75V, the output power will be halved. When the voltage is lower than 9.0V, the output will be cut off and won’t be resumed 
again. 

2. Over-heat Protection: When the internal temperature of the ESC is higher than 100°C, this protection will be activated and the output power will be reduced 
till cut off. The RED LED blinks when the vehicle stops, and the ESC will not resume output power until its temperature is below 80°C. 
3. Throttle signal loss protection: The ESC will cut off the output power if the throttle signal has been lost for 0.1 second. The “Fail Save” function of the radio 

system is strongly recommended to be activated. 

Trouble Shooting: 

Troubles 

Possible Causes 

Solutions 

After power on, no LED lights up, no self-
test and no beep sound. 

No power is drawn to the ESC; The switch of 
the ESC is broken. 

Check the connections between battery and ESC. Re-solder the 
connectors if needed; Change the ESC switch. 

After turn on, the RED LED blinks but the 

motor doesn’ t work. 

Throttle wire is wrongly plugged or into the 

incorrect channel; The ESC can’t successfully 
complete the throttle range self-calibration. 

Plug the throttle signal wire correctly into the throttle channel (usually 

Ch2) of the receiver; 
Set the “TRIM” of throttle channel to 0 or turn the knob to its neutral 
position. 

The car runs backwards when 
accelerating forward on 
the transmitter. 

Direction setting of the throttle channel is 
incorrect in the transmitter or the motor 
wires are wrongly connected. 

Reverse the direction of the throttle channel, from the original “NOR” 
to “REV” or “REV” to “NOR”; 
Swap the wires between the ESC and motor. 

The vehicle can’t reach to the full speed 
even at the full throttle, and the RED LED 

doesn’ t keep lighting. 

There are some incorrect settings in the 
transmitter. 

Set D/R, EPA, ATL to 100% or turn the knobs to maximum value. Set 
TRIM to 0 or turn the knob to its neutral position. 

Vehicle can’t reverse. 

The corresponding jumper is plugged into the 
wrong position; Neutral point of throttle is 

drifted or deviated. 

Insert the jumper into the right location; Set the “TRIM”of the throttle 
channel to 0 or turn the knob to its neutral point. 

Motor suddenly stops running. 

The throttle signal is lost; The low voltage 
cutoff protection or thermal protection (i.e. 

over heat protection) of the ESC is activated. 

Check connection between ESC and receiver). Check battery voltage of 
the transmitter if it is too low; The red LED on the ESC blinks, denoting 

the ESC is under low voltage cut-off protection or over-heat protection. 
Let the ESC cool down. If the battery voltage is low, please change the 

battery. 

Vehicle neither go forward no reverse, 
but the LED indicators work normally. 

The connection between ESC and motor is 
interrupted; The motor is damaged. 

Check the connectors between the motor and ESC to ensure all 
connections are firm and reliable; Replace a new motor. 

The motor accelerates rapidly at the 

startup moment, 
but has lockout or cogging problem. 

The discharge capacity of the battery is not 

strong enough; Motor rotates too fast; gear 
ratio is too aggressive; driveline not ok 

Change battery with better discharge capability; Use a motor with 

lower RPM, or smaller pinion to soften the gear ratio; Check the 
driveline of the vehicle. 

- 25 -

Summary of Contents for CR 3.4

Page 1: ...BENDIENUNGSANLEITUNG MANUAL mode d emploi 1 10 SCALE 4WD ELECTRIC CRAWLER ...

Page 2: ... 1 ...

Page 3: ... 2 ...

Page 4: ... 3 ...

Page 5: ... 4 ...

Page 6: ... 5 ...

Page 7: ... 6 ...

Page 8: ... 7 ...

Page 9: ... 8 ...

Page 10: ... 9 ...

Page 11: ... 10 ...

Page 12: ... 11 ...

Page 13: ... 12 ...

Page 14: ... 13 ...

Page 15: ... 14 ...

Page 16: ... 15 ...

Page 17: ... 16 ...

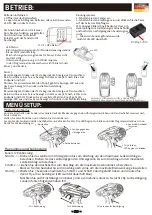
Page 18: ... Car 4 Nachdem die Fernsteuerung eingeschalten ist können Sie auch das Fahrzeug aktivieren après avoir allumé la télécommande vous pouvez également activer le véhicule Radio System Instructions Anleitung für Fernsteuerung Instructions pour le contrôle à distance Functions of radio switches Funktionen der Schalter Fonction des interrupteurs CH 5 Front differentail lock 1 CH 5 Differentialsperre vor...

Page 19: ...mage to setup you battery type and drive mode Kindly note to restart the ESC to save the setting Setzen Sie die Jumper wie auf dem Bild zu sehen ist um den Batterietyp und Fahrmodus zu wählen Speichern Sie die Einstellung durch einen Neustart des ESCs Réglez les cavaliers comme indiqué sur l image pour sélectionner le type de batterie et le mode de conduite Sauvegardez le réglage en redémarrant le...

Page 20: ...verklebt 0 Offset Felgen Design 20 Speichen schwarz Reifenprofil Slick Product specification Produktspezifikation Spécification du produit Length Länge Longueur Width Breite Large Height Höhe Hauteur Chassis Tyre Ø Rad Ø Roue Ø Wheelbase Radstand Empattement Weight Gewicht Poids Steering angle Lenkungseinschlag Ground clearance Bodenfreiheit Low speed gear ratio Low Speed Übersetzung High speed ge...

Page 21: ... zu bestätigen LED leuchtet dauerhaft blau Möchten Sie auch Einstellungen an Kanal 3 und 4 vornehmen drücken Sie nicht CH3 zur Bestätigung sondern fahren folgendermaßen fort Programmierung Kalibrierung CH1 Kalibrierung CH2 Kalibrierung CH3 drücken für Bestätigung LED Status Richtungssteuerungsmodus für Standardsteuerungsmodus Blaues Licht leuchtet stätig Mischrichtungssteuerungsmodus für Panzer Ro...

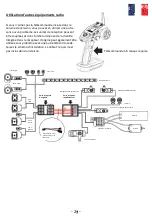
Page 22: ...rderlich Verwendung einer anderen Funkanlage Sollte Ihnen die im Lieferumfang enthaltene Fernsteuerung nicht zusagen kann auch eine anderen problemlos verwendet werden Die Empfängereinheiten können gekoppelt werden und somit kann auch die im Original Empfänger verbaute Lichteinheit des Crawlers problemlos mit einer anderen Fernsteuerung verwendet werden Folgen Sie dem Installationsdiagram Die erfo...

Page 23: ...t 3S LiPo Wenn die Spannung unter 9 75V liegt wird die Ausgangsleistung halbiert Wenn die Spannung niedriger als 9 0V ist wird der Ausgang abgeschaltet und nicht wieder aktiviert 2 Überhitzungsschutz Wenn die Innentemperatur des ESC höher als 100 C ist wird dieser Schutz aktiviert und die Ausgangsleistung wird bis zur Abschaltung reduziert Die ROTE LED blinkt und der Fahrtenregler nimmt die volle ...

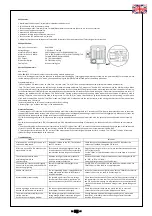
Page 24: ...e maximum Hold the position and power on transmitter Release the wheel and trigger press 3nd channel button panel indicator light will go flashing programming mode on ready for setting 1 Turn wheel anticlockwise to the end and hold 2 Pull trigger to the end and hold 4 Release wheel and trigger back to normal 3 Power on 5 Press Channel 3 button LED light go flashing After enter programming mode Cha...

Page 25: ... receiver will all necessary device for controlling vehicle And connect CH1 CH2 CH3 CH4 with Y cable not incl from Third party Receiver to the receiver which is pre installed on vehicle as below diagram After re start radio and vehicle own exsiting radio can be use Third party 6 channel Radio connect to third party RX plug in device connect to Pre installed RX Y cable not incl 24 ...

Page 26: ... voltage is below 9 75V the output power will be halved When the voltage is lower than 9 0V the output will be cut off and won t be resumed again 2 Over heat Protection When the internal temperature of the ESC is higher than 100 C this protection will be activated and the output power will be reduced till cut off The RED LED blinks when the vehicle stops and the ESC will not resume output power un...

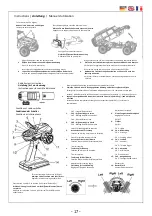
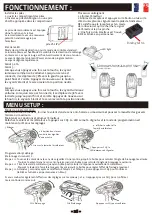
Page 27: ...ur confirmer la DEL est allumée en permanence en bleu Si vous souhaitez également effectuer des réglages sur les canaux 3 et 4 n appuyez pas sur CH3 pour confirmer mais continuez comme suit Programmation Calibrage CH1 Étalonnage CH2 Étalonnage Appuyez sur CH3 pour confirmer Etat de la LED Mode de contrôle de direction pour le mode de contrôle standard La lumière bleue est fixe Mode de contrôle de ...

Page 28: ...ion d autres équipements radio Si vous n aimez pas la télécommande incluse dans le volume de livraison vous pouvez en utiliser une autre sans aucun problème Les unités de réception peuvent être couplées et donc l unité lumineuse de la chenille intégrée dans le récepteur d origine peut également être utilisée sans problème avec une autre télécommande Suivez le schéma d installation Le câble Y requi...

Page 29: ...e de moitié Si la tension est inférieure à 6 0V la sortie est coupée et ne se réactive pas 3S LiPo si la tension est inférieure à 9 75V la puissance de sortie est réduite de moitié Si la tension est inférieure à 9 0V la sortie est coupée et ne se réactive pas 2 protection contre la surchauffe si la température interne de l ESC est supérieure à 100 C cette protection est activée et la puissance de ...

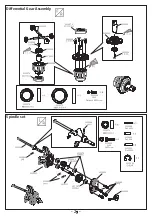
Page 30: ...0596 1230574 1230575 1230596 1230568 1230528 1230566 1230502 1230567 1230603 1230572 1230502 1230527 1230572 1230589 1230550 1230575 1230589 1230568 1230566 1230567 1230603 2 5x6 Flat Head HEX Screw 3x10 CAP Screw Differential Gear Assembly Spindle set Pin1 6X11 Pin2 0X8 Pin2 0X10 29 ...

Page 31: ...rew 3x14 CAP Screw 2 5x6 Flat HEX Screw 1230575 1230596 1230594 1230544 1230545 1230545 1230579 1230579 1230581 1230579 1230578 1230581 1230579 1230581 1230581 1230579 1230579 3x28 CAP Screw 1230594 3x10 Round head HEX screw 3x14 Round head HEX screw 1230579 1230581 3x20 Set Screw 1230606 3x8 Round head HEX screw 1230578 1230542 1230606 1230546 1230500 1230546 Portal Axle Housing Assembly Front po...

Page 32: ... 1230616 1230590 1230593 1230525 Gearbox Assembly 1230567 Pin 2 0X10 1230596 2 5x6 Flat Head Screw 1230575 BB10 X 5 X 4 1230571 BB9 X 5 X 3 1230515 1230579 3x10 Round Head HEX Screw 1230641 2 5x10 CAP Screw 1230589 3x10 CAP Screw 1230590 3x12 CAP Screw 1230593 3x24 CAP Screw 1230575 BB10 X 5X 4 1230567 Pin 2 0x10 1230532 1230567 1230515 1230552 1230596 1230552 1230515 1230572 1230571 1230513 12305...

Page 33: ...572 1230567 1230595 1230590 1230548 1230589 1230610 1230549 1230588 1230557 1230558 1230560 1230559 1230605 4 4 1230567 Pin 2 0x10 1230552 3 0 E CLIP 1230588 3x8 CAP Screw 1230608 M3 Lock NUT 1230605 4x4 SET Screw 1230589 3x10 CAP Screw 1230575 BB10 X 5 X 4 1230571 BB9 X 5 X 3 1230590 3x12 CAP Screw 1230595 3x32 CAP Screw 1230562 7x5 1x0 5 Shim 32 ...

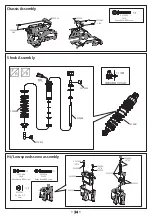
Page 34: ...12 1230576 3 6 1230580 3 12 1230576 3 6 1230579 3 10 1230579 3 10 1230579 3 10 1230599 3 8 1230599 3 8 1230579 3 10 1230579 3 10 1230604 3 3 1230580 3 12 1230576 3 6 1230578 3 8 1230580 3 12 1230576 3 6 1230578 3 8 1230578 3 8 1230583 3 18 1230584 3 30 1230578 3 8 1230713 ST2 4 1230713 ST2 4 1230584 3 30 Button Head Screw 1230713 ST2 4 Button Head Screw 1230576 3 6 Button Head Screw 1230578 3 8 Bu...

Page 35: ...6 1230506 1230512 1230586 2 5x8 Round Head HEX screw 1230614 2 5x16 Round Head HEX screw 1230561 6 x 2 6 x 0 5 Shim 1230586 2 5 8 1230561 1230611 1230509 1230614 2 5 16 1230553 1230586 2 5 8 1230561 Hi Low speeds servo assembly 34 1230689 1230545 Shock Assembly 1230545 1230688 1230687 ...

Page 36: ...30614 2 5 16 1230554 1230604 3 3 1230586 2 5 8 1230561 1230614 2 5 16 1230512 1230587 2 5 14 1230587 2 5x14 Round Head HEX Screw 1230604 3x3 SET Screw 1230587 2 5x14 Round Head HEX Screw 1230634 2x4 Round Head HEX Screw 1230634 2x4 1230634 2x4 35 1230579 3x10 Round Head HEX Screw 1230600 3x12 Flat Head HEX Screw 1230579 3 10 1230579 3 10 1230579 3 10 1230579 3 10 1230600 3 12 Chassis Assembly ...

Page 37: ...k Screw 1230593 3 24 1230593 3 24 1230594 3 28 1230606 3 20 1230546 1230546 1230608 1230541 1230541 1230540 1230540 Upper Lower 1230657 1230657 1230657 36 Hi Low speeds servo Differential lock servo assembly 1230604 3x3 SET Screw 1230579 3x10 Round Head HEX Screw 1230579 3 10 1230579 3 10 1230553 1230604 3 3 1230613 1230687 1230687 ...

Page 38: ...AP Screw 1230594 3x28 CAP Screw 1230608 M3 Lock NUT 1230606 3x20 SET Screw 1230593 3 24 1230593 3 24 1230594 3 28 1230606 3 20 1230608 1230541 1230540 1230546 1230546 Upper Lower 1230541 1230540 1230657 1230657 1230657 37 Vertical universal shaft assembly 1230533 ...

Page 39: ...0604 3 3 1230604 3 3 1230581 3 14 1230551 1230604 3 3 1230604 3 3 1230581 3 14 1230551 1230604 3 3 Modular Assembly 1230591 3 14 1230591 3 14 1230591 3 14 1230591 3 14 1230592 3 18 1230592 3 18 1230543 1230657 1230591 3 14 Shock installation position 1230591 3x14 CAP Screw 1230592 3x18 CAP Screw ...

Page 40: ... 39 1230556 1230556 1230556 1230556 M4 12 8 Screw Axle 1230533 1230533 Vertical universal shaft assembly Servo wires zip tied ...

Page 41: ... 5 8 1230716 2 5 18 1230644 2 5 6 1230712 2 5 8 1230645 3 8 1230713 2 4 1230654 4 35 1230599 3 8 1230713 2 4 1230700 1230696 1230702 1230710 1230702 1230599 3 8 1230715 2 5 10 1230716 2 5 18 1230690 1230691 1230692 1230693 1230694 1230696 1230696 1230713 2 4 1230645 3 8 1230644 2 5 6 Button Head Screw 1230715 2 5 10 Button Head Screw 1230713 2 4 Button Head Screw 1230716 2 5 18 Button Head Screw 1...

Page 42: ... 41 Wheels and Tires Assembly 1230609 Flange Lock Nut M4 1230601 2 5 10 CAP Screw 1230601 2 5 10 1230601 2 5 10 1230704 1230704 1230703 1230705 1230705 1230609 1230706 Body Assembly 1230698 1230698 ...

Page 43: ...rts list 1230500 1230502 1230501 1230503 1230504 1230506 1230507 1230509 1230510 1230511 1230512 1230513 1230514 1230515 1230516 1230518 1230520 1230521 1230522 1230523 Front 42 1230508 1230524 1230526 1230525 ...

Page 44: ...re parts list 1230527 1230528 1230529 1230530 1230531 1230532 1230533 1230540 1230541 1230542 1230543 1230544 1230545 1230546 1230548 1230549 1230550 1230552 1230551 1230553 1230554 1230556 1230557 1230558 ...

Page 45: ...arts list 1230559 1230560 1230561 1230562 1230563 1230564 1230639 1230640 1230641 1230652 1230611 44 REAR 1230653 1230616 1230615 1230617 1230654 1230647 1230565 1230567 1230566 1230568 1230569 1230570 1230571 ...

Page 46: ...arts list 5 1230572 1230573 1230574 1230575 1230576 1230578 1230579 1230580 1230581 1230582 1230583 1230584 M3 30 1230586 1230587 1230588 1230590 1230589 1230591 1230592 1230593 1230594 1230595 1230596 1230599 ...

Page 47: ... 2030005 60A Brushed ESC 1230613 1230657 1230682 6 Channel Radio for Crawler 1230683 6 Ch Receiver for Crawler 1230684 Chassis Mount 1230685 Roof Rack 1230686 Side Steps 1230687 Shock Absorber Set 1230688 Shock Absorber Shafts 1230689 Shock Absorber Springs 1230690 Blue 1230691 Orange 1230692 Green 1230693 Gray Body ...

Page 48: ...4 Button head Self tapping Screws 1230645 1230710 Bodyshell Button Magnet 1230711 Cap Head Screws M4 16 1230712 Flat head Self tapping Screws 1230713 Button head Self tapping Screws 1230714 Button head sSelf tapping Screws 1230694 Body PC clear 1230694 Body PC clear Body PC cl 2 5ear 1230694 Body PC clear ST2 5 8 ST2 4 ST2 8 ST2 5 6 Button head Self tapping Screws ST3 8 1230715 Button head Self ta...

Page 49: ...ear High Speed 32T Reduction gear 45T Transmission Gear Set 1230669 1230670 1230671 1230672 Alu Servo Mount for 2 Speed Gear Box 1230678 Alu Linkage Mount 4 Alu Shock Tower 4 Alu Gear Box Mount Alu Differential Lock Servo Mount 2 1230674 1230675 1230676 1230677 Alu Steering Servo Mount Alu Sway Bar Mount Alu Rear Hub Set 2 1230679 1230680 1230681 More add on and tuning parts you will find at Mehr ...

Page 50: ...Absima GmbH Gibitzenhofstr 127a RG 90443 Nürnberg Germany Web www absima com ...

Reviews: