background image

ABtUS

 SINGAPORE PTE LTD


www.abtussingapore.com

ABtUS

 SIGAPORE PTE LTD


www.abtussingapore.com

8 × 8 HDMI 

Matrix Switcher

Model: 

MAX-HDMI88P

rev.2017.06.12

Summary of Contents for MAX-HDMI88P

Page 1: ...ABtUS SINGAPORE PTE LTD www abtussingapore com ABtUS SIGAPORE PTE LTD www abtussingapore com 8 8 HDMI Matrix Switcher Model MAX HDMI88P rev 2017 06 12 ...

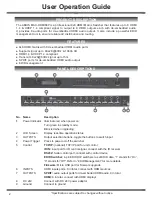
Page 2: ...9 No Name Description 1 Power Indicator Illuminate red when power on Turn green in standby mode Blink red when upgrading 2 LCD Screen Display real time operation status 3 OUTPUTS Output selection buttons toggle the buttons to switch input 4 Power Trigger Press to power on off the switcher 5 Control TCP IP optional TCP IP port for unit control IR IN input port for IR control signal connect with the...

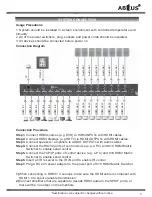
Page 3: ...1 Connect HDMI sources e g DVD to HDMI INPUTs with HDMI cables Step2 Connect HDMI displays e g HDTV to HDMI OUTPUTs with HDMI cables Step3 Connect speakers amplifiers to AUDIO OUTPUTs with audio cables Step4 Connect the RS232 ports of control device e g a PC and 8 8 HDMI Matrix Switcher to enable serial control Step5 Connect the TCP IP ports of control device e g a PC and 8 8 HDMI Matrix Switcher ...

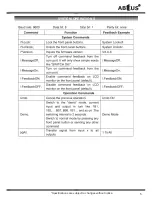
Page 4: ...gh the included IR remote Here is a brief introduction to the IR remote 1 Standby Enter exit stand by mode 2 INPUTS Buttons for input selection 3 OUTPUTS Buttons for output selection I O Switch Foramt INPUT OUTPUT RS232 Communication Commands 1 Case sensitve 2 in the commands are for easy recognition only and not necessary in real operations Other symbols including are parts of the commands 3 Feed...

Page 5: ... Specifications are subject to changes without notice 5 SYSTEM OPERATIONS ...

Page 6: ...6 Specifications are subject to changes without notice SYSTEM OPERATIONS ...

Page 7: ... Specifications are subject to changes without notice 7 SYSTEM OPERATIONS ...

Page 8: ...8 Specifications are subject to changes without notice SYSTEM OPERATIONS ...

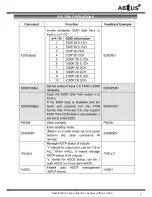
Page 9: ...other saved EDID data by adjusting the 4 pin EDID DIP switcher or sending corresponding RS232 command VIA RS232 commands Dial the switcher to 1111 to enable software EDID management Invokeing embedded EDID data Send command EDID X B y to enable to enable input to invoke embedded EDID data of 8 8 HDMI Matrix Switcher For example send EDID 4 B 3 the INPUT device 4 will gain embedded EDID data is tha...

Page 10: ...cess the custom EDID data are set successfully 6 Send the command EDID 1 B 12 the 1 input channel can invoke this new customized EDID data Via 4 pin EDID DIP switcher Beside EDID can be managed via RS232 commands 8 8 HDMI Matrix Switcher boasts a 4 pin EDID DIP switcher to manage EDID Dial the switchers to invoke demands EDID data Embedded EDID data 10 sets in total the chart below illustrate the ...

Page 11: ... single PC Connect a computer to the TCP IP port of the 8 8 HDMI Matrix Switcher and set its network segment to the same as the default IP of the 8 8 HDMI Matrix Switcher Controlled by PC s in LAN The 8 8 HDMI Matrix Switcher can be connected with a router to make up a LAN with the PC s this make it able to be controlled in a LAN When control just make sure the 8 8 HDMI Matrix Switcher network seg...

Page 12: ...s the router Step4 Set the PC s network segment to the original one Step5 Connect 8 8 HDMI Matrix Switcher and PC s to the router In the same LAN each PC is able to control the 8 8 HDMI Matrix Switcher asynchronously Control 8 8 HDMI Matrix Switcher via web based GUI In addition to control 8 8 HDMI Switcher via communication software 8 8 The Matrix Switcher can bed controlled via web based GUI It ...

Page 13: ... corresponding button Button 1 8 at the right bottom corner provides quick saving and recall for overall connection status For example Step1 Select button 1 at INPUT column Step2 Select button 5 at OUTPUT column If all OUTPUT ports in needed you only need to click All Step3 Choose a scene that you want to save Step4 Click Confirm to save the setting or Click Clear to clear set up Configuration Pro...

Page 14: ...elect to All inputs all input devices will copy the EDID from output device Step3 Click Confirm to save the setting or Click Clear to cancel operation 3 Select Audio Out to enter the following interface to tum on off the Audio Output 2 Status 1 At the top of the interface click Status to enter the following interface to modify the name and mode of this machine and then they will be display in LCD ...

Page 15: ...r the following interface to inquire and configure network setting including MAC address IP address subnet mask and Gateway 5 Password At the top of the interface click Password to enter the following interface to inquire and modify the admin or user password 3 Select Scene to enter the following interface to modify the name of scenes ...

Page 16: ...ace turn on the Front Panel to lock all buttons of machine they cannot be operated Display Ratio 4K 4096 2160 30 50 60Hz 3840 2160 24 25 30 50 60 Hz 21 9 2560 1080 60Hz 16 9 1920 1080 1080P 3D 1600 900 1366 768 1280 720 1024 576 60Hz 16 10 1920 1200 1680 1050 1440 900 1360 768 1280 800 60Hz 4 3 1600 1200 1400 1050 1280 1204 1024 768 800 600 640 480 60Hz ...

Page 17: ... Specifications are subject to changes without notice 17 TROUBLESHOOTING MAINTENANCE ...

Page 18: ...18 Specifications are subject to changes without notice TROUBLESHOOTING MAINTENANCE If your problem persists after following the above troubleshooting steps seek further help from authorized dealer or our technical support ...

Page 19: ...TS 1 IR IN 3 5mm jack 1 TCP IP female RJ45 1 RS232 3 pin pluggable terminal block EDID MANAGEMENT In built EDID data and manual EDID management AUDIO SIGNAL Dolby Digital DTS DTS HD MAX RESOLUTION 4K 2K 1080P 3D TRANSMISSION DISTANCE 4Kx2K 60Hz 15m POWER SUPPLY DC 24V 2 71A POWER CONSUMPTION 32W Full Load 2 2W Standby TEMPERATURE 0 50 C REFERENCE HUMIDITY 10 90 DIMENSION L X W X H 437 44 235 mm WE...

Page 20: ...ABtUS SINGAPORE PTE LTD www abtussingapore com ...

Reviews: