background image


19

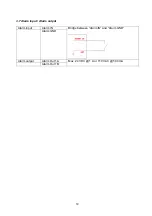
3.7 Alarm input / Alarm output 


Alarm input 

Alarm IN 

Bridge between “Alarm IN” and “Alarm GND” 


 Alarm 

GND 

Alarm output 

Alarm Out 1A 

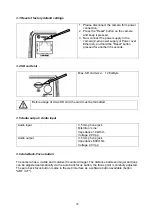
Max. 24 VDC @ 1 A or 110 VAC @ 500 mA 


Alarm Out 1B 


Summary of Contents for IPCA53000

Page 1: ...IPCA53000 D Bedienungsanleitung Hardware uk User manual hardware Version 04 2016...

Page 2: ...uflistung der Inhalte finden Sie im Inhaltsverzeichnis mit Angabe der entsprechenden Seitenzahlen auf Seite 6 gb These user manual contains important information for installation and operation This sh...

Page 3: ...3 IPCA53000 Bedienungsanleitung Hardware Version 04 2016 Originalbedienungsanleitung in deutscher Sprache F r k nftige Verwendung aufbewahren IPCA53000...

Page 4: ...Produktbezeichnungen sind Warenzeichen der jeweiligen Inhaber Alle Rechte vorbehalten Bei Fragen wenden Sie sich an Ihren Facherrichter oder Fachhandelspartner Haftungsausschluss Diese Bedienungsanle...

Page 5: ...t achtlos liegen Plastikfolien t ten Styroporteile usw k nnten f r Kinder zu einem gef hrlichen Spielzeug werden Die Video berwachungskamera darf aufgrund verschluckbarer Kleinteile aus Sicherheitsgr...

Page 6: ...UNG 8 3 1 ANSCHL SSE 8 3 2 GEH USE BERSICHT 8 3 3 WIEDERHERSTELLEN DER EINSTELLUNGEN RESET 9 3 4 SD KARTEN EINSCHUB 9 3 5 AUDIOEINGANG AUDIOAUSGANG 9 3 6 AUTO BACK FOKUS TASTE 9 3 7 ALARMEINGANG ALARM...

Page 7: ...or Sie das Produkt in Betrieb nehmen Die Bedienungsanleitung enth lt wichtige Informationen f r Montage und Bedienung 2 Symbolerkl rung Das Symbol mit dem Blitz im Dreieck wird verwendet wenn Gefahr f...

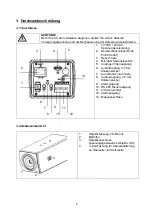
Page 8: ...t Taste 4 MicroSD Karteneinschub 5 Analoger Videoausgang 6 Audio Eingang 3 5 mm Klinkenstecker 7 Auto Back Fokus Taste 8 Audio Ausgang 3 5 mm Klinkenstecker 9 Alarmeingang 10 RS 485 Steuerausgang 11 n...

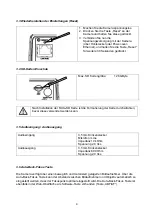
Page 9: ...matierung der Karte durchzuf hren bevor diese verwendet werden kann 3 5 Audioeingang Audioausgang Audioeingang 3 5 mm Klinkenstecker Mikrofon Line Impedanz 10 kOhm Spannung 2 0 Vss Audioausgang 3 5 mm...

Page 10: ...10 3 7 Alarmeingang Alarmausgang Alarmeingang Alarm IN Br cke zwischen Alarm IN und Alarm GND Alarm GND Alarmausgang Alarm Out 1A Max 24 VDC 1 A oder 110 VAC 500 mA Alarm Out 1B...

Page 11: ...r Sie wartungsfrei Es sind keinerlei f r Sie zu berpr fende oder zu wartende Bestandteile im Inneren des Produkts ffnen Sie es niemals 4 2 Reinigung Reinigen Sie das Produkt mit einem sauberen trocken...

Page 12: ...IPCA53000 User manual Hardware Version 04 2016 English translation of the original German user manual Retain for future reference IPCA53000...

Page 13: ...ll company names and product descriptions are trademarks of the corresponding owner All rights reserved If you have any questions please contact your specialist installation contractor or specialist d...

Page 14: ...sheeting polystyrene packaging etc can pose a danger to children if played with The video surveillance camera contains small parts which could be swallowed and must be kept out of the reach of childre...

Page 15: ...S 17 3 1 CONNECTIONS 17 3 2 HOUSING OVERVIEW 17 3 3 RESET OF FACTORY DEFAULT SETTINGS 18 3 4 SD CARD SLOT 18 3 5 AUDIO OUTPUT AUDIO INPUT 18 3 6 AUTO BACK FOCUS BUTTON 18 3 7 ALARM INPUT ALARM OUTPUT...

Page 16: ...putting the product into operation The user guide contains important information on installation and operation 2 Explanation of symbols The triangular high voltage symbol is used to warn of the risk o...

Page 17: ...3af 3 Reset button 4 MicroSD slot 5 Analogue video output 6 Audio input 3 5 mm phone jack 7 Auto Back Focus button 8 Audio output 3 5 mm phone jack 9 Alarm input 10 RS 485 control interface 11 not use...

Page 18: ...fore usage of micro SD card the card must be formatted 3 5 Audio output Audio input Audio input 3 5 mm phone jack Mikrofon Line Impedance 10 kOhm Voltage 2 0 Vpp Audio output 3 5 mm phone jack Impedan...

Page 19: ...19 3 7 Alarm input Alarm output Alarm input Alarm IN Bridge between Alarm IN and Alarm GND Alarm GND Alarm output Alarm Out 1A Max 24 VDC 1 A or 110 VAC 500 mA Alarm Out 1B...

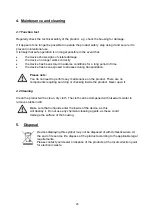
Page 20: ...n Please note You do not need to perform any maintenance on the product There are no components requiring servicing or checking inside the product Never open it 4 2 Cleaning Clean the product with a c...

Reviews: