background image


10

uk


Introduction 


Dear Customer, 
 
Thank you for purchasing this product. 
 
IPCB62515A 
This device complies with the requirements of the following EU directives: the EMC Directive 
(2014/30/EU) and the RoHS Directive (2011/65/EU). 
 
IPCB64515B 
This device complies with the requirements of the following EU directives: the EMC Directive 
(2014/30/EU) and the RoHS Directive (2011/65/EU). 
 
IPCB68515A 
This device complies with the requirements of the following EU directives: the EMC Directive 
(2014/30/EU) and the RoHS Directive (2011/65/EU). 
 
To ensure this condition is maintained and that safe operation is guaranteed, it is your obligation 
to observe this user manual. 
 
Please read the entire user manual carefully before putting the product into operation, and pay 
attention to all operating instructions and safety information. 
 

All company names and product descriptions are trademarks of the corresponding owner. 
All rights reserved. 


If you have any questions, please contact your specialist installation contractor or 
specialist dealer. 


Disclaimer 
 

This user manual has been produced with the greatest of care. Should you discover any 
missing information or inaccuracies, please let us know about them. 
ABUS Security-Center GmbH & Co. KG does not accept any liability for technical and 
typographical errors, and reserves the right to make changes to the product and user manuals 
at any time and without prior warning. 
ABUS Security-Center GmbH is not liable or responsible for any direct or indirect damage 
resulting from the installation, performance and use of this product. No guarantee is made for 
the contents of this document. 

Summary of Contents for IPCB64515B

Page 1: ...IPCB62515A IPCB64515B IPCB68515A D Installationsanleitung Version 06 2019 Originalbedienungsanleitung in deutscher Sprache F r k nftige Verwendung aufbewahren...

Page 2: ...rch beachten Sie alle Bedienungs und Sicherheitshinweise Alle enthaltenen Firmennamen und Produktbezeichnungen sind Warenzeichen der jeweiligen Inhaber Alle Rechte vorbehalten Bei Fragen wenden Sie si...

Page 3: ...t achtlos liegen Plastikfolien t ten Styroporteile usw k nnten f r Kinder zu einem gef hrlichen Spielzeug werden Die Video berwachungskamera darf aufgrund verschluckbarer Kleinteile aus Sicherheitsgr...

Page 4: ...RKL RUNG 5 3 HARDWAREBESCHREIBUNG 6 3 1 ANSCHL SSE 6 3 2 GEH USE BERSICHT 6 3 3 WIEDERHERSTELLEN DER EINSTELLUNGEN RESET 7 3 4 SD KARTEN EINSCHUB 7 3 5 VERWENDUNG DES STECKERSCHUTZES 7 4 WARTUNG UND R...

Page 5: ...rodukt in Betrieb nehmen Die Bedienungsanleitung enth lt wichtige Informationen f r Montage und Bedienung 2 Symbolerkl rung Das Symbol mit dem Blitz im Dreieck wird verwendet wenn Gefahr f r die Gesun...

Page 6: ...era bereinstimmen 1 Netzwerkanschluss RJ45 PoE 802 3at 2 Spannungsanschluss 12 VDC Polarit t ist zu beachten 3 An Ger teunterseite unter Abdeckung Analoger Videoausgang f r Servicezwecke BNC FBAS 1Vss...

Page 7: ...ten Einschub Zum Installieren der Micro SD Karte ist zuvor die Abdeckung an der Unterseite der Kamera zu entfernen Der Micro SD Karteneinschub befindet sich unter der Abdeckung Max SD Kartengr e 256 G...

Page 8: ...Sie wartungsfrei Es sind keinerlei f r Sie zu berpr fende oder zu wartende Bestandteile im Inneren des Produkts ffnen Sie es niemals 4 2 Reinigung Reinigen Sie das Produkt mit einem sauberen trockene...

Page 9: ...IPCB62515A IPCB64515B IPCB68515A uk Installation manual Version 06 2019 English translation of the original German user manual Retain for future reference...

Page 10: ...utting the product into operation and pay attention to all operating instructions and safety information All company names and product descriptions are trademarks of the corresponding owner All rights...

Page 11: ...sheeting polystyrene packaging etc can pose a danger to children if played with The video surveillance camera contains small parts which could be swallowed and must be kept out of the reach of childre...

Page 12: ...S 13 3 CONNECTIONS AND FUNCTIONS 14 3 1 CONNECTIONS 14 3 2 HOUSING OVERVIEW 14 3 3 RESET OF FACTORY DEFAULT SETTINGS 15 3 4 SD CARD SLOT 15 3 5 USAGE OF CONNECTOR COVER 15 4 MAINTENANCE AND CLEANING 1...

Page 13: ...he product into operation The user guide contains important information on installation and operation 2 Explanation of symbols The triangular high voltage symbol is used to warn of the risk of injury...

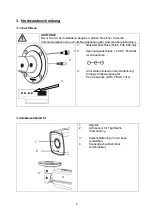
Page 14: ...he camera match 1 Network connector RJ45 PoE 802 3at 2 Power connector 12 V DC ensure that the polarity is correct 3 On bottom side of device under the cover Analogue video output for service need BNC...

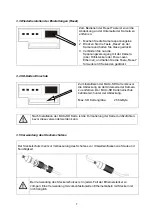
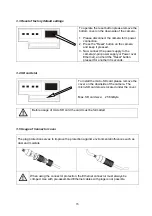
Page 15: ...pressed for another 30 seconds 3 4 SD card slot To install the micro SD card please remove the cover on the downside of the camera The micro SD card slow is located under the cover Max SD card size 2...

Page 16: ...n Please note You do not need to perform any maintenance on the product There are no components requiring servicing or checking inside the product Never open it 4 2 Cleaning Clean the product with a c...

Reviews: