background image

9

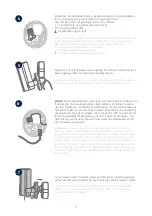
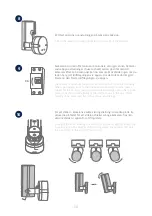
Ta nu kameran som är ansluten med en strömkabel ur parkeringsläget

och skruva fast den på fästets bas. Se till att inga kablar kommer i kläm.

Now take the camera connected by power cable out of the parking 
position and screw it back onto the base of the mount. Make sure 


that no cables are pinched.

7

5

Fästets bas har ett så kallat parkeringsläge för kameran. Ställ kameran i

parkeringsläge inför den följande kabeldragningen.


The base of the mount has a so-called parking position for the camera. 
Place the camera in the parking position for the following cabling.

4

Anslut den strömförande ledaren, neutralledaren och skyddsjordsleda-
ren som tidigare gick genom foten till kopplingsplinten.

Tips: Det går att ta ut kopplingsplinten ur sin hållare.
L  = strömförande tråd (oftast svart eller brun)

N = nolledare (oftast blå)

   = skyddsledare (grön-gul)
 

Connect the live conductor, neutral conductor and the PE conductor that 

were previously passed through the base to the screw terminal block.

Tip:

 The screw terminal block can be removed from its holder.

L = Live conductor (usually black or brown)
N = Neutral conductor (usually blue)

   = Protective earth conductor (green-yellow)

6

Viktigt!

 Anslut skyddsledaren (grön-gul), som från fabrik är ansluten till 

fotens skydd, till kopplingsplinten i kamerafoten. Vid behov: Använd 

den lilla styrskenan i kamerafoten till kärnorna. Anslut sedan kamerans 

nätkabel korrekt via den (svarta) kontakten till motsvarande anslutning 

i kamerafoten. Tänk på: Kontakten har snäppt fast i rätt position för att 

förhindra oavsiktlig frånkoppling under den vidare monteringen. Vid 
demontering måste du ta hänsyn till motsvarande klämmekanism för 
att inte skada ledningarna.

Important! 

Connect the (green-yellow) protective earth conductor, 

which is already connected to the cover of the foot ex factory, to the 

terminal block in the camera foot. If necessary: Use the small wire rail 

in the camera foot for the wire.  Then connect the power cable of the 
camera via the (black) plug correctly to the connector in the camera 

foot.Note: The plug is locked in the correct position to prevent acciden-

tal disconnection during further installation. When disassembling, pay 

attention to the appropriate clamping mechanism to avoid damaging 

the cabling.

Summary of Contents for PPIC46520

Page 1: ...1 W L A N L J U S U T O M H U S K A M E R A W I F I L I G H T O U T D O O R C A M E R A Q U I C K G U I D E PPIC46520 V1 0...

Page 2: ...n 31 tecken Wi Fi network with password and encryption The Wi Fi password must not exceed 31 characters Den mobila enhetens platstj nst m ste vara aktiverad The location service of the mobile device...

Page 3: ...ion 1 microSD kort f rinstallerat microSD card preinstalled Insexnyckel Allen key Monteringsmaterial Mounting material Kamera fot Camera Base Borrmall Drill template Hj lpmedel f r att ta ut microSD k...

Page 4: ...4 K A M E R A C A M E R A Framsida Front Mikrofon Microphone L sskruv kamerafot Camera base screw Objektiv Lens Lysdiod med vitt ljus White light LED Ljussensor Light sensor...

Page 5: ...ear Antennanslutning RP SMA Antenna connection RP SMA ppning till LAN anslutning Openings for LAN connection ppningar till f stskruvar Openings for mounting screws ppning till 230 V kabel Opening for...

Page 6: ...ble microSDcard max 128 GB min class 10 The provided removal tool can be used to remove the card The camera must be disconnected from the power supply to remove and insert the memory card When inserte...

Page 7: ...R E S E T Kameran kan tas i drift via appen innan den installeras F rdel P s s tt kan du se den f rsta livebilden och finjustera kamerans visningsriktning direkt under den efterf ljande installatione...

Page 8: ...s must be disconnected from the power supply during installation Therefore switch off the power first Make sure that the circuit breaker remains switched off during the entire installation process If...

Page 9: ...emoved from its holder L Live conductor usually black or brown N Neutral conductor usually blue Protective earth conductor green yellow 6 Viktigt Anslut skyddsledaren gr n gul som fr n fabrik r anslut...

Page 10: ...camera You can access the live image again after a prox 60 seconds if you have already carried out set up via the app If not already done Now start the initial set up via the app 9 8 S tt fast antenn...

Page 11: ...t p smartphonen surfplattan Bluetooth must be activated on the smartphone tablet InstalleraApp2CamPlussamtidrifttagning InstallationofApp2CamPlusandstart up Starta App2Cam Plus och v lj L gg till ny e...

Page 12: ...se to each other as possible at a maximum distance of 3 metres 3a 4 Alternativ 1 Scanna QR koden i kamerafoten Option 1 Scan the QR code located in the camera base Alternativ 2 Tryck p knappen L gg ti...

Page 13: ...mret DID i f rpackningen Alternativt i kamerafoten under QR koden Tryck sedan p N sta Select your camera by its identification number You will find the identification number DID enclosed in the packag...

Page 14: ...ommer att anv nda kameran permanent Tryck sedan p N sta Select your home network Wi Fi network in which you want to operate the camera permanently Then tap on Next Ange l senordet till ditt n tverk Tr...

Page 15: ...s operate the camera with the latest firmware Idrifttagningen via app har nu slutf rts Appen visar nu kame ra versikten med en f rsta f rhandsbild fr n s kerhetskameran Tryck p play symbolen i f rhand...

Page 16: ...ind the current firmware version of your camera and available updates under Camera overview Live view Camera settings Devices Search firmware update Alla sk rmbilder som visas r fr n iOS appen Android...

Page 17: ...a inaktivera ljud f r inspelningar med utan ljud se kamerainst llningar Activate deactivate audio for recordings with without sound see camera settings Aktivera avaktivera ljudsignal Activate deactiva...

Page 18: ...ijn beschikbaar op de website van ABUS Scan gewoon de QR code of voer het webadres in om de productpagina met de sectie Downloads te openen Den komplette brugsanvisning og yderligere oplysninger finde...

Reviews: