background image


16

1.  Intended use 

 
This camera is used for indoor and outdoor video surveillance (depending on the model) in 
conjunction with a recording device or appropriate display unit (e.g. PC). 


Use of this product for any other purpose than that described may lead to damage 
to the product and other hazards. All other uses are not as intended and will result 
in the invalidation of the product guarantee and warranty. No liability can be 
accepted as a result. This also applies to any alterations or modifications made to 

the product. 
Read the user guide carefully and in full  


before putting the product into operation. The user guide contains  


important information on installation and operation. 


2.  Explanation of symbols 


The triangular high voltage symbol is used to warn of the risk of  
injury or health hazards (e.g. caused by electric shock). 


The triangular warning symbol indicates important notes in this user manual which 
must be observed. 
 

This symbol indicates special tips and notes on the operation of the device. 


This user manual describes the software functions in the 
camera browser interface. For information about how to 
install the hardware for the respective camera, please read 
the quick start manual or the hardware installation manual, if 
you have it. 
 
You can download a PDF version of the user manuals in your 
language at 

www.abus.com

 via the product search. 


Summary of Contents for TVIP44511

Page 1: ...TVIP44511 TVIP48511 D Installationsanleitung uk Installation manual Version 01 2023...

Page 2: ...EU Richtlinien EMV Richtlinie 2014 30 EU sowie RoHS Richtlinie 2011 65 EU Um diesen Zustand zu erhalten und einen gefahrenlosen Betrieb sicherzustellen m ssen Sie als Anwender diese Bedienungsanleitun...

Page 3: ...allen so teilen Sie uns dies bitte mit Die ABUS Security Center GmbH Co KG bernimmt keinerlei Haftung f r technische und typographische Fehler und beh lt sich das Recht vor jederzeit ohne vorherige An...

Page 4: ...t achtlos liegen Plastikfolien t ten Styroporteile usw k nnten f r Kinder zu einem gef hrlichen Spielzeug werden Die Video berwachungskamera darf aufgrund verschluckbarer Kleinteile aus Sicherheitsgr...

Page 5: ...ONEN 7 3 1 SPANNUNGSVERSORGUNG 7 3 2 INSTALLATION 7 3 3 WIEDERHERSTELLEN DER EINSTELLUNGEN RESET 8 3 4 SD KARTEN EINSCHUB 9 3 5 VERWENDUNG DES STECKERSCHUTZES 9 3 6 HINWEIS ZUR VERWENDUNG DER INTEGRIE...

Page 6: ...e das Produkt in Betrieb nehmen Die Bedienungsanleitung enth lt wichtige Informationen f r Montage und Bedienung 2 Symbolerkl rung Das Symbol mit dem Blitz im Dreieck wird verwendet wenn Gefahr f r di...

Page 7: ...er Fixierschrauben Verwenden Sie dazu das mitgelieferte Werkzeug Anschlie end l sst sich die Bodenplatte mittels der 3 Befestigungsl cher D bel und Schrauben an der Decke oder der Wand befestigen Acht...

Page 8: ...im Innenbreich der Kamera Dazu muss zuerst die Kuppel entfernt werden 1 Machen Sie die Kamera spannungslos 2 Dr cken Sie die Taste Reset an der Kamera und halten Sie diese gedr ckt 3 Verbinden Sie nu...

Page 9: ...llation der Micro SD Karte ist die Formatierung der Karte durchzuf hren bevor diese verwendet werden kann 3 5 Verwendung des Steckerschutzes Der Steckerschutz dient zur Verbesserung des Schutzes vor U...

Page 10: ...zu gering sein Dies hat eine schlechte Verwertbarkeit des Videobildes zur Folge Weiterhin ist bei der Kamerainstallation zu achten dass um das Kamerablickfeld sich keine Objekte in unmittelbarer N he...

Page 11: ...r Sie wartungsfrei Es sind keinerlei f r Sie zu berpr fende oder zu wartende Bestandteile im Inneren des Produkts ffnen Sie es niemals 4 2 Reinigung Reinigen Sie das Produkt mit einem sauberen trocken...

Page 12: ...TVIP44511 TVIP48511 Installation manual Version 01 2023 English translation of the original German user manual Retain for future reference...

Page 13: ...nding owner All rights reserved If you have any questions please contact your specialist installation contractor or specialist dealer Disclaimer This user manual has been produced with the greatest of...

Page 14: ...sheeting polystyrene packaging etc can pose a danger to children if played with The video surveillance camera contains small parts which could be swallowed and must be kept out of the reach of childre...

Page 15: ...S AND FUNCTIONS 17 3 1 POWER SUPPLY 17 3 2 INSTALLATION 17 3 3 RESET TO FACTORY DEFAULT 18 3 4 SD CARD SLOT 19 3 5 USAGE OF CONNECTOR COVER 19 3 6 NOTES FOR USAGES OF INTEGRATED IR LEDS 20 4 MAINTENAN...

Page 16: ...he product into operation The user guide contains important information on installation and operation 2 Explanation of symbols The triangular high voltage symbol is used to warn of the risk of injury...

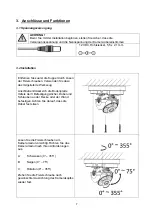
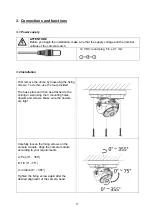
Page 17: ...dome by loosening the fixing screws To do this use the tool provided The base plate can then be attached to the ceiling or wall using the 3 mounting holes dowels and screws Make sure the dowels are t...

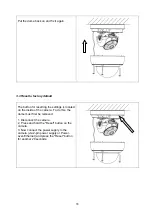
Page 18: ...ttings is located on the inside of the camera To do this the dome must first be removed 1 Disconnect the camera 2 Press and hold the Reset button on the camera 3 Now connect the power supply to the ca...

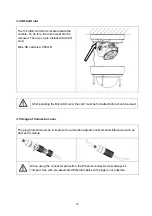
Page 19: ...B After installing the Micro SD card the card must be formatted before it can be used 3 5 Usage of Connector cover The plug protection serves to improve the protection against environmental influences...

Page 20: ...e may be too low at night This results in poor usability of the video image Furthermore when installing the camera make sure that there are no objects in the immediate vicinity e g gutter or wall arou...

Page 21: ...n Please note You do not need to perform any maintenance on the product There are no components requiring servicing or checking inside the product Never open it 4 2 Cleaning Clean the product with a c...

Reviews: