background image

AC Mobility 
User Manual for the TRAXX2 Rear Wheel Drive electric wheelchair 


Page 

8

 of 

25


March 2012


General description of the TRAXX 2 Rear Wheel Drive 

The TRAXX 2 Rear Wheel Drive is a highly versatile electric wheelchair that incorporates the following key 
components :   


Adjustable seat 
width 


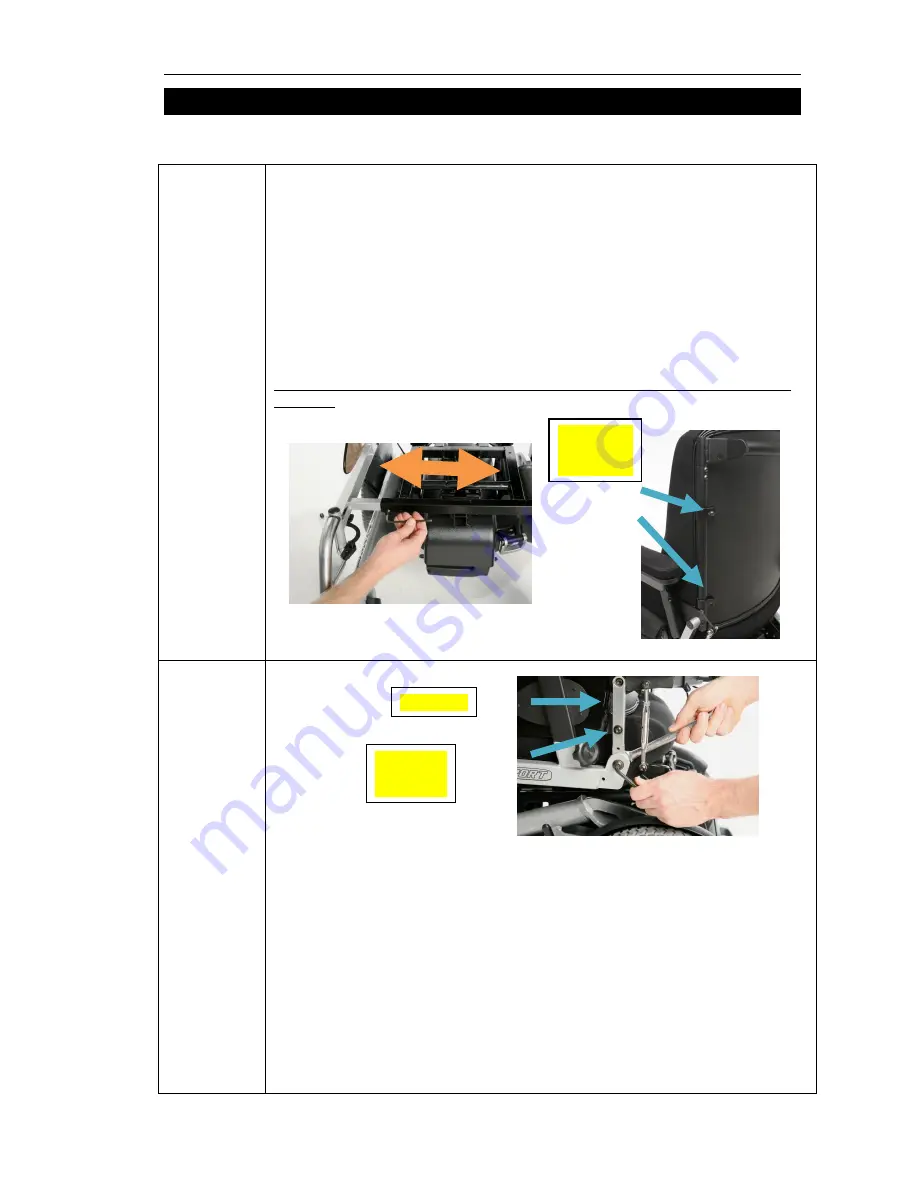
The seat width is infinitely adjustable from 15” (38cms) through to 20” (51cms).  
 
This adjustment is built into the frame.  A


4

MM 

A

LLEN KEY IS REQUIRED TO MAKE THE ADJUSTMENT

.


To adjust the seat width,  


remove the seat cushion, seat board or seat pan  


release the two grub screws at the front of the seat frame (location shown), and 
two at the rear of the seat frame 


remove the backrest attachment clamps and the backrest 


remove the grub screws in the backrest stabiliser bar, or any obstacle that will 
prevent the backrest from being widened 


Adjust the seat width to the desired setting


Please note – when you change seat width, you may need to change the seat and backrest 
upholstery  


Adjustable seat 
depth 


The seat depth is infinitely adjustable from 15” (38cms) through to 20” (51cms).  
 
This adjustment is built into the frame. A


17

MM SPANNER AND A 

5

MM 

A

LLEN KEY ARE REQUIRED TO 

MAKE THE ADJUSTMENT

To adjust the seat depth 


Loosen the seat depth adjustment bolt on each side of the wheelchair 


Push or pull the seat cams to change the seat depth to the desired position. Check 
that the seat depth is the same on each side and correct if necessary 


Retighten the seat depth adjustment bolts 


You may need to adjust the backrest angle for the client (please see section below) 

You do not need to replace the upholstery nor any other parts when you change the seat 
depth. 


Backrest 

attachment 

clamps 

Seat cam 

Seat depth 

adjustment


bolt 

Summary of Contents for TRAXX2

Page 1: ...AC Mobility The TRAXX2 Rear Wheel Drive Electric Wheelchair User Manual Complies with AS3695 ...

Page 2: ...Components of the TRAXX 2 Rear Wheel Drive 6 Specifications 7 General description of the TRAXX 2 Rear Wheel Drive 8 General Warnings 12 Chair checklist and maintenance 17 Operating Instructions for your TRAXX 2 Rear Wheel Drive 18 Batteries 18 Fault finding 21 Repairs and service 21 How to prepare the TRAXX 2 for storage shipment or travel 22 Packing and shipping instructions 22 Limited product wa...

Page 3: ...nsure that you and your carers assistants are thoroughly informed about your chair Please read the Safety and Warning notices carefully and consult your dealer if you have any queries The safety warnings used in this manual are intended to be used only as guidelines and you may find it necessary to develop your own methods to solve problems you may encounter in your daily driving Seek assistance f...

Page 4: ...encounter when using your chair Any seating needs Other options you may require for your comfort and safety Adjustment of your chair and its performance characteristics It is important that the chair and its driving characteristics are adjusted to meet your particular needs and abilities Please consult your therapist or medical adviser in conjunction with your wheelchair supplier before adjustment...

Page 5: ...cles or hazards such as objects on the ground ramps or slopes which you cross that may cause the chair to change its lateral or longitudinal stability Do not go up or down inclines that have water ice oil or other slippery substances on the surface loose slippery or rough surfaces Such obstacles or hazards may make the chair unstable and tip over which may cause injury to yourself or others Plan a...

Page 6: ...n chair and off chair accessories 3 Legrest hanger and footplate folded 4 Legrest hanger release catch allows the hanger to swing back and to be removed 5 Manual park brakes to be used when the wheelchair is in freewheeling mode and is to be parked or stored 6 Front and drive wheels 1 Seat frame showing seat cushion backrest armrests and side panels 2 Controller 6 Drive wheel casters 3 Legrest han...

Page 7: ...s long 350 cms long Legrests Heavy duty height adjustable swing away removable Length adjustment 10 cms Footplates Steel adjustable in Dorsiflexion plantarflexion angle Forwards backwards position Sideways position Inversion eversion angle Floor to seat height without tilt 46 cms as measured to top of seat pan when in 0 degree setting Floor to seat height with power tilt 46 cms as measured to top ...

Page 8: ...er bar or any obstacle that will prevent the backrest from being widened Adjust the seat width to the desired setting Please note when you change seat width you may need to change the seat and backrest upholstery Adjustable seat depth The seat depth is infinitely adjustable from 15 38cms through to 20 51cms This adjustment is built into the frame A 17MM SPANNER AND A 5MM ALLEN KEY ARE REQUIRED TO ...

Page 9: ...can be provided for other commercially available seat cushions Backrest support surfaces The backrest upholstery is constructed from a high density high hardness base foam EN50 250 with a soft viscoelastic overlay 52 60 to provide comfort and immersion Low profile backrest upholstery is are available for those clients who do not need a lot of lateral trunk support Deep contour backrest upholstery ...

Page 10: ... AN ADJUSTABLE SPANNER IS REQUIRED TO MAKE THIS ADJUSTMENT To adjust the pad position Loosen the two attachment bolts Slide the armrest pad to the desired position Retighten the attachment bolts Note there are two mounting points at the front and the rear of the armrest giving a 10cms adjustment range Please note that customized armrests or armrest pads can be provided if this range is not suitabl...

Page 11: ... Push the legrest release lever to release the legrest catch Swing the legrest away Lift the legrest off the mounting points if required Adjustable footplates The footplates can be adjusted in the following ways Height approx 10 cms The nominal range is from 33 cms to 49 cms from the top of the seat side rail This can be customized if required A 14 MM SPANNER IS REQUIRED TO MAKE THIS ADJUSTMENT LO...

Page 12: ...MOVE THE FOOTPLATE FASTENER BOLTS ON EACH PLATE ADJUST THE PLATE POSITION ON THE FOOTPLATE SUPPORT TUBE BELOW AS DESIRED AND RE ATTACH THE FOOTPLATE FASTENER BOLTS Lateral plate angle to allow for foot inversion and eversion A 3 MM AND A 5 MM ALLEN KEY IS REQUIRED TO MAKE THIS ADJUSTMENT Note the footplates can also be flipped up for easy access to the front of the wheelchair Abiltity to free whee...

Page 13: ... are designed to help you avoid an accident which may lead to injury to you or to others Warning 1 Electromagnetic interference What is electromagnetic interference EMI Electromagnetic interference is the interference that may occur as a result of electromagnetic energy emitted from radio wave sources Such radio waves can adversely affect the operation of electronic devices such as the controller ...

Page 14: ...ught close to the chair You should switch off the power to the chair should you be aware that any source of possible electromagnetic interference has been brought close to the chair being aware that adding accessories or components or modifying the wheelchair or its controller system may make the wheelchair more susceptible to EMI If the chair shows any signs of electromagnetic interference you sh...

Page 15: ...other people who may assist you are also fully knowledgeable in the operation of the chair and the daily requirements for maintenance such as charging the batteries and checking the tyre pressures Please see the wheelchair maintenance checklist below This training is important to help avoid any possible injury to yourself or to others Warning 6 Weight limits for the chair Please note that the weig...

Page 16: ...ning the wheelchair when on a slope The chair is not driven in an unsafe or reckless manner You do not stand on the frame of the wheelchair You do not use the footplates as a platform You never operate the chair without the anti tip bars Warning 10 Footplate clearance height The lowest point of the footplates should clear the ground by 65mm 2 to ensure adequate clearance Warning 11 Reaching leanin...

Page 17: ...cid which can burn your skin eyes or clothing Always wear protective clothing and gloves when checking or changing batteries in your chair When changing batteries seek help from your dealer or other qualified service personnel Batteries are heavy and must be handled carefully to avoid personal injury Batteries must be installed correctly ensuring that the cables are connected to the correct batter...

Page 18: ...boot around the joystick Drive wheels and clutch release system Check that the wheel hub clutch release system or motor brake release system operates easily and smoothly Fasteners Check for any loose fasteners Legrests and footrests Check that the legrests lock securely Check that the footrest plates operate correctly Seat depth adjustment cam Check the seat depth adjustment cam is tightly fastene...

Page 19: ...chair 3 Hub release system for freewheeling Check that the wheel hubs are fully engaged Should the wheel hubs be disengaged rotate the hub until it is fully locked into the motor drive shaft Make sure the power to the chair is turned OFF before attempting to engage disengage the wheel hubs DO NOT use the motors to engage the wheel hubs as this may damage the wheel hubs and put you or others at ris...

Page 20: ...e type batteries with a minimum rating of 28 ampere hour Batteries of 38 amp hour or greater are preferred Installing batteries in the battery boxes 1 remove the Battery Box Release Bolts in the support tube see illustration above 2 lower the battery box 3 release the two Battery Box Cover Knobs and remove the battery box lid 4 insert batteries according to the battery connection guide under the l...

Page 21: ...p to extend the life of the batteries DO NOT fully discharge the batteries as this will reduce battery life Make sure the batteries are fully recharged before re using Use the correct battery charger as supplied by your wheelchair dealer How to get the maximum driving distance from your batteries You can help to get the maximum driving distance from your batteries by fully charging the batteries b...

Page 22: ...or If you notice any other irregular aspect of your chair or if the chair fails to respond after making some of the above inspections phone your nearest Authorized Service Agent or dealer for assistance They will advise if the wheelchair should be returned for repairs If the chair is to be returned they will also advise on the availability of replacement units and the required method of packing an...

Page 23: ...id should be secured to the pallet Warranty Against Defects The warranty set out below applies as a minimum only unless the products are subject to any Statutory Warranty against Defects under the Australian Consumer Law which exceeds the minimum warranty If any goods are supplied by AC Mobility in circumstances where Statutory Warranties apply to that supply AC Mobility shall provide a warranty w...

Page 24: ...nd c if AC Mobility requests the return of the applicable Product or part the purchaser will be responsible for the collection and freight costs of returning that Product or part the Retailer or AC Mobility 5 This warranty is a minimum warranty and is in addition to any non excludable legal rights or remedies conferred on the consumer under any applicable Act and any similar laws To the extent per...

Page 25: ...e You are also entitled to have the goods repaired or replaced if the goods fail to be of acceptable quality and the failure does not amount to a major failure Notice to the consumer if any There are no other express warranties Contact information AC Mobility Pty Ltd Telephone 08 9209 1777 5 Boulder Rd Fax 08 9209 1999 Malaga WA 6090 Email sales acmobility com au ...

Reviews: