ƺ
!
Ì
Note:
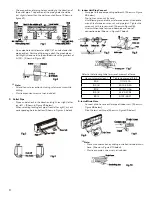
• The through-wall height of drain hose should not be higher
than the outlet pipe hole of the indoor unit (Shown in Figure
#25 above).
• Angle drain hose slightly downward. Drain hose CANNOT be
curved or bent (Shown in Figure #26 above).
• In order to drain smoothly, the water outlet CANNOT be placed
in water (Shown in Figure #27 below).
Ƴ
.7 VACUUM PUMPING AND LEAK
DETECTION
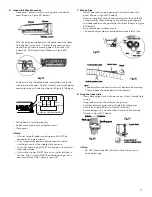
1. Use Vacuum Pump
•
Remove valve caps from liquid valve and gas valve and form
the nut of refrigerant charging vent.
•
Connect charging hose of piezometer to the refrigerant
charging vent of the gas valve. Then connect the other
charging hose to the vacuum pump.
•
Open piezometer completely and operate unit for 10-15
minutes in order to check pressure level of piezometer.
Should remain at -0.1MPa.
•
Close vacuum pump and keep closed for 1-2 minutes to
verify pressure of piezometer remains at -0.1MPa. If the
pressure decreases, there MAY be leakage.
•
Remove piezometer, completely open both the valve core
of the liquid valve and gas valve with an inner hexagon
spanner.
•
Tighten screw caps of valves and refrigerant charging vent
(Shown in Figure #28 below).
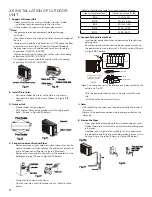
2. Leakage Detection
•
Check for leaks using leak detector.
•
Use soapy water if leak detector is unavailable. Apply soapy
water to the area in question. Leave soap & water solution
on for 3 minutes. Watch for air bubbles coming from
solution to detect leak.
Ƴ
.8 CHECK AFTER INSTALLATION
AND TEST OPERATION
1. Check after Installation
Check according to the following requirement after finishing
installation.
No.
Items to be checked
Possible malfunction
1
Has the unit been
installed firmly?
Unit may shake or emit
rattling noise.
2
Was refrigerant leakage
test performed?
This may cause insufficient
cooling heating) capacity.
3
Is heat insulation of
pipeline sufficient?
May cause condensation
and water leakage.
4
Does water drain well?
May cause leakage.
5
Does voltage of power
supply match voltage
listed on nameplate?
Malfunction and damage to
the unit may result.
6
Was electric wiring
and pipeline installed
correctly?
Malfunction and damage to
the unit may result.
7
Was the unit properly
grounded?
May experience electric
leakage.
8
Does the power cord
meet specification?
Malfunction and damage to
the unit may result.
9
Are there obstructions in
the air inlet/outlet?
This may cause insufficient
cooling heating) capacity.
10
Was unit free of dust and
packing material prior to
installation?
Malfunction and damage to
the unit may result.
11
Are both the gas valve
and liquid valve open
completely?
This may cause insufficient
cooling heating) capacity.
2. Test Operation
•
Prep test operation
o Client approves air conditioner installation.
o Specify the important notes of the air conditioner to the
client.
•
Method of test
o Turn on power. Press ON/OFF button on the remote
controller to start operation.
o Press MODE button to select AUTO, COOL, DRY, FAN
and HEAT to check if the operation(s) is functioning.
o If the ambient temperature is lower than 60.8ºF – the air
conditioner cannot begin the cooling cycle.


