background image

Chapter 2 — 

Getting Started

15

2.

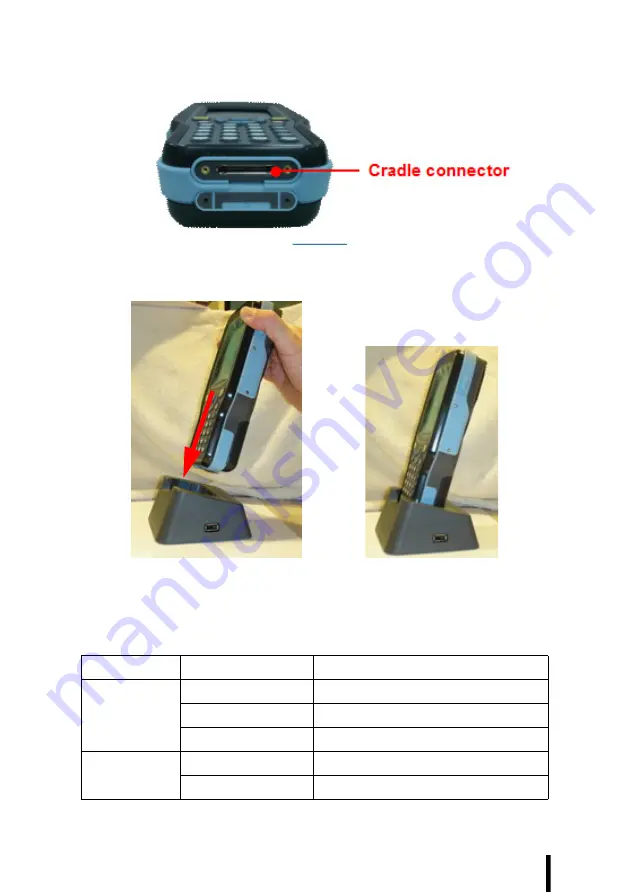
Flip open the docking connector cover on the bottom of the 
HT1100.

3.

Slide the device into the docking station until it clicks into 
place. 

4.

The connection is secure when the bottom edge of the device 
is aligned with the docking station, and the LED indicator on 
the device lights up green.

LED Status

LED

Meaning

HT1100

Blinking Red

Charging

Solid Green

Charging complete

Flashing Green

Battery low (< 13% charge)

Docking 
Station

Solid Green

HT1100 is inserted.

Off

HT1100 is not inserted

Summary of Contents for Handy Terminal HT1100

Page 1: ...Handy Terminal HT1100 User Manual...

Page 2: ...al means such as photocopying recording or information storage and retrieval systems The material in this manual is subject to change without notice Copyright 2007 ACA Digital Ltd All rights reserved...

Page 3: ...ent has been tested and found to comply with the limits for a Class B digital device pursuant to Part 15 of the FCC Rules These limits are designed to provide reasonable protection against harmful int...

Page 4: ...ive implies conformity to the following European Norms in brackets are the equivalent international standards EN 60950 1 IEC60950 1 Product Safety EN 300 328 Technical requirement for radio equipment...

Page 5: ...arrying case Use only the AC adapter power cord and batteries that are approved for use with this HT1100 Use of another type of bat tery or AC adapter may cause risk of fire or explosion Before you co...

Page 6: ...ient time for the moisture to evaporate before using the HT1100 Allow the HT1100 to acclimatize to the room temperature before turning on the power When you disconnect a cable pull on its connector or...

Page 7: ...ithium Ion battery pack The process is most efficient at normal room temperature or slightly cooler It is essential that you charge batteries within the stated range of 0 C to 50 C Charging bat teries...

Page 8: ...ttery charge notice vi Storage and safety notice vi Chapter 1 Introducing the HT1100 Features 2 Package Contents 3 Optional Accessories 3 A Tour of the HT1100 4 Front View 4 Right and Left View 6 Top...

Page 9: ...a Storage Card 34 Connecting Devices to the HT1100 35 Opening the Port Covers 35 Connecting USB 35 Connecting a USB Type A 35 Connecting a USB Type B 36 Connecting a Serial Cable 36 Connecting Headpho...

Page 10: ...nection 51 Synchronizing Information 52 Synchronization Options 52 Using ActiveSync to Exchange Files 53 Chapter 5 Scanner Setup Symbologies 54 Interface 54 Basic Setup 55 Chapter 6 Advance Settings C...

Page 11: ...Table of Contents x...

Page 12: ...240 x 320 resolution Barcode scanner Built in Bar Code Scan Engine Communication USB Host Client 802 11b g Bluetooth version 1 2 GPS optional GPRS optional RFID optional Audio Built in microphone Buil...

Page 13: ...ent Optional Accessories The following optional accessories can be used to add to the function ality of the HT1100 Sleeve with hand strap shoulder strap Vehicle cradle If anything is missing or appear...

Page 14: ...r of the HT1100 The following sections describe the main components and features of the HT1100 Front View LCD with touchscreen Power button Navigation keys Function and numeric key Power LED Internal...

Page 15: ...on press this button for 1 second to enter power saving mode Press the button again to turn the HT1100 off Function and numeric key Keypad interface for controlling the HT1100 See Keypads and Functio...

Page 16: ...Chapter 1 Introducing the HT1100 6 Right and Left View...

Page 17: ...port RS232 port Connect a serial connector to this port for serial communications Left barcode scan button Press to activate the barcode scanner Microphone jack Enables you to record voice audio with...

Page 18: ...ses infrared technology to transmit and receive data from other IR enabled devices Scans barcodes when pressing the left and right barcode buttons Cradle connector Connects the HT1100 to cradle enabli...

Page 19: ...ionality See Inserting a PCMCIA Card on page 30 Stylus Enables you to interact with the operating system Remove the stylus from the holder and hold and use it the same way you would a pen or pencil Sp...

Page 20: ...dle Memory card slot internal Accommodates Secure Digital memory cards See Inserting an SD Memory Card on page 33 Battery pack compartment Houses the removable and rechargeable battery pack See Instal...

Page 21: ...evices DC in jack Connect the AC adapter to this jack to supply power to the cradle and charge the HT1100 battery USB mini type B port client Connect a USB mini type B connector to this port RS232 por...

Page 22: ...ry pack is handled improperly DO NOT disassemble crush puncture short external contacts or dispose the battery pack in fire or water DO NOT attempt to open or service the battery pack Dispose of used...

Page 23: ...y compartment cover to the chassis 2 Align the battery pack making sure the battery contacts are aligned with the contacts in the compartment and place the battery in the compartment as shown in the f...

Page 24: ...e without fully charging the backup battery may result in loss of data stored in RAM memory Allowing the battery to go below 3 charge may result in loss of data NOTES Data you enter may not be properl...

Page 25: ...s into place 4 The connection is secure when the bottom edge of the device is aligned with the docking station and the LED indicator on the device lights up green LED Status LED Meaning HT1100 Blinkin...

Page 26: ...USB cable to connect the HT1100 to a PC to use with Active Sync Refer to See Synchronizing with Your Computer on page 48 1 Connect the USB mini type B connector to the mini port on the cradle A 2 Plu...

Page 27: ...c stylus usage and set up the system time zone date and time Powering On 1 Turn on your device by pressing the power button on the front panel NOTE The HT1100 screen ships with a protective plastic fi...

Page 28: ...the center cross hair firmly and accurately with the stylus The cross hair moves to the next location Carefully press and briefly hold stylus on the center of the target Repeat as the target moves aro...

Page 29: ...key to save the settings or press Esc to revert to the previous settings NOTE To recalibrate the screen at any time tap Start Settings Control Panel Then double tap Stylus Tap the Calibra tion tab and...

Page 30: ...to set the time and date 1 Tap Start Settings Control Panel 2 Double tap Date Time 3 Tap the arrows next to the month to select the correct month 4 Select a field in the time box and tap the arrows ne...

Page 31: ...the box next to Automatically adjust to have the OS automatically adjust for daylight saving time 7 Click Apply to save the settings Adjusting the Screen Brightness Follow these instructions to adjust...

Page 32: ...he Dark arrow to make the screen darker or click the Bright arrow to make the screen brighter 5 Click the close button to exit the utility Click to make the backlight darker Click to make the backligh...

Page 33: ...t with the HT1100 operating system and also operate secondary functions using the function keys and Fn key The following illustration shows the keypad keys When the blue function Fn key is pressed an...

Page 34: ...and down in menus or dialog boxes Back space deletes a previous character Turns the HT1100 on and off Press the Enter key to confirm a command or action Number 1 Alphanumeric 2 a b c Alphanumeric 3 d...

Page 35: ...case When CAPs is on an icon appears in the system tray Press to insert a space in text When in numeric entry mode press this key to enter an asterisk When in alphabetic mode press this key to enter a...

Reviews: