background image

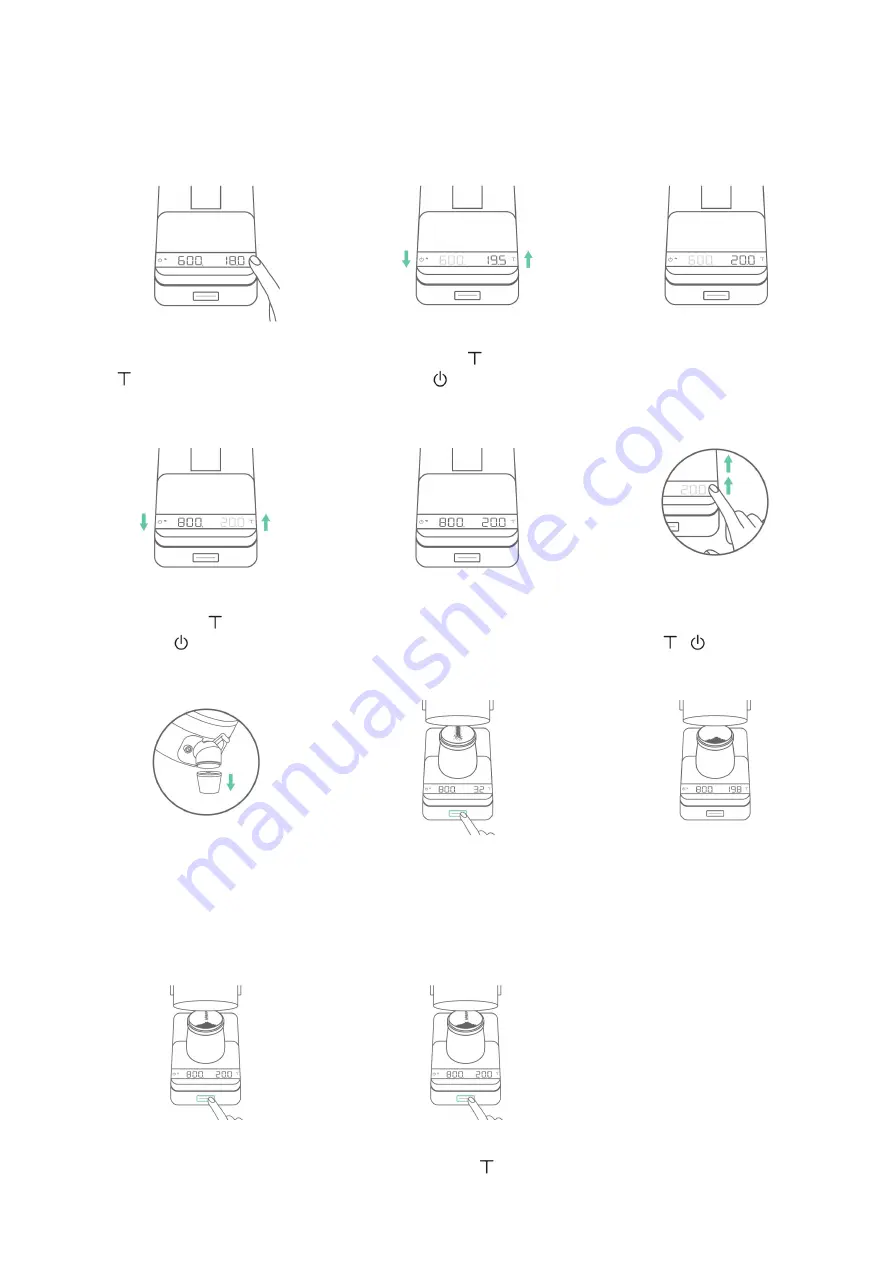
Make sure to 

remove

 the 

spout extender from the 

Orbit spout and 

place

 the 

dosing cup on the Lunar.

To begin the grinding 

session, 

click

 the Orbit 

button. The Orbit will start 

grinding until the target 

weight is reached.

At the end of each 

session, you can click the 

Orbit button to pulse a 

small amount of coffee if 

needed.

Remove

 the dosing cup 

or 

double tap

      to reset 

the current grind-by-

weight session.

When the target weight 

is reached, the Orbit will 

automatically stop the motor. 

Note: In Grind-By-Weight mode, when 

the grinder detects no coffee in the 

chute, it automatically stops after 60 

seconds.

Adjusting Weight and RPM in Grind-by-weight Mode

24

To adjust the target weight 

and RPM, 

press and hold


      until the weight starts 

blinking.

When you reach the 

desired target weight, 

wait 

5 seconds

 to move on to 

the RPM adjustment.

When the weight starts 

blinking, 

tap

      to increase 

and 

tap

      to decrease.

When adjusting target 

weight and RPM, 

press and 

hold

      /      to speed up 

the adjustment.

When the RPM starts 

blinking, 

tap

      to increase 

and 

tap

      to decrease.

When you reach the 

desired RPM, 

wait 5 

seconds

 to save.

1

4

7

10

11

2

5

8

3

6

9

Summary of Contents for AOT007

Page 1: ...Acaia Orbit User Manual FW 1 0 6 AOT007 AOT008 AOT009 AOT010 AOT011 AOT012 AOT013...

Page 2: ...Auto stop Auto purge Reverse And Adjust Stall Prevention Advanced Control with the Orbit App App Overview When Connected to the Orbit When Connected with Orbit and Lunar RPM Profile Overview Time bas...

Page 3: ...he built in auto reverse cleaning process and a knocker grind retention for single dosing is kept at a minimum The companion Orbit app gives you full control of the Orbit You can personalize the butto...

Page 4: ...s appliance can be used by children aged from 8 years and above and people with reduced physical sensory mental capabilities or lack of experience and knowledge if they are under supervision or have b...

Page 5: ...Parts Identification 5...

Page 6: ...with Magnetic Pad Accessory Tool Kit Spout Extender x 1 Hex Wrench x 1 Lunar Metal Magnetic Strips x 4 Burr Carrier Screws x 6 Spout Screws x 2 Touch Point sticker x 5 Knocker spring x 2 m4x12mm scre...

Page 7: ...Plug into a 100V 240V AC power source Place the 58 mm Dosing Cup on the base of the Orbit Turn on the main power switch at the back Click the Orbit button in the front When the button light is on you...

Page 8: ...Orange Preset A 600 RPM Preset B 1000 RPM Preset C 1500 RPM Manual Mode Warning Firmware update Reset to factory default Purge Cleaning in progress Connecting in progress Click Double Click Triple Cli...

Page 9: ...g Speed Press and hold the Orbit button to switch between 3 default RPM profiles The 3 presets are each represented by a different color light You can access the RPM profiling feature through the Orbi...

Page 10: ...to the burrs or motor Detent Ring The detent ring is a moveable ring that sits above the adjustment ring It is marked with symbols that can be used as reference points for grind settings Stepless Adju...

Page 11: ...seconds of reversing the dial can be adjusted finer as usual To see our single dose grinding workflow go to the Orbit videos list on the Acaia YouTube Channel The auto stop and auto purge function ar...

Page 12: ...rred and the Orbit will then restart the motor to try to grind again In many cases the momentary pause and restart will correct the stall and grinding will continue successfully After stalling 5 times...

Page 13: ...e Magenta light Purge Button RPM Profile Settings Settings Sharing Function Will display a white dot when in connection Orbit Connection Icon Lunar Connection Icon 13 The companion Orbit App gives you...

Page 14: ...r A white dot will appear on both the Orbit and the Lunar icon in the upper left corner Only viewable when Lunar is connected to Orbit Only usable when Lunar is connected to Orbit Grinding time Grindi...

Page 15: ...ges can be set between 600 1500 RPM and include a timer to set how long each stage should run RPM profiling is only available while the Orbit is connected to the Orbit app RPM profiling is not availab...

Page 16: ...grinding session The grinder will automatically stop when the target time is reached When RPM profiling is enabled adjust the initial and ending phase times to control the duration of a grinding sess...

Page 17: ...target RPM is displayed by the gray line 1 2 3 Manual Grinding Orbit s manual grinding mode enables you to control the RPM freely in real time During a single grinding session you can change the spee...

Page 18: ...uble Click Triple Click Press and Hold for 10 seconds The customizable options are Pulse Purge Power Off and Reverse Burr Setting Please note that the action Click is set to power on start and stop Th...

Page 19: ...ge will also be disabled 4 Auto Stop is only supported in single dose grinding Auto Purge 1 The default setting is ON Auto Purge Setting can only be turned on when Auto Stop Setting is on 2 On Auto Pu...

Page 20: ...nction to give you a hands free operating experience See the instructions in the next section on how to pair your Lunar to Orbit and how the Lunar functions when connected to the grinder Auto Grinding...

Page 21: ...magnetic strips with the application tool and attach the strips to the Lunar Align and insert the application tool flaps into the Lunar base gap Remove the application tool 1 4 2 5 3 6 21 Note The Lun...

Page 22: ...ia Updater App Place the Lunar on the Orbit When the Orbit button turns orange and the Lunar displays Confirm tap on the Lunar to confirm pairing Check if the Lunar has the magnetic strips aligned cor...

Page 23: ...ode Grind Pause Pulse Increase value Reset grind by weight session Adjust target weight and RPM Toggle auto start grinding 3 seconds Click Double Click Press and Hold Bluetooth Connection Indicator Po...

Page 24: ...tically stop the motor Note In Grind By Weight mode when the grinder detects no coffee in the chute it automatically stops after 60 seconds Adjusting Weight and RPM in Grind by weight Mode 24 To adjus...

Page 25: ...These screws can be replaced with thumb screws for easy assembly 5 Attach the spout extender 25 Care and Cleaning Do not immerse the Orbit in water Use a soft cloth with warm water only to clean the...

Page 26: ...ing cup magnet affect scale readings A The dosing cup magnet can affect the readings but this does not impact the weighing after you perform a tare The weight result will remain accurate and consisten...

Page 27: ...ill be reset to factory default You can also reset the Orbit to factory default with the Orbit APP To enter the Orbit firmware update mode press and hold the Orbit button in the front while the Orbit...

Page 28: ...Acaia Orbit Coffee Grinder Space Gray SSP Lab Sweet V3 Product Weight 5600 g 10 g Product Dimensions W 266 mm L 108 mm H 394 mm Rated Voltage 100V 240V Frequency 50 60Hz Motor 200W Brushless DC Motor...

Page 29: ...l rights reserved No part of this manual may be reproduced processed duplicated or published in any form by photocopying microfilming reprinting or any other method in particular electronic means with...

Reviews: