background image

Manual PCI-IDO-48A Series 

Optional Accessories 


  CAB50F-6 

Six-foot ribbon cable assembly with 
50-pin female connectors 


  STB-50 

Screw terminal board, typically ships 
with standoffs but can also mount on 
SNAP-TRACK or DIN-SNAP 


  DIN-SNAP-6 

Six inch length of SNAP-TRACK with 
two clips, for mounting one STB-50 
screw terminal board on a DIN rail 


  STB-72CH 

50-Pin Three-Header Universal Screw 
Terminal Board Installed in T-BOX Black 
Powder-Coated Metal Enclosure 


  MP104-DIN 

Kit allows DIN rail mounting of STB-72CH 
in the T-BOX. 


Summary of Contents for PCI-IDO-16A

Page 1: ...n Diego CA 92121 858 550 9559 FAX 858 550 7322 contactus accesio com www accesio com MODELS PCI IDO 48A PCI IDO 32A and PCI IDO 16A Isolated FET Outputs PCI Card With External Trigger Updates USER MANUAL FILE MPCI IDO 48A A2c ...

Page 2: ...t rights of ACCES nor the rights of others IBM PC PC XT and PC AT are registered trademarks of the International Business Machines Corporation Copyright by ACCES I O Products Inc 10623 Roselle Street San Diego CA 92121 All rights reserved WARNING ALWAYS CONNECT AND DISCONNECT YOUR FIELD CABLING WITH THE COMPUTER POWER OFF ALWAYS TURN COMPUTER POWER OFF BEFORE INSTALLING A CARD CONNECTING AND DISCO...

Page 3: ...r or parts not excluded by warranty Warranty commences with equipment shipment Following Years Throughout your equipment s lifetime ACCES stands ready to provide on site or in plant service at reasonable rates similar to those of other manufacturers in the industry Equipment Not Manufactured by ACCES Equipment provided but not manufactured by ACCES is warranted and will be repaired according to th...

Page 4: ...Included with your board 7 Optional Accessories 8 Chapter 2 Installation 9 Chapter 3 Option Selection 11 Figure 3 1 Option Selection Map 11 Chapter 4 Address Selection 12 Chapter 5 Programming 13 Table 5 1 Register Address Map 13 Chapter 6 Connector Pin Assignments 15 Table 6 1 Port 0 Connector Pin Assignments P2 15 Table 6 2 Port 1 Connector Pin Assignments P3 16 Table 6 3 Port 2 Connector Pin As...

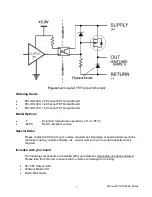
Page 5: ...chine Systems Multiple terminal control Office Automation Kiosks Functional Description This series of cards provide 48 32 or 16 opto isolated discrete outputs Each output is individually isolated using solid state P Channel FET switches These switches provide higher throughput in comparison to electromechanical relays The outputs require user supplied load voltages ranging from 5VDC to 60VDC Diod...

Page 6: ...ll if a rising edge of the External Trigger has happened Refer to Chapter 5 Programming for details regarding the functions mentioned above Output connections are via three 50 pin IDC connectors labeled Port0 Port1 and Port2 in this manual Each Port contains sixteen outputs and Port0 also contains The External Trigger input Outputs are broken out using 50 wire ribbon cables that mate with the IDC ...

Page 7: ...RoHS RoHS compliant version Special Order Please contact ACCES with your precise requirement Examples of special orders would be conformal coating custom software etc we will work with you to provide exactly what is required Included with your board The following components are included with your shipment depending on options ordered Please take the time now to ensure that no items are damaged or ...

Page 8: ...ships with standoffs but can also mount on SNAP TRACK or DIN SNAP DIN SNAP 6 Six inch length of SNAP TRACK with two clips for mounting one STB 50 screw terminal board on a DIN rail STB 72CH 50 Pin Three Header Universal Screw Terminal Board Installed in T BOX Black Powder Coated Metal Enclosure MP104 DIN Kit allows DIN rail mounting of STB 72CH in the T BOX ...

Page 9: ...e following instructions assume the CD ROM drive is drive D Please substitute the appropriate drive letter for your system as necessary DOS 1 Place the CD into your CD ROM drive 2 Type to change the active drive to the CD ROM drive 3 Type to run the install program 4 Follow the on screen prompts to install the software for this board WINDOWS 1 Place the CD into your CD ROM drive 2 The system shoul...

Page 10: ...ons from installed ribbon cables to the field equipment wiring 9 Check all connections and installations to ensure the system is ready to be turned on Do not turn on field power before turning on the computer as all outputs on the card will be ON 10 Replace the computer cover and turn ON the computer which should auto detect the card depending on the operating system and automatically finish insta...

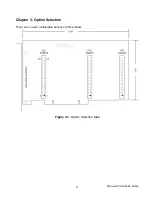
Page 11: ...Manual PCI IDO 48A Series 11 Chapter 3 Option Selection There are no user configurable options on this product Figure 3 1 Option Selection Map ...

Page 12: ...rmine which resources were assigned In these operating systems you can use either PCIFind or the Device Manager utility from the System Properties Applet of the control panel The card is installed in the Data Acquisition class of the Device Manager list Selecting the card clicking Properties and then selecting the Resources Tab will display a list of the resources allocated to the card In Linux yo...

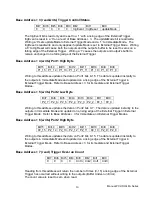
Page 13: ...he outputs in Immediate Mode and updated on a rising edge of the External Trigger in External Trigger Mode Refer to Base Address 3 for Immediate and External Trigger Modes Base Address 1 write Port0 High Byte Bit15 Bit14 Bit13 Bit12 Bit11 Bit10 Bit9 Bit8 P0_15 P0_14 P0_13 P0_12 P0_11 P0_10 P0_9 P0_8 Writing to this address updates the data on Port0 bits 8 15 The data is updated instantly to the ou...

Page 14: ...n a rising edge of the External Trigger in External Trigger Mode Refer to Base Address 3 for Immediate and External Trigger Modes Base Address 5 write Port2 Low Byte Bit7 Bit6 Bit5 Bit4 Bit3 Bit2 Bit1 Bit0 P2_7 P2_6 P2_5 P2_4 P2_3 P2_2 P2_1 P2_0 Writing to this address updates the data on Port2 bits 0 7 The data is updated instantly to the outputs in Immediate Mode and updated on a rising edge of ...

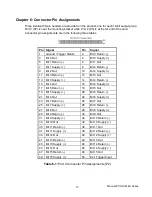
Page 15: ...ply 11 Bit 3 Return 12 Bit 3 Out 13 Bit 3 Supply 14 Bit 4 Return 15 Bit 4 Out 16 Bit 4 Supply 17 Bit 5 Return 18 Bit 5 Out 19 Bit 5 Supply 20 Bit 6 Return 21 Bit 6 Out 22 Bit 6 Supply 23 Bit 7 Return 24 Bit 7 Out 25 Bit 7 Supply 26 Bit 8 Return 27 Bit 8 Out 28 Bit 8 Supply 29 Bit 9 Return 30 Bit 9 Out 31 Bit 9 Supply 32 Bit 10 Return 33 Bit 10 Out 34 Bit 10 Supply 35 Bit 11 Return 36 Bit 11 Out 37...

Page 16: ...ly 20 Bit 22 Return 21 Bit 22 Out 22 Bit 22 Supply 23 Bit 23 Return 24 Bit 23 Out 25 Bit 23 Supply 26 Bit 24 Return 27 Bit 24 Out 28 Bit 24 Supply 29 Bit 25 Return 30 Bit 25 Out 31 Bit 25 Supply 32 Bit 26 Return 33 Bit 26 Out 34 Bit 26 Supply 35 Bit 27 Return 36 Bit 27 Out 37 Bit 27 Supply 38 Bit 28 Return 39 Bit 28 Out 40 Bit 28 Supply 41 Bit 29 Return 42 Bit 29 Out 43 Bit 29 Supply 44 Bit 30 Ret...

Page 17: ...ly 20 Bit 38 Return 21 Bit 38 Out 22 Bit 38 Supply 23 Bit 39 Return 24 Bit 39 Out 25 Bit 39 Supply 26 Bit 40 Return 27 Bit 40 Out 28 Bit 40 Supply 29 Bit 41 Return 30 Bit 41 Out 31 Bit 41 Supply 32 Bit 42 Return 33 Bit 42 Out 34 Bit 42 Supply 35 Bit 43 Return 36 Bit 43 Out 37 Bit 43 Supply 38 Bit 44 Return 39 Bit 44 Out 40 Bit 44 Supply 41 Bit 45 Return 42 Bit 45 Out 43 Bit 45 Supply 44 Bit 46 Ret...

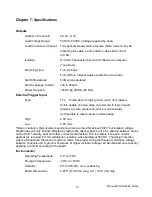
Page 18: ...wire connection which is not isolated Configurable to reset outputs on falling edge High 2 0V min Low 0 8V max Note on Isolation Opto Isolators and connectors are rated for at least 500V but isolation voltage breakdowns will vary and are affected by factors like cabling spacing of pins spacing between traces on the PCB humidity dust and other environmental factors This is a safety issue so a caref...

Page 19: ...is manual or just want to give us some feedback please email us at manuals accesio com Please detail any errors you find and include your mailing address so that we can send you any manual updates 10623 Roselle Street San Diego CA 92121 Tel 858 550 9559 FAX 858 550 7322 www accesio com ...

Reviews: