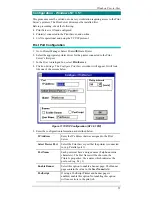
Windows Peer-to-Peer
69
Windows SMB
This section describes configuration and operation using Windows SMB (Server
Message Block.
Device Configuration
If you are using Windows SMB, no device configuration is required.
Software Installation
Under Windows SMB, no software installation is required.
However, if you wish to manage the Print Server, or monitor the attached printers,
you can install one of the program described in
Chapter 8 - Management Tools.
PC Configuration
Before printing using the Print Server’s printer is possible, the printer must be
created or added in the Windows environment. The following section explains how
this is done.
Windows 95
1.
From the command prompt type:
NET USE LPTn \\SCXXXXXX\P1
Where
n is a number from 1 to 9, indicating the parallel port you wish to redirect to the
Print Server.
SCXXXXXX is the Print Server’s default name found on the bottom of the
unit.
P1 is the port on the Print Server to which the printer is attached.
This command will redirect print jobs from the parallel port to the Print Server
port.
Using only port 1 with the SMB protocol is strongly
recommended.
2.
Return to Windows. Select the “My Computer” icon then select “Printer”.
3.
Select “Add Printer”. The “Add Printer Wizard” will guide you through the
installation. Follow the Wizard’s instructions. When asked, “How is the printer
attached to your computer?”, be sure to select “Local Printer”.
Do not select “Network Printer”. Selecting “Network
Printer” will disable printing.
4.
When prompted for the port to use for this printer, select the parallel port which
is being redirected to the Print Server. (The port used in the
Net Use command.)
5.
When the installation is complete, the Wizard offers you a test print out. Choose
"Yes" then click on “Finish”.

