Print Server User’s Guide
70
6.
Add the following into your AUTOEXC.BAT file. The AUTOEXEC.BAT is in
C:\ (root directory of drive C: ) and can be edited with Notepad. If
AUTOEXEC.BAT does not exist, create it with Notepad.
NET USE LPTn \\SCXXXXXX\P1
This is the same command used in step 1. By placing it in AUTOEXEC.BAT, it
will be executed every time you start your computer.
Configuration is now complete. You will be able to print to the printer attached to
the Print Server by selecting the printer you just installed.
Windows NT
To add a printer using SMB under Windows NT.
1.
From the command prompt type:
NET USE LPTn \\SCXXXXXX\P1
Where
n is a number from 1 to 9, indicating the parallel port you wish to redirect to the
Print Server.
SCXXXXXX is the Print Server’s default name found on the bottom of the
unit.
P1 is the port on the Print Server to which the printer is attached.
This command will redirect print jobs from the parallel port to the Print Server
port.
Using only port 1 with the SMB protocol is strongly
recommended.
2.
Return to Windows and open “Print Manager”.
3.
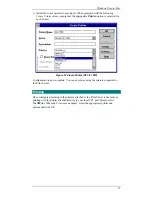
Select the “Printer” menu and choose “Create Printer”.
4.
Type a name and a description in the “Printer Name” and “Description” fields.
5.
Select your printer type, and install the correct driver for the printer attached to
the Print Server.
6.
From the “Print to” list, select the print server entered in step 1. For example,
select \\SC123456\P1.
7.
Close Print Manger.
Configuration is now complete. You will be able to print to the printer attached to
the Print Server by selecting the printer you just installed.
Windows for Workgroups
1.
From the command prompt type:
NET USE LPTn \\SCXXXXXX\P1
Where
n is a number from 1 to 3, indicating the parallel port you wish to redirect to the
Print Server.
SCXXXXXX is the Print Server’s default name found on the bottom of the
unit.
P1 is the port on the Print Server to which the printer is attached.


