background image

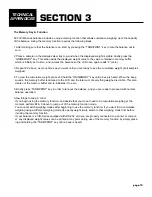
VIR-Series RS-232 Bi-Directional Serial Communications

All VIR-Series balances are equipped with a standard 9-pin male, bi-directional RS-232 interface located at the rear of the
balance. The RS-232 communication parameters are configurable with respect to baud rate, parity, # of stop bits, and hand-
shake. A seven-bit ASCII data stream is sent from the balance to an appropriate connected computer or printer via the prop-
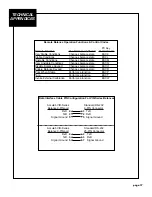
er data interface cable. Correctly configured cables can be purchased from Acculab, or, can be made by the user. See the
table “Data Interface Cable PIN Configuration For VIR-Series Balances”.

User Configurable Balance Parameters

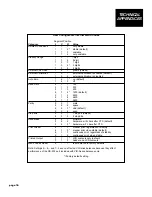
The table "User Configurable Internal Menu Codes" shows the balance parameters that are user configurable. Changing
configurable internal balance parameters requires accessing the balance internal menu system via the keypad. Navigating
the menu system is performed as follows:

1. To gain access to the balance internal menu system, start with the balance turned off. Briefly press the "ON/MEMORY"

key and immediately (and briefly) press the "TARE/PRINT" key while all LCD segments are illuminated. You should see a
"1" toward the left side of the LCD. This is the "left" segment value.

2. To increment the displayed digit within any segment, briefly press the "TARE/PRINT" key repeatedly until you reach your

target value.

3. To switch from one code segment to another, IE. from the left to center digit, center to right digit, or right to left digit, briefly

press the "CAL/MODE" key. Increment each digit segment by the method explained in #2, above.

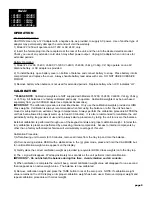
4. When switching from the center to right segment, the number displayed is the setting that is currently selected - marked by

a small right facing arrow 

that points to the “g” indicator on the lower right side of the display.

5. To select a new value, increment the third segment (#2) until you reach the new desired value. To lock in this new value,

press and hold the "CAL/MODE" key until the small right facing arrow       appears and points to the “g” indicator on the
lower right side of the display. 

6. If you need to move on and change other internal values, do so by repeating steps 2-5 above.

7. To finalize and save all revised parameter settings, press and hold the "TARE/PRINT" key until the balance resets. All your

new settings are now balance defaults at startup.

Note: To reset the balance to all its factory default parameters, specify the menu code "9 - 1" and invoke step #7, above.

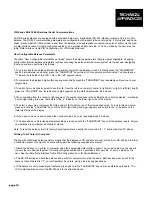
Printing To A Printer Or Computer

Printing with VIR-Series balances simply means that the displayed LCD contents are sent out the 9-pin RS-232 port to either
a connected printer or computer. To successfully print the following conditions must exist:

1. Attach the balance to a printer or computer using the appropriate data interface cable. The correct cable must be used to

connect the two devices together. Correctly configured cables can be purchased from Acculab, or, can be made by the
user. See the table “Data Interface Cable PIN Configuration For VIR-Series Balances”.

2. The RS-232 settings on both the balance and printer (or computer) must be the same. Both devices must be set to the

same number of data bits (“7”, not configurable), baud rate, parity, stop bits and handshake.

3. If the balance is set to manual print (default), press and hold the “TARE/PRINT” key until an audible beep is heard. The

LCD contents will be sent out the RS-232 port to the attached device.

page 14

TECHNICAL

APPENDICES

Summary of Contents for VI Series

Page 1: ...VI Series VIR Series Instruction Manual for Models VI 1mg VI 200 VI 2400 VI 3mg VI 350 VI 4800 VI 400 VI 4kg VI 600 VI 6kg VI 1200 VI 10kg 400025 12 Rev B ...

Page 2: ...nd Technology This instrument has been fully inspected and has passed all quality tests as speci fied by Acculab quality procedures To assure proper measurements it is necessary to periodically recalibrate the instrument using appropriate standards as specified in the operating manual Phone 800 656 4400 267 988 8702 Fax 800 356 0338 303 940 2250 Sales Office 67 Buck Road Suite 131 Huntingdon Valle...

Page 3: ...t as clean as possible Electrostatic fields gravitational fields dust dirt moisture vibration air currents and proximity to other electronic equipment can all have an adverse effect on the reliability and accuracy of your unit Handle with care Carefully set weighing tray onto top of unit until level Gently apply all items to be weighed onto the center of tray top Although designed to be quite dura...

Page 4: ...els New housing design directs spills away from the keypad Brushed stainless steel weighing surfaces Built in lock down bracket cable lock sold separately Sealed keypad with raised buttons for tactile feel along with audio function tone Large angled LCD display AC adapter and calibration weights included with all models Housing is constructed of sturdy ABS material with special structural cross br...

Page 5: ...the unit periodically during long periods of use and to always start a procedure by taring the unit to re zero the bal ance External calibration is performed through the use of the key pad controls and proper calibration weight Internal factory calibration is preset and performed by accessing internal components Access to internal components by other than a factory authorized technician will void ...

Page 6: ...procedure When all weight is removed from the weighing tray the tared value of the container will be displayed as a negative number Press the TARE key again to return the balance to zero NOTE The total weight of the container plus material cannot exceed the capacity of the balance Lock Down Bracket A molded piece is attached to the back of the balance housing that can be used on an optional basis ...

Page 7: ... for evaluation 7 E 54 This fault will appear on the display when the unit is powered on This occurs when the electronics are no longer within the factory set parameters The most common cause is from objects being dropped onto the weighing pan or from the balance itself being dropped The balance must be returned to Acculab or an authorized service center for electronic evaluation and repair 8 in t...

Page 8: ... Less than 80 RH DISPLAY TYPE LCD 75 high with segment test AUDIO TONE At startup and function keys POWER REQUIREMENTS AC adapter only included PLATFORM SIZE TYPE 100mm diameter 4 stainless steel DIMENSIONS H x W x D 4 75 x5 75 x10 25 120 x 146 x 260mm NET WEIGHT lb kg 4 1 8 DRAFT SHIELD Glass stainless steel w spill ring SECURITY Built in lock down bracket cable lock sold separately INCLUDED ACCE...

Page 9: ...mplete portability AC adapter included with all models and calibration weights included with all models under 1200g Housing is constructed of sturdy ABS material with special structural cross bracing for added rigidity SECTION 2 For Models VI 200 VI 350 VI 400 VI 600 VI 1200 VI 2400 VI 4800 VI 4kg VI 6kg VI 10kg VIR models include RS 232 interface for computer or printer capability Data output con...

Page 10: ...temperature Always perform the calibration procedure AFTER the unit has been allowed to properly warm up at least 30 minutes It is also recommended to recalibrate the unit periodically during long periods of use and to always start a procedure by taring the unit to re zero the balance External calibration is performed through use of the keypad controls and proper calibration weight Internal fac to...

Page 11: ...lance to zero NOTE The total weight of the container plus material cannot exceed the capacity of the balance Auto Off An auto shut off feature is provided which is operational only while the unit is operating under battery power The unit will automatically turn off after approximately two minutes if no active weighing takes place Auto shut off will not occur during operation with AC Adapter Lock D...

Page 12: ...bable causes of this error code The balance must be returned to Acculab or an authorized service center for electronic evaluation and repair 1 There is something causing the sensor to function out of specification 2 Rough improper handling of the balance 3 Liquids and other materials spilled into the balance NOTE Do not attempt to access internal components or make any unauthorized repairs since t...

Page 13: ... lock sold separately INCLUDED ACCESSORIES Calibration weight AC adapter AC adapter only OPTIONAL ACCESSORIES Cable lock carry case Cable lock calibration weight carry case SUPPLIED ACCESSORIES Calibration Weight with the following models VI 200 One 1 200g weight to calibrate balance at 200g OIML Class M1 VI 350 One 1 200g weight to calibrate balance at 200g OIML Class M1 VI 400 One 1 200g weight ...

Page 14: ...until a beep is heard When the beep sounds the memory buffer is dumped to the LCD and the total sum of everything weighed is visible This also clears out the memory buffer and re initializes it to zero 5 Briefly press TARE PRINT key in order to tare out the balance and you are ready to proceed with normal balance operation A few things to keep in mind If you begin using the memory function and dec...

Page 15: ...segment the number displayed is the setting that is currently selected marked by a small right facing arrow that points to the g indicator on the lower right side of the display 5 To select a new value increment the third segment 2 until you reach the new desired value To lock in this new value press and hold the CAL MODE key until the small right facing arrow appears and points to the g indicator...

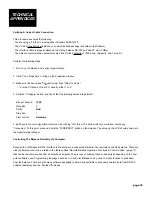
Page 16: ...top bits 1 Flow control Hardware 5 Exit back to the main Hyperterminal screen by clicking OK twice The bottom left of your window should say Connected At this point press and hold the TARE PRINT button on the balance The value on the LCD should show up in the Hyperterminal window Controlling The Balance Remotely Via Computer Because the VIR Series RS 232 interface is bi directional a connected com...

Page 17: ...0 Parity 5 2 1 mark 5 2 2 space 5 2 3 odd default 5 2 4 even Stop Bits 5 3 1 1 stop bit default 5 3 2 2 stop bits Handshake 5 4 1 software 5 4 2 hardware w 2 chars after CTS default 5 4 3 hardware w 1 char after CTS Print Stream 6 1 1 manual print regardless of stability 6 1 2 manual print when stable default 6 1 3 continuous print regardless of stability 6 1 4 continuous print when stable Printed...

Page 18: ...alance state ESC O Enable Balance Keypad Changes balance state ESC R Print When Stable Performs a function ESC P Tare Performs a function ESC T Invoke External Calibration Performs a function ESC W Data Interface Cable PIN Configuration For VIR Series Balances RxD 2 TxD 3 Signal Ground 5 Acculab VIR Series Balance 9 PIN port Standard RS 232 9 PIN Connector 3 TxD 2 RxD 5 Signal Ground RxD 2 TxD 3 S...

Page 19: ...bility to use the product s Acculab shall limit its obligations under warranty to a time not to exceed the original product warranty period set forth herein Acculab reserves the right to either repair or replace the balance or scale This warranty gives you specific legal rights and you may have other rights which may be dif ferent from state to state In the event that service is required the Custo...

Page 20: ...ations subject to change without notice as applicable Phone 800 656 4400 267 988 8702 Fax 800 356 0338 303 940 2250 Sales Office 67 Buck Road Suite 131 Huntingdon Valley PA 19006 www acculab com 400025 1 Rev B ...

Reviews: