background image

2

©2007 Johnson Level & Tool

Table of Contents

1. Kit Contents
2. Features and Functions
3. Safety Instructions
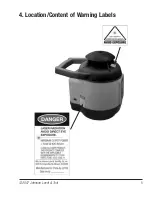
4. Location/Content 

of Warning Labels

5. Location of Parts/Components
6. Operating Instructions
7. Using the Product

8. Accuracy Self-Check
9. Technical Specifications
10. Application Demonstrations
11. Care and Handling
12. Product Warranty
13. Product Registration
14. Accessories

1. Kit Contents

For Model No. 40-6525

Description

Qty.

Self-Leveling Rotary Laser Level

1

“C” Alkaline Batteries

4

“C” Alkaline Battery Holder

1

Vertical Mounting Adapter

1

Tinted Glasses

1

Instruction Manual with Warranty Card

1

Hard Shell Carrying Case

1

For Model No. 40-6530

Description

Qty.

Self-Leveling Rotary Laser Level

1

Ni-MH Rechargeable Battery Pack

1

“C” Alkaline Battery Holder (batteries not included)

1

6V Battery Adapter

1

Vertical Mounting Adapter

1

Tinted Glasses

1

Detector with 9V Battery and Quick Clamp 

1

Instruction Manual with Warranty Card 

1

Hard Shell Carrying Case

1

Summary of Contents for 40-6525

Page 1: ...n your choice of this Self Leveling Rotary Laser Level We suggest you read this instruction manual thoroughly before using the instrument Save this instruction manual for future use This is a Class II...

Page 2: ...Kit Contents For Model No 40 6525 Description Qty Self Leveling Rotary Laser Level 1 C Alkaline Batteries 4 C Alkaline Battery Holder 1 Vertical Mounting Adapter 1 Tinted Glasses 1 Instruction Manual...

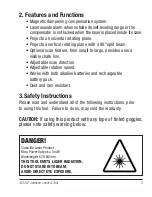
Page 3: ...user a visible chalk line Adjustable scan direction Adjustable rotation speed Works with both alkaline batteries and rechargeable battery pack Dust and rain resistant 3 Safety Instructions Please rea...

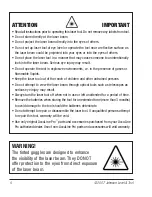
Page 4: ...he laser beam Serious eye injury may result Do not operate the tool in explosive environments i e in the presence of gases or flammable liquids Keep the laser tool out of the reach of children and oth...

Page 5: ...2007 Johnson Level Tool 5 4 Location Content of Warning Labels...

Page 6: ...on of Part Components Rotating Laser Output Widow Handle Vertical Vial Control Panel Battery Box DC 6V Power Jack 40 6530 Only 90 Beam Output Window Lock Unlock Symbol Transportation Locking Knob Hole...

Page 7: ...eries Battery kit C alkaline battery box Rechargeable battery pack 40 6530 only 1 Loosen the set bolt and take the battery box apart from the unit as shown in fig a 2 Put in four C batteries included...

Page 8: ...nnect the tripod to the laser using the 5 8 thread at the bottom of laser 3 Rotate locking knob counter clockwise to unlock then turn power on Press the keys on control panel to adjust to your desired...

Page 9: ...tor Light Solid indicator light means continuous rotation mode Flashing indicator light means scan mode 4 Scan mode button With the first press of this button the instrument emits a short horizontal l...

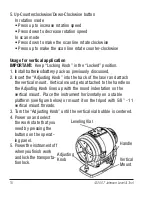
Page 10: ...e Adjusting Knob into the back of the laser and attach the vertical mount Vertical mount gets attached to the handle so the Adjusting Knob lines up with the round indentation on the vertical mount Pla...

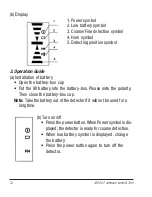
Page 11: ...0 266 x 0 118 x 0 029mm Weight 0 55 Ibs 0 249 Kg Dust and rain resistant Backlit Screen Double sides display Horn for beam location 2 Components a Structure 1 Front Display window 2 Level vial 3 Coar...

Page 12: ...into the battery box Please note the polarity Then close the battery box cap Note Take the battery out of the detector if it will not be used for a long time b Turn on off Press the power button When...

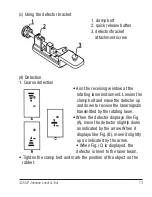
Page 13: ...en the clamp bolt and move the detector up and down to receive the laser signals transmitted by the rotating laser When the detector displays like Fig A move the detector slightly down as indicated by...

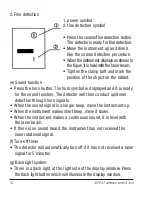
Page 14: ...ayed and it is ready for the sound function The detector will then conduct up down detection through horn signals When the sound signal is a longer beep move the instrument up When the instrument make...

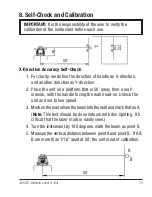
Page 15: ...50 away from a wall indoors with the handle facing the wall head on Unlock the unit and set to low speed 3 Mark on the wall where the beam hits the wall and mark that as A Note This test should be do...

Page 16: ...ation 1 Screw off the adjustment hole bolt with the cross screwdriver and adjust the fine adjustment bolt in the instrument core with a flat head screwdriver until the laser line in within 1 16 at 50...

Page 17: ...0 6530 Self Leveling Range 3 5 Scanning Mode degrees 0 30 60 Power Supply 4 C alkaline batteries 40 6525 Rechargeable battery pack or 6V adapter 40 6530 Battery Life Approx battery life 20 hours conti...

Page 18: ...l 10 Application Demonstrations Ceiling Installation Fence Installation Window Installation Squaring and leveling Wall or Footing Construction Cement Floor Installation Anti static Flooring Installati...

Page 19: ...ry and clean especially the laser output window Remove any moisture or dirt with a soft dry cloth Do not use harsh chemicals strong detergents or cleaning solvents to clean the laser unit 12 Product W...

Page 20: ...ice Department at 800 563 8553 In Canada contact Johnson Level Tool s Customer Service Department at 800 346 6682 13 Product Registration Enclosed with this instruction manual you will find a warranty...

Page 21: ...ro accessories will void any applicable limited warranty and there will be NO WARRANTY If you need any assistance in locating any accessories please contact our Customer Service Department In the U S...

Reviews: