21
4.5 Remote Thermo-hygrometer Transmitter installation
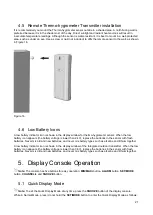
It is recommended you mount the Thermo-hygrometer sensor outside in a shaded area. A north-facing wall is
preferred because it is in the shade most of the day. Direct sunlight and radiant heat sources will result in
inaccurate temperature readings. Although the sensor is water-resistant, it is best to mount in a well-protected
area, such as under an eve. Use a screw or nail (not included) to affix the remote sensor to the wall, as shown
in Figure 16.
Figure 16
4.6 Low Battery Icons
A low battery indicator icon is shown in the display window for thermo-hygrometer sensor. When the low
battery icon appears (the battery voltage is lower than 2.4V), replace the batteries in the sensor with fresh
batteries. Never mix old and new batteries, and never mix battery types such as alkaline and lithium together.
A low battery indicator icon is shown in the display window of the Integrated outdoor transmitter. When the low
battery icon appears (the battery voltage is lower than 3.6V), replace the batteries in the sensor with fresh
batteries. Never mix old and new batteries, and never mix battery types such as alkaline and lithium together.
5. Display Console Operation
Note:
The console has five buttons for easy operation:
MIN/MAX/-
button,
ALARM
button,
SET/MODE
button,
C
and
SNOOZE
button.
5.1 Quick Display Mode
Note:
To exit the Quick Display Mode at any time, press the
SNOOZE
button of the display console.
While in Normal Mode, press (do not hold) the
SET/MODE
button to enter the Quick Display Mode as follows:

