INSTALLATION & SETUP
Step
9
>
Press
UP
to increase contrast to a normal viewing level.
Step
10
>
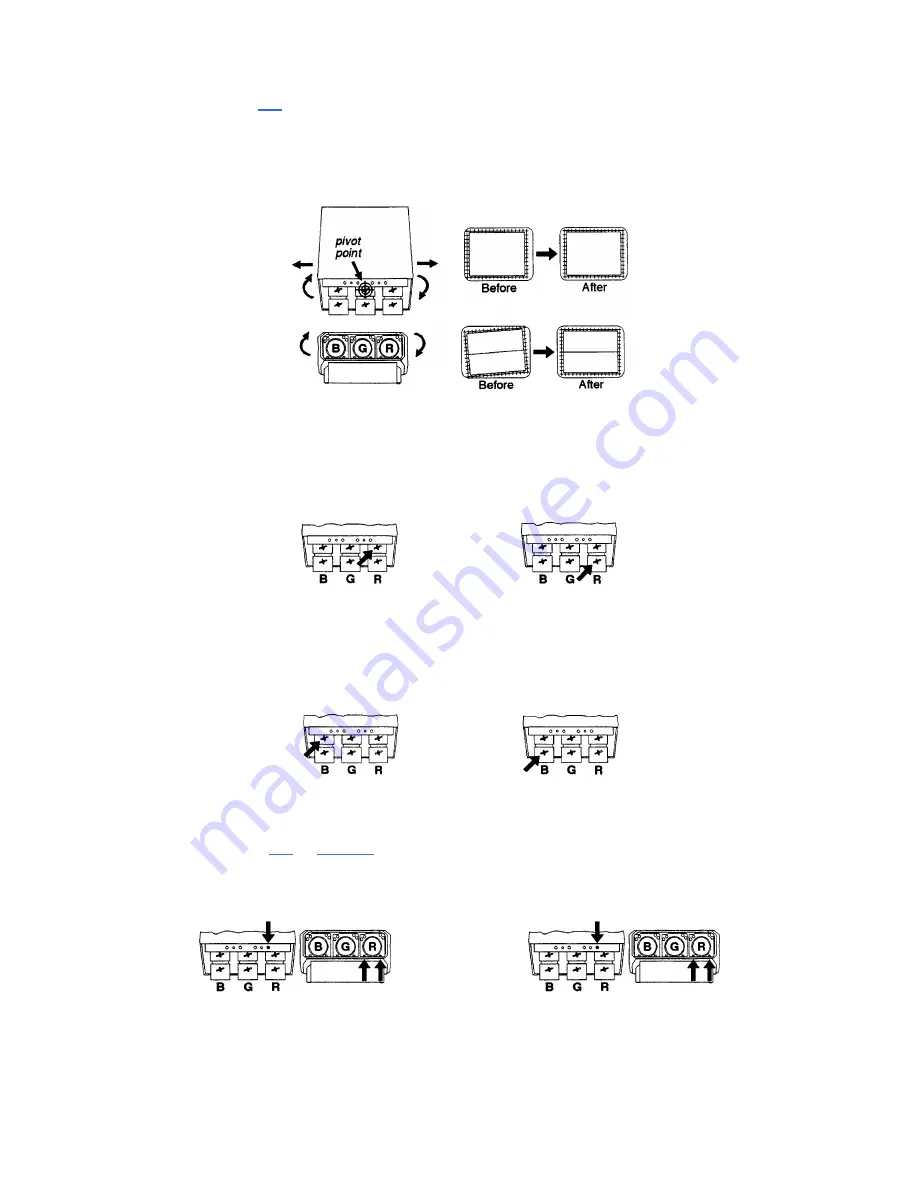
Pivot the projector and move it side to side as necessary to display a
symmetrical crosshatch centered left-to-right on the screen. The pivot point should be at
the tear wing nut of the green lens to avoid changing the throw distance.
Step 11 >
Tilt the projector until the center horizontal line is level and centered with
the screen. Adjust the feet of the projector or ceiling mount as required.
Step 12 >
A red image is displayed. Loosen the rear wing nut on the red lens. Rotate
the lens using the wing nut until the picture is focused in the center. Tighten the rear wing
nut.
Step
13
>
Loosen the front wing nut on the red lens. Rotate the front lens barrel until
the picture is focused in the corners. Tighten the front wing nut.
Step
14
>
A blue image is displayed. Loosen the rear wing nut on the blue lens. Rotate
the lens using the wing nut until the picture is focused in the center. Tighten the rear wing
nut.
Step 15 >
Loosen the front wing nut on the blue lens. Rotate the front lens barrel until
the picture is focused in the comers. Tighten the front wing nut.
Step 16 >
Press
UP
or
DOWN
to adjust for best electrical focus at the center of the
picture.
Step 17 >
On the
Model 8 & 9,
loosen the three bolts labeled
''B''
One is located on the
top plate. The other two are below the red lens.
On the Model, loosen the four bolts labeled
"A"
Loosen the two bolts labeled
''B''.
Step
18
>
A red and green crosshatch is displayed. Move the red lens so that the left
and right edges of the red crosshatch match the green.
2-20
Summary of Contents for Model 8
Page 1: ......
Page 44: ...INSTALLATION SETUP Figure 2 29 ACON Installation Examples 2 38 ...
Page 104: ...Physical Dimensions 5 5 ...
Page 105: ...5 6 ...
Page 113: ...A p p e n d i x B B 1 ...
Page 114: ...B 2 ...
Page 115: ...C 1 ...
Page 116: ...C 2 ...
Page 117: ...D 1 ...
Page 118: ...D 2 ...
Page 119: ...E 1 ...
Page 120: ...F 1 ...
Page 121: ...F 2 ...
Page 122: ...F 3 ...
Page 123: ...F 4 ...
Page 124: ...F 5 ...
Page 125: ...F 6 ...
Page 126: ...F 7 ...
Page 127: ...F 8 ...
Page 128: ...F 9 ...
Page 129: ...F 10 ...
Page 130: ...G 1 ...
Page 131: ...Index 1 ...
Page 132: ...Index 2 ...


