1. Introduction
User Guide
Page 1-7
Linux: Red Hat, SUSE, Fedora, CentOS etc.
MAC: OS X( 10.5, 10.6, 10.7, 10.8, 10.9 and later)
8.
Operating Conditions
Humidity: 5% - 85%
Operating Temperature: 0C – 40C
Certification: RoHS, UL, CE, FCC, C-Tick, BSMI
9.
Host connection
HBA: Z1M-G2 (PCIe2.0, 20Gb/s)
Convertor: C1M-G2 (Thunderbolt2.0 to PCIe2.0)
..more info
10.
QSFP Cable
Connector PCI Express 2.0 x4
Copper cable support Length: 2M
Optical cable support Length: 10M, 30M, 50M, 100M
1.2
Unpacking the System
Your ExaSAN A12S2-PS is shipped in special packaging to provide protection during
transportation, as well as to facilitate simple and safe removal from the carton(s). Note
that different components may be shipped in separate cartons.
1.2.1
What Is In Your Order
Your ExaSAN System Integrator/Value Added Reseller should have helped you assess,
identify, and order all necessary system components and accessories. If you ordered
the complete system solution, your order includes everything described in Section 1.3.
Note that there are generic system components and accessories required by the
ExaSAN solution architecture, but they are not sold by your ExaSAN System
Integrator/Value Added Reseller and therefore not included in your ExaSAN A12S2-PS
order. Please refer to Section 1.5, “What Else You Need” for additional information.
1.2.2
Checking the Equipment You’ll Need
Section 1.1.3 has a complete list of all the equipment you’ll need to set up the ExaSAN
A12S2-PS. Check carefully against that list; verify that you have all of the system
components and accessories before commencing hardware installation.
1.2.3
Unpacking
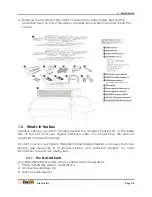
Follow the steps below to open the carton and remove the system from its packaging.
Keep in mind that you should work with a second person if heavy lifting is a concern for
you.
1.
Read Chapter 2, “Preparing to Install ExaSAN A12S2-PS.”
2.
Remove any packing material on the outside of the carton.
3.
Cut the tape at the top of the carton. If you use a long cutting instrument, exercise
care to avoid damaging the content inside.
Summary of Contents for ExaSAN A12S2-PS
Page 8: ...1 Introduction User Guide 1 Introducing ExaSAN PCIe 2 0 Storage System...
Page 28: ...2 Preparation User Guide 2 Preparing to Install ExaSAN A12S2 PS...
Page 31: ...3 Installation User Guide 3 Installing the ExaSAN A12S2 PS...
Page 47: ...4 How to Use User Guide 4 Using RAIDGuard X...
Page 77: ...4 How to Use User Guide Page 4 30 2 Check the Confirm box and click Unlock Drive...
Page 79: ...5 RAID User Guide 5 RAID Overview...


