background image


5.    RAID 


User Guide 


4.1.3  Planning your RAID 

Before create RAID, it is a good idea to become familiar with the variety of configurations, or 
schemes, that are available for the ExaSAN RAID storage. This section describes these 
schemes and illustrates how each RAID level is applied. 
 

RAID Level 

Description 

Capacity 

RAID 0 

Striping, the fastest and most 
efficient array type but offers no fault-
tolerance 

Total of all drives 

RAID 1 

Mirroring, All disks have the same 
data 

Total of one drive 

RAID 5 

Block-level striping with distributed 
parity, one disk fault tolerant 

Total of all drives minus one drive 

RAID 6 

Block-level striping with double 
distributed parity, two disks fault 
tolerant 

Total of all drives minus two 
drives 

RAID 0+1 

Combines the advantage of R0 and 
R1, provides optimal speed and 
reliability 

One-half the total capacity of 
drives (Sum of RAID 1 member 
sets) 

 
When configuring RAID, you may take the follow items into consideration: 
1.  Are you using a DAS or SAN environment? 
2.  Do you currently have more than one RAID or JBOD? 
3.  Which is more important, transfer speed or data security? One or two disk fault tolerance? 
4.  Do you need multiple volume or single volume on your RAID systems? 
5.  Do you have to consider the metadata volume for SAN software? 
6.  Do you consider using Global spare drives? 
7.  The number of disk drives used determines the speed of the RAID created. Take into 

account the desired speed when configuring RAID. 


Summary of Contents for ExaSAN

Page 1: ...S User Guide Support Host Bus Adapter PCIe 2 0 Z1M G2 PCIe 3 0 Z2M G3 Z2D G3 Support Host Convertor Thunderbolt2 0 to PCIe2 0 C1M G2 Support Switch System PCIe 2 0 SW08 Q4 SW16 SWF16 Accusys Storage L...

Page 2: ...ar log explanation and add DAS and SAN log file path V1 1 1 02 26 2013 Delete 5M copper cable on page 1 4 and 1 6 V1 1 2 12 24 2013 Modify Heartbeat LED indicator to flash on page 3 5 V1 1 3 09 22 201...

Page 3: ...you are new to RAID and RAIDGuardX this guide will help you become familiar with the technology and assist you in setting up and using RAID on the B08S3 PS If you are already familiar with ExaSAN use...

Page 4: ...age Ltd The information contained herein is the exclusive property of Accusys Storage Ltd and shall not be copied transferred photocopied translated on paper film electronic media or computer readable...

Page 5: ...ing to Install ExaSAN B08S3 PS 2 1 2 1 Precaution for Handling the System 2 1 2 2 Choosing the Location for the System 2 1 2 3 Electrical Power 2 1 2 4 Operating Environment 2 2 2 5 Security 2 2 3 Ins...

Page 6: ...4 16 4 1 7 Option 4 17 4 1 7 1 Slicing 4 17 4 1 7 2 LUN Map 4 19 4 1 7 3 Expansion 4 20 4 1 7 4 Migrations 4 21 4 1 7 5 Snapshot 4 24 4 1 7 6 Health Center 4 27 4 1 7 7 Unlock Drives 4 28 4 1 8 Updati...

Page 7: ...1 Introduction User Guide 1 Introducing ExaSAN PCIe 2 0 Storage System...

Page 8: ...xaSAN can transfer up to 32 Gb s by using single connection Post production work including non linear editing NLE requires high bandwidth storage to quickly move the volume of data being processed and...

Page 9: ...hey are the reasons why ExaSAN is the best RAID solution for a power user working on studio or individual work space 1 Host Interface PCIe3 0 8Gb s x4 lanes for transfers up to 32Gb s 2 Disk Interface...

Page 10: ...monitoring and control via GUI LED indicator for RAID enclosure status Event logging to text file with event viewer Event notification by email SMTP Centralized multiple RAID system management Suppor...

Page 11: ...Accusys System Integrator Value Added Reseller or Accusys Customer Service see Appendix C Customer Service and Technical Support for more information to report any missing item The Accessories packag...

Page 12: ...d is Fan fail 4 Heartbeat Flashing Blue indicates the controller is active 1 3 1 2 Beeper Codes Controller Status Beeper mode Turn on the Controller One short beep System Panic Long beep Controller Wo...

Page 13: ...d Disk Lock Steady Green Disk Access Flashing Blue Steady Green Disk Initialization Flashing Blue Steady Green Disk Rebuild Flashing Blue Rebuild Drives Steady Red Original Drives Steady Green Disk Ex...

Page 14: ...troduction User Guide Page 1 7 Original Drives Steady Green Migrating Drives Original Drives Migrating Drives Steady Green Original Drives Steady Green Disk Health Center Action Flashing Blue Steady G...

Page 15: ...n progress No light indicates no host accessing Host connected LED bottom Flashing Green indicates the controller is connected normally No light indicates the controller connected abnormal 3 Terminal...

Page 16: ...S3 PS HDD compatibility list is on the Document section of B08S3 PS s web page 2 Host system computer When connecting B08S3 PS PS you will need a host workstation or server with an available PCIe3 0 x...

Page 17: ...ccusys com tw products accessories c1m new html to convert Thunderbolt to PCIe 6 Dual DAS port adapter Z2D G3 optional If you need twice times of B08S3 PS performance to work on you need a Z2D G3 http...

Page 18: ...2 Preparation User Guide 2 Preparing to Install ExaSAN B08S3 PS...

Page 19: ...cation is you should keep the following points in mind when determining where to place your system 1 Measure the amount of available space on your desk The amount of space required for the B08S3 PS is...

Page 20: ...operating environment for the ExaSAN B08S3 PS must meet certain requirements 1 Verify that the temperature range of the chosen location is within the limits established for the system and all other co...

Page 21: ...3 Installation User Guide 3 Installing the ExaSAN B08S3 PS...

Page 22: ...3 1 Powering On to turn the components on in the prescribed order 3 1 1 Installing Disk Drives Follow the steps below to install your HDDs 1 Place the HDD with connector align with the edge of the dis...

Page 23: ...on PCIe slots on some motherboards are for graphics cards only Check with the motherboard vendor for compatibility Follow these steps to install the card in each host system 1 Make sure that the clien...

Page 24: ...rd over the slot insert the connector into the slot press gently but firmly until it is securely seated Install HBA card on a PCIe slot 6 Use the screw that you saved in step 2 to secure the metal bra...

Page 25: ...N product or Accusys FAE Dept see Appendix C Customer Service and Technical Support for more information Note For Mac Windows platform Executing installer package to install driver and GUI at the same...

Page 26: ...uld select the adequate packages on the menu list during installation Check Development Tools Then click Optional Packages to select all packages when you install your Linux OS 1 Copy the ExaSAN RAID...

Page 27: ...t to start the driver automatically please put the compiled driver ACS6x ko to directory as follows cp ACS6x ko lib modules uname r kernel drivers scsi For RHEL CentOS etc depmod a For SLES OS vi etc...

Page 28: ...UI Server Linux zip GC location ExaSAN model GUI Client x x x zip 2 Create folder Accusys and unzip GS GC files to subfolder GS and GC 3 Perform GS open a terminal console and enter the following comm...

Page 29: ...our Java version is earlier than 1 6 please go to www java com to upgrade If version is ok please enter the following commands cd Accusys GC x x x x x x java jar RAIDGuardX jar Now you can add control...

Page 30: ...nfirm the driver has been properly installed with the following steps 1 Click on About This Mac and lick on the More Info button then Click on the System Report button 2 MacOS recognize ExaSAN as Fibr...

Page 31: ...identifier actual name may vary as Storage Controllers device manager in Windows platform Caution If you see the HBA listed as an unknown device under Windows follow the driver installation steps to r...

Page 32: ...rray Make sure LUN mapping refer to Section LUN mapping is setup and then volume should be appeared on OS now enjoy the high speed access to new ExaSAN Volume 3 3 1 Check on new Volume in Disk Utility...

Page 33: ...4 How to Use User Guide 4 Using RAIDGuardX...

Page 34: ...which host directly connected to RAID system Note RAIDGuardX Server is default installed in ExaSAN Switch therefore in the SAN environment you can run RAIDGuardX Client alone to manage RAID controller...

Page 35: ...RAID controller firmware System Code Boot Code etc Dump controller log Download the event log for troubleshooting Help Search Search keyword in RAIDGuard X Help Center Displays the help for RAIDGuard...

Page 36: ...e Drive Lag Proof Enable Disable NCQ mode Enable Disable SMART Mode Enable Disable Beeper Enable Disable Equalization Enable Disable Cache of controller and drives can be enable disable MISC for contr...

Page 37: ...ient locally 2 SAN Clicking Manually Add Controller in controller tab to add remotely Following steps for add controller in detail 1 DAS add controller locally 1 Click Add Controller to display a list...

Page 38: ...Enter the Server or Switch IP 3 Click Search and wait for the Serial Number to populate 4 Type the password default is 00000000 for the controller 5 Click Add to finish adding the controller Note To r...

Page 39: ...striping with double distributed parity two disks fault tolerant Total of all drives minus two drives RAID 0 1 Combines the advantage of R0 and R1 provides optimal speed and reliability One half the...

Page 40: ...This is shown in the information to the right of the drop down list For example RAID 5 requires at least 3 drives 2 Select the sector size from the drop down menu Available sector sizes are 512 bytes...

Page 41: ...is selected it will recalculate the disk parity and data organization how it is arranged The amount of time required for the initialization process varies depending on the disk volume Performance eva...

Page 42: ...umbers in the order they are created For example the first array created is labeled with the 1 icon the second array created is labeled with the 2 icon and so forth Note The ExaSAN RAID controller can...

Page 43: ...5 RAID User Guide Caution When you delete an array all data on the hard disk drives will be lost...

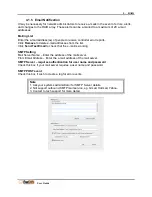
Page 44: ...e list Click Send Test Email to check that the e mail is working SMTP Setting Mail Server Name Enter the address of the mail server From Email Address Enter the e mail address of the mail server SMTP...

Page 45: ...well DLP concept In the event of performance degradation or delay of a single drive due to aging the ExaSAN RAID system reads both data and parity stripes concurrently It bypasses the slow reads and r...

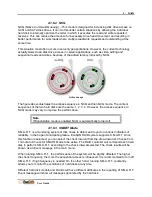
Page 46: ...ode may vary to improve the performance Note If Equalization mode is enabled NCQ is automatically turned off 4 1 6 3 SMART Mode S M A R T is a monitoring system of disk drives to detect and report on...

Page 47: ...sers can respond to the error promptly and carry out troubleshooting If the error indicated by the Beeper alarm has been resolved you may uncheck the Beeper option 4 1 6 5 Equalization Mode Regardless...

Page 48: ...o constantly write data to the RAID storage without long latency Read Pre fetch Identifies sequential access patterns and aggressively pre fetches patters into cache From the drop down list choose the...

Page 49: ...eros Type another 8 characters Password Confirmation Confirm the new controller password Note Do not lose your password If it is lost you will have to contact your agent or the Accusys Support Team SN...

Page 50: ...cing ExaSAN RAID slicing overcomes the inherent design of how data is stored on an HDD or RAID system by subdividing a RAID array into segments or slices These slices are effective hardware partitions...

Page 51: ...ce or merge 1 Select the array to slice or merge by clicking on a drive with an array number The capacity is displayed By default Slice 0 contains the entire capacity of the disk array 2 Click on Slic...

Page 52: ...to automatically assign a LUN to the new array If Assign LUN automatically is not selected you need to assign the LUN manually using LUN map If the slice has been partitioned you need to set its LUN M...

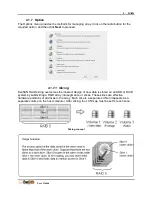
Page 53: ...ay Although you may still access the array while doing Expansion its performance is affected considerably You may check the progress of Expansion in the main view Example Note The new hard drive must...

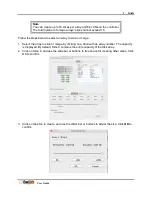
Page 54: ...grations Different from Expansion which enlarges an array by adding hard drives to a fixed RAID level Migration changes the RAID level of an array It allows live changes to the RAID without the need t...

Page 55: ...an existing drives of array Follow the steps below to select an array to migrate This changes the RAID level such as from RAID 1 to RAID 5 1 Select the array to migrate From the drop down menu select...

Page 56: ...5 RAID User Guide 3 The main array information screen will indicate that the array is currently migrating...

Page 57: ...splitting the source and target after the background sync is completed The I O mirroring is stopped and the difference is under tracking in a bitmap table to support fast re sync Create Shot Create a...

Page 58: ...function from the drop down menu 2 Select the Split Now radio button 3 Select the required shot by clicking on the Shot No radio button From the respective drop down menus select the source volume an...

Page 59: ...ot This function can speed up mirroring for previous snapshots 1 Select the Resynchronize shot function from the drop down menu 2 Select the required shot by clicking on the Shot No radio button You c...

Page 60: ...dition 2 Click the radio button to Rebuild the parity data Rebuilding parity on an array uses the data on the array to create new parity data no repair problems with the data Verify the parity data Ve...

Page 61: ...ed directly to the array if there has not been drive access during the locked period Otherwise the controller will rebuild parity data on the drive when the drive is online Note If Drive Drop occurs i...

Page 62: ...usys com tw support download htm Under the Download link you can click the folder to look for your ExaSAN system model 4 Proceed to the next section to update the firmware files 4 1 8 2 Installing the...

Page 63: ...5 RAID User Guide 5 RAID Overview...

Page 64: ...ter Once you have defined a group of drive modules as a RAID set the controller groups those drives into logical disks On the ExaSAN RAID system each logical disk appears to the client system as one L...

Page 65: ...a full copy of your data on each drive in mirror set In a RAID 1 configuration the capacity of the smallest drive is the maximum storage area 5 3 3 RAID 5 Independent data disks with distributed pari...

Page 66: ...5 RAID 0 1 Striped set with Mirroring RAID 0 1 combines the advantages of RAID 0 and RAID 1 with none of the disadvantages RAID 0 1 creates a mirror of the primary striped set RAID 0 1 provides optima...

Page 67: ...Appendices User Guide Page 6 1 6 Appendices...

Page 68: ...FP connector is active as SAN mode LED 3 The lower QSFP connector is active as DAS mode LED 4 The HBA card is failure system disconnected 4 Q Why doesn t the performance reach the expected levels whil...

Page 69: ...eature called User Account Control UAC When UAC is enabled the RAIDGuardX server cannot detect the controller and thus displays the message Find no RAID card To resolve this disable UAC and run RAIDGu...

Page 70: ...mail alerts to Option Set the Slice expansion migration health disk locking LUNs and take a snapshot of the array Option Menu Icons Slicing an array into several parts LUN Map Assign a LUN to a slice...

Page 71: ...ng selected for expansion migration rebuilding A transition drive state during the array 1 2 3 4 migration A transition drive state during the array 1 2 3 4 expansion A transition drive state during t...

Page 72: ...Guard X 2 Client operation system log it s better to record related error message C 2 Contact Us For customer services and technical support locate an Accusys office near you from the link below http...

Reviews: