background image

P.


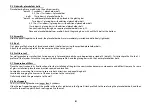
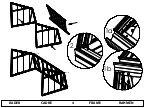
3 Si placeholder bolts

Placeholder bolts are used during the entire assembly. 

*detail 5 : 7 windows : 1 placeholder bolt

     8, 9, 10 or 11 windows: 2 placeholder 

bolts      12 windows: 3 placeholder bolts 

*detail 6 : an additional placeholder bolt is placed in the glazing bar

     7 windows: 1 glazing bar with additional placeholder bolt 

     8, 9, 10 or 11 windows: 2 glazing bars with additional placeholder bolt 

     12 windows: 3 glazing bars with additional placeholder bolt 

     You can find what glazing bars require placeholder bolts on p. 22. 

     Place one placeholder bolt per profile. Attach the glazing bars, with an M6x16 bolt at the bottom. 

P.


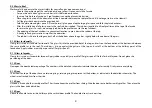
4 Assembly

Slide the panels together to the end, the placeholder bolts are immediately inserted and definitively tightened. 

P.


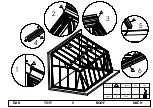
5 Roof

First place profile A atop the 2 façades and attach it definitively using the provided placeholder bolts. 

Attach the B profiles to profile A in the corner and then to the gutter. 

P.


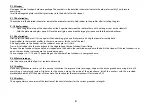
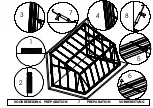
6 Profile in roof

For wall greenhouses smaller than 9 windows, only 2 placeholder bolts have to be provided instead of 3 (detail 2). First attach profile A to the 2 L 

profiles of the façades. Attach the 2 supports in between profile A and the glazing bars with the 2 outer placeholder bolts. 

P.


7 Preparation of Glass

Place the construction in its final location, after the installation of the glass the construction becomes cumbersome and difficult to move. For ease 

of glass installation, place the construction squared and levelled. 

Squared by measuring from corner to corner in both directions, and equalizing both. 

Levelled by bringing the 4 corners of the construction to the same level. 

Definitively attach the greenhouse to the wall. 

P.


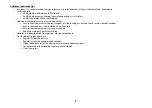
8 Roof support

This is just for wall greenhouses longer than 8 windows 

Slide the roof support up against the profile in the roof, as indicated in the figure. Attach profile B to the roof using the placeholder bolt, and then 

attach to the roof support. Attach roof support A to the wall. 

Summary of Contents for MS3 H Series

Page 1: ...DBER05022019 Copyright A C D nv sa zwaaikomstraat 22 8800 Roeselare Belgium info acd be MS3 H...

Page 2: ......

Page 3: ...ois Toit Porte Lucarne Vitrage Finition Gevel Zijwand Dak Deur Dakraam Beglazing Afwerking E Open all the boxes and make sure the contents is correct Sort all parts according to the usage which is men...

Page 4: ...t in past Bijna elk profiel in deze serre bezit 1 of meerdere boutgleuven Bij verbindingen met boutgleuven steeds de profielen goed tegen elkaar drukken Wachtbouten zijn bouten die we in een gleuf sch...

Page 5: ...fiel A in de hoek en vervolgens aan de goot Blz 6 Profiel in dak Voor muurserres kleiner dan 9 ruiten moeten er maar 2 wachtbouten voorzien worden in plaats van 3 detail 2 Bevestig eerst profiel A aan...

Page 6: ...en en onderaan afgeknipt boven de goot iets lager dan de onderzijde van het glas Blz 10 Glas in zijwanden Standaard wordt er klaar glas gebruikt in de zijwanden Het glas past bovenaan in de voorziene...

Page 7: ...evens de dwarsligger het rubber schuin aansnijden zodat deze mooi aansluit Een stukje rubber wordt in de ronde holte van de nok gedrukt om verschuiving van het dakraam tegen te gaan Om het dakraam te...

Page 8: ...van het dakraam in het slotgat vast zit en zo het dakraam goed vastklemt o Zorg ervoor dat de deur goed dicht is vergrendel de deur indien mogelijk o Zorg ervoor dat er geen luchtspleten zijn onder d...

Page 9: ...erre Bon savoir Les rainures boulon sont des rainures dans lesquelles s adapte la t te d un boulon Quasiment tous les profils de cette serre poss dent 1 ou plusieurs rainure s boulon En cas de raccord...

Page 10: ...mont s et serr s d finitivement Page 5 Toit Placez le premier profil A au dessus des 2 fa ades et fixez le d finitivement avec les boulons d arr t pr vus Fixez les profils B au profil A dans le coin...

Page 11: ...s vers le haut dans le fa te et coup en dessous ras de la goutti re un peu en dessous du bas des vitres Page 10 Vitrage des parois lat rales Pour les parois les vitres sont en verre clair en version s...

Page 12: ...aoutchouc sur les deux profils de toit de la m me mani re que pour le reste du toit Appliquez galement le caoutchouc sur l entretoise et coupez le en oblique pour qu il se rejoigne de fa on esth tique...

Page 13: ...o Assurez vous de l absence de fissures dans l embase o Evacuez l exc s de neige pour viter trop de poids R gle g n rale veillez viter que le vent ne puisse p n trer dans la serre Conseils pour le bon...

Page 14: ...profile in this greenhouse has 1 or more bolt slots When attaching by means of bolt slots ensure that the profiles are firmly pressed together Placeholder bolts are bolts that are inserted into a slo...

Page 15: ...es to profile A in the corner and then to the gutter P 6 Profile in roof For wall greenhouses smaller than 9 windows only 2 placeholder bolts have to be provided instead of 3 detail 2 First attach pro...

Page 16: ...ttom above the gutter slightly below the bottom of the glass P 10 Glass in sidewalls Clear glass is used as standard for sidewalls The glass fits into the provided slot at the top and rests on the fou...

Page 17: ...of the roof Also apply rubber to the sleeper cut the rubber at an angle so it is flush Press a bit of rubber into the round space in the ridge to keep the roof window from sliding To open the roof win...

Page 18: ...sure that the pusher for the roof window is in the locking cut out and firmly secures the roof window o Ensure that the door is firmly closed Lock if possible o Ensure that there are no air slits unde...

Page 19: ...ygesch ft farbloses neutrales Silikon schnelltrocknender Beton zur Verankerung des Gew chshauses Nivellierwaage Spaten Seil oder Bandma von mindestens 7 m selbststehende Leiter Interessantes Schrauben...

Page 20: ...tzlicher Warteschraube 8 9 10 oder 11 Scheiben 2 Glasleisten mit zus tzlicher Warteschraube 12 Scheiben 3 Glasleisten mit zus tzlicher Warteschraube Welche Glasleisten mit einer Warteschrauben zu vers...

Page 21: ...tenwand und schieben Sie diese zwischen den Dachprofilen nach oben bis sie nicht mehr auf der Seitenwand ruht Ziehen Sie die Scheibe wieder nach unten in die vorgesehene Rinne Die Platte um die Scheib...

Page 22: ...raubennute des Quertr gers S 17 Dachfenster Die Nummern der Detailsichten deuten auf die Reihenfolge der Montierschrittte Profile nach Einsetzen der Scheibe gummieren S 18 Dachfenster Legen Sie die Sc...

Page 23: ...ungsmakler ber die Montage des Gew chshauses zu informieren Regelm ig kontrollieren ob alle Schrauben noch angespannt sind ob Ihre Verankerung Beton und Anker noch immer einwandfrei ist die Position d...

Page 24: ...1 1 GIEBEL G 1826 1 1 1 2843 1658 I 628 2 1 286 1 C 11 F D E J 7 E C J B K C M6x16 L F L D 4 D B 3 C 10 A E E C H K 1 B 8 15 10 I J 14 G 17 7 4 9 A F 2 16 D 2 13 5 6 3 7 12 13 11 15 L C 17 I K B C 13...

Page 25: ...ABLE GIEBEL 286 1 1595 1781 1 1 1 1658 2840 I 456 1 1 2843 A 4 1 2086 3 B 12 M6x16 K C L B C 13 K L D J 1811mm A 1 D 16 J I 10 C A 15 C E A B F I E D J G H 14 C K 1 3 4 5 2 2 12 13 10 9 6 7 16 7 8 11...

Page 26: ...C 8 SEITENWAND 1635 ZIJWAND PAROIS LAT RALE 3 A C B D 1 1 2 Qty Fig Nr L mm SIDE PANEL 3 9 4 2 11 10 1 7 B C B D 9 7 3 9 9 D 3 A 9 D C C C C C C 5 4 3 2 1 10 9 8 11 9 B 6 A A 5 A M6x16 A D C D A C 177...

Page 27: ...FRAME KADER CADRE 4 1a 1b 2 RAHMEN 2 1a 1b 1a 1b 2...

Page 28: ...A 2 A B A 6 A ROOF DAK TOIT 5 A 1 Qty Fig Nr L mm DACH 2840 1 3 B 4 5 B B 5 B B B 6 B 6 5 6 2 A 3 5 6 1 5 B 5 6 6 4 5 B 4 Art 800834...

Page 29: ...2 A B 3 A DAK TOIT 6 A 1 Qty Fig Nr Art B DACH ROOF 4 B A 1 2 3 4 4 3 A B B 1 A 800249 L 155...

Page 30: ...7 8 5 6 4 A VORBEREITUNG VOORBEREIDING PR PARATION 7 1 PREPARATION 2 3 1 1 1 3 4 3 4 3 4 3 4 3 4 3 4 3 4 3 4 2 2 7 7 1 5 6 5 6 5 6 5 6 5 6 8...

Page 31: ...ING PR PARATION 8 1 PREPARATION VORBEREITUNG 2 Art Nr Fig Qty 1 A 4 A 801820 NL Serres langer dan 8 ruiten F Les serres plus longues que 8 vitres E Greenhouses longer than 8 windows D Nur f r Wandgew...

Page 32: ...a 1 BA b 2d BA CG d a b c 3 CG GLAS VITRAGE 9 BA Qty Fig Nr L mm 1650x730 GLAS GLASS 1234x730 BA 2c CG 2a BA 3 2 3 3 CG BA 2 1 BA 1 1 CG 3 CG BA BA 1 BA CG 2 2 2 CG 1 BA 2b CG 3...

Page 33: ...b a AA GLAS GLAS VITRAGE 10 AA Qty Fig Nr L mm 1650x730 1 GLASS 1 c AA 2 2 2 2 2 2 AA AA AA AA AA AA 1 1 1 1 1 1 1 2 AA 2 2 a b c d 2...

Page 34: ...4 EI 7 7 7 6 5 GD AA AA AA EL J HE IC I I IC I EI 7 3 2 1 1 4 7 7 7 EK 7 EJ 7 2 I AA HE 3 GLAS VITRAGE 11 IC EJ HE EK I Qty Fig Nr L mm 2 7 GLASS GLAS 2 EI EL 290x134 1650x730 GD 1650x730 5 AA 3 5 18...

Page 35: ...A B A B 3 2 1 A A B B 4 Nr DEUR PORTE 12 B 2 DOOR Qty Fig 2 L mm 708 1795 A 1 2 3 4 T R A B A B Art 800073 800747...

Page 36: ...3 1 2 4 DOOR DEUR PORTE 13 1 2 3 4 T R...

Page 37: ...A 1 d a b c 7 b a A a B b 6 C AC b a AC 6 b a 5 3 2 B 4 A DOOR DEUR PORTE 14 A B 1 Qty Fig Nr L mm 1475 1485 1 1 1595x730 AC T R 7 7 7 7 1 2 3 4 5 A AC B 6 B Art 800262 800257...

Page 38: ...1 2 15 DOOR DEUR PORTE T R 2 b 1 a 2X...

Page 39: ...imer BELANGRIJK IMPORTANT Ontvetten Primer Degraiss Primer Degrease primer Detail A 1 2 2X 3M VHB 3 KRAK 3M VHB A 1 2 Niet kleven in een vochtige omgeving Do not stick in a humid environment Nicht in...

Page 40: ...B A C A CROSS BAR DWARSLIGGER TRAVERSE 16 A C B 1 1 2 Qty Fig Nr L mm 30 70 707 QUERBALKEN B A 3 4 3 2 1 A B B 1 2 C 4 M6x25 A C Art 800604 800253 800252...

Page 41: ...A B B A DA 3 DAKRAAM LUCARNE 17 A DA B 1 2 2 Qty Fig Nr L mm 780x730 770 758 1 2 DACH FENSTER 4 5 6 7 ROOF WINDOW 9 8 9 1 2 3 5 6 A 8 c a b d 7 4 A A B B DA 7 B A B DA A B B A DA Art 800038 800089...

Page 42: ...BA 2b CF 460x730 1 1 BA CF BA 2c CF ROOF WINDOW DAKRAAM LUCARNE 18 BA 1 Qty Fig Nr L mm 1650x730 DACH FENSTER BA 2 1 CF BA 2d CF 2a BA...

Page 43: ...3 4 5 6 BA ROOF WINDOW DAKRAAM LUCARNE 19 3 4 7 8 DACH FENSTER a a CF 6 A C CF 9 CF b a 5 a b c d 5 Stukje Rubber 5cm Morceau de caoutchouc 5cm Piece of caoutchouc 5cm St ck Gummi 5cm A 1 Qty Fig Nr L...

Page 44: ...D 3 B 2 C 1 A B D C 4 6 5 3 2 1 4 6 A 5 WATERAFVOER VACUATION D EAU 20 A C B 1 1 1 Qty Fig Nr L mm 1000 WATER DRAINAGE WASSERABFUHR D 1 6...

Page 45: ...an 6 ruiten F Les serres plus longues que 6 vitres E Greenhouses longer than 6 windows D Nur f r Wandgew chsh user von mehr als 6 Scheiben Optie MONTAGE op MUUR of VERHARDE ondergrond Option ASSEMBLY...

Page 46: ...ors 8 windows 2 sets middle anchors 9 windows 2 sets middle anchors 10 windows 2 sets middle anchors 11 windows 3 sets middle anchors 12 windows 1 set ancres interm diaires 7 vitres 2 sets ancres inte...

Page 47: ...ABDECKPLATTEN PLAQUETTES DE FINITION 23 COVER PLATES AFDEKPLAATJES...

Reviews: