Window-Raiser: OPTIONAL
This is an
option
.
Make sure that the hole in the cylinder axis corresponds to the first hole in the tube.
Push the smallest pin with its straight rod through the holes. Make sure that the pin sticks through the tube.
Turn the cylinder completely in the round nut.
First disassemble the roof window; then, disassemble the crossbeam.
Slide 2 stop bolts in the bolt slot of the crossbeam.
Reinstall the crossbeam. Make sure that the crossbeam is pressed completely against the glass. Then reinstall the rubber on the
crossbeam and have it fit closely to the side that is cut off diagonally.
The numbers of the detailed views indicate the assembly order. Tighten the assembly definitively.
Install the base plate firmly on the crossbeam with the two pre-mounted bolts.
Reinstall the roof window in its place and centre it.
Clamp the window-raiser base plate on the roof window tongue, using 2 bolts and a stainless steel plate.
Turning the cylinder determines the opening distance of the roof window at a specific temperature.
U
Summary of Contents for R205 Retro
Page 2: ......
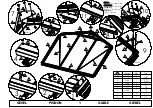
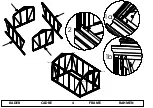
Page 36: ...1a 1b 1a 1b 1a 1b 2 2 2 2 1a 1b 2 FRAME KADER CADRE 4 1a 1b RAHMEN...
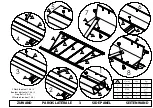
Page 39: ...3 3 A B 2 2 2 2 2 3 3 2 VOORBEREIDING PR PARATION 6 1 PREPARATION VORBEREITUNG A B...
Page 44: ...4 DOOR DEUR PORTE 11 1 2 3 T R 2 3 1 4...
Page 46: ...DEUR PORTE 13 DOOR T R 1 2 2 a b 1 2X...
Page 54: ...3 2 1 1 2 3 3 01 3 45 3 3 0673 53 19 8 08 01 3 015 0 015 0...
Page 55: ...a b 7 1 2 3 4 5 6 8 8 08 01 3 3 01 3 0673 53 0 45 3 3 7 1 2 3 4 5 6 8...
Page 57: ...ABDECKPLATTEN AFDEKPLAATJE PLAQUETTES DE FINITION 22 COVER PLATES...


