background image

AXS 

 Ramp Manual 


Manual


Acdeos BV 
Touwbaan 1A 


2352 CZ Leiderdorp 
Netherlands 
www.ACDEOS.com 
Date:  3-4-2020 
Doc AR9000 04 
Rev.   2

AXS 

 FL Ramp


Summary of Contents for AXS FL

Page 1: ...AXS Ramp Manual Manual Acdeos BV Touwbaan 1A 2352 CZ Leiderdorp Netherlands www ACDEOS com Date 3 4 2020 Doc AR9000 04 Rev 2 AXS FL Ramp...

Page 2: ...ent of the auto lock 27 8 3 Adjustment of the platform 29 9 Spare parts 30 10 Additional kits 32 11 Environment 32 12 CE Certification 33 13 M1 Certification 34 Appendix I Installation drawing Double...

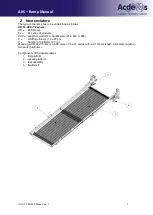
Page 3: ...FL series of products XXX Length of platform in Centimeters 210 250 or 280 Y Width 8 86 cm 10 97 cm Z Number of platforms 2 or 3 Meaning a AR FL 210 8 2 is a AXS ramp of the FL series with a 2 1 mete...

Page 4: ...y obstacle outside the vehicle or in the path of the ramp when in motion 4 It is recommended that the ramp is operated by the driver only or other qualified operators 5 The driver or operator must hav...

Page 5: ...ce 25 800 mm 300 Kg height side edge 50 mm Germany DIN 75078 1 Netherlands Permanente taxi regeling 20 800 mm 300 Kg height side edge30 mm Sweden M1 wheelchair bus 15 United Kingdom DPTAC 12 800 mm 30...

Page 6: ...ocedure ramps with auto lock To open the ramp from inside first open de doors than firmly push the ramp at the top It will go out and open automatically 5 2 Close operation procedure ramps with auto l...

Page 7: ...ficial installation drawings Ask Acdeos for the final revision and official installation drawing The figures and drawings used in this manual are for indication only Mechanical Installation Always cre...

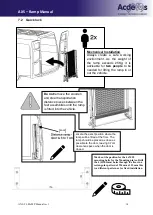
Page 8: ...icle for the position of the chassis In some applications the reinforcing U profiles may not fit properly in such cases the U profile will need to be modified to make it fit If a new back up plate is...

Page 9: ...ling device You will also need to install the ramp stop at the door to prevent the ramp for rattling or hitting against the rear door window We recommend positioning this as high as possible at the do...

Page 10: ...p or approx 4 5 people Check that the fixing fitting of the ramp is strong enough for this weight OPERATION Move the ramp in and out to check that all moving parts are running freely Check that the ra...

Page 11: ...ight angle with the slot in the Alu profile Needed parts Leg kit AR 200 073 Unfold the ramp Remove the centre gas spring including the ball joint from the bracket on platform 1 by unscrewing the M8 nu...

Page 12: ...hest extend and tighten the bolts Mounting the right leg Mount the turning point of the push rod at platform 1 as far to the plastic end cap as possible Mount the turning point of the leg as close to...

Page 13: ...FL RAMP Manual rev 1 12 7 1 1 Bump stop Needed tools size 13 wrench allen key size 5 Remove the m8 nut from the gas spring Do not remove the gas spring from the hole Place the bump stop assembly on th...

Page 14: ...ket with loosely fixed bolts in the side profile Close the ramp and adjust the bracket so the rubber bump stops aligns with counterpart Check the t nuts for being fit properly square on the slot Tight...

Page 15: ...rtation distance pieces between the feet assemblies until the ramp is fitted into the vehicle Locate the exact position where the ramp will be fitted at the floor The ramp should be placed as close as...

Page 16: ...up plate is required please use one with a similar surface area of 35 cm2 to fit the requirements Place the two mounting plates with the mushrooms in the vehicle and fix using the M10 bolts If the ho...

Page 17: ...ing against the rear door window We recommend positioning this as high as possible at the door The bracket needs to be fitted with the two rivet nuts M8 Drill 11 mm holes Position the bracket so that...

Page 18: ...mp or approx 4 5 people Check that the fixing fitting of the ramp is strong enough for this weight OPERATION Move the ramp in and out to check that all moving parts are running freely Check that the r...

Page 19: ...d into the vehicle Assemble the lock and the centre piece in the bottom plate assembly You can choose the direction of the locking lever pointing side or rear Use blue Loctite on the M6 wire from the...

Page 20: ...applies when the ramp must be able to be turned to an inside stow position See below sketch with approximately dimensions In case the ramp should only be able to swing out you should position the swi...

Page 21: ...eed to remove this later Move the top fixation bracket as close as possible to the wall Then position the two fixation 90 deg brackets on the wall and position at a place where you have a firm counter...

Page 22: ...h the center of the lock roll approximately Place the ramp and the turning device in the vehicle and fix using the M10 wire struts If the holes are going through the chassis longer struts may be neede...

Page 23: ...osition Left or right version mirrored Fix the lock plate s with enough spacers at the floor Adjustment should be made in such a way that the bottom plate slides easily under the lock plate with very...

Page 24: ...osition and then swing it back into the vehicle When closing the ramp it should pass easily back over the vehicle floor If there is too much collision with the floor you need more pre load on the hook...

Page 25: ...s means that it is not necessary to grease any of the moving parts 7 6 Yearly inspection The inspection of the ramp can only be done by a company that is familiar with ramps and lifting devices and wh...

Page 26: ...ctions 8 1 Replacement of Gas springs Careful the gas springs are mounted under pre tension Follow these instructions to replace them loosen the M8 bolts from the bracket to remove preload using a 5 m...

Page 27: ...ide the bracket as far as possible up and tighten the M8 bolts firmly again using a 5mm Allan key Remove the pre tension rings close the ramp and you are ready Put the new gas spring in place Do not r...

Page 28: ...ng disassembly assembly Unfold the ramp remove the middle gas spring from the ramp and take off the brackets Unfold the ramp remove the middle gas spring from the ramp and take off the brackets Fix th...

Page 29: ...t or upper platform Position is 5 10 mm from the edge Standard is 7 mm 5 mm for less force 10 mm for more force opening the two platforms from each other tighten to 30 Nm For the 280 models the 2nd br...

Page 30: ...justment of the platform The straightness of the platform can be adjusted at the center hinge In two possible ways There are two M10 bolts at the left and right side of the platform around the center...

Page 31: ...e gas spring AR 121 9 Lock roll AR 022 3 Middle gas spring AR 055 10 Handgrip AR 117 4 End profile AR 312 11 Black plastic middle end cap left AR 245 5 End flap Alu part AR 242 11a Black plastic middl...

Page 32: ...description Part number 1 Rubber bump stop AR 075 2 Lock mechanism left AR 200 005 004 AR 032 116 2a Lock mechanism right AR 200 006 004 AR 032 116 3 Lower Gas Spring AR 200 060 4 Mounting kit 1x AR 2...

Page 33: ...kit AR 200 091 HD wheel fixing kit AR 200 092 Bump stop kit AR 200 096 11 Environment The AXS ramp is made of durable materials which can all be recycled Each different material can be easily being se...

Page 34: ...ty of Company Acdeos BV Address Touwbaan 1A City 2352 CZ Leiderdorp Country Netherlands Website WWW ACDEOS COM Legal represented by Mr A de Moes Conformity Product is designed tested and produced conf...

Page 35: ...bility of Company Acdeos BV Address Touwbaan 1A City 2352 CZ Leiderdorp Country Netherlands Website WWW ACDEOS COM Legal represented by Mr A de Moes Conformity Product is tested following the M1 test...

Page 36: ...AXS Ramp Manual AXS FL RAMP Manual rev 1 35...

Page 37: ...anual Appendix I Installation drawing Double ramps Dimensions in mm Type L W H Hf AR FL 210 8 2 2120 860 1150 475 AR FL 250 8 2 2520 860 1350 584 AR FL 280 8 2 2820 860 1500 650 AR FL 280 10 2 2820 97...

Page 38: ...AXS Ramp Manual AXS FL RAMP Manual rev 1 37 Appendix II Drill tool 4 Holes at 1004 x 210 for fixed mounting of the ramp 4 Holes at 956 x 155 for mounting with optional quick out kit...

Reviews: