background image

English

16

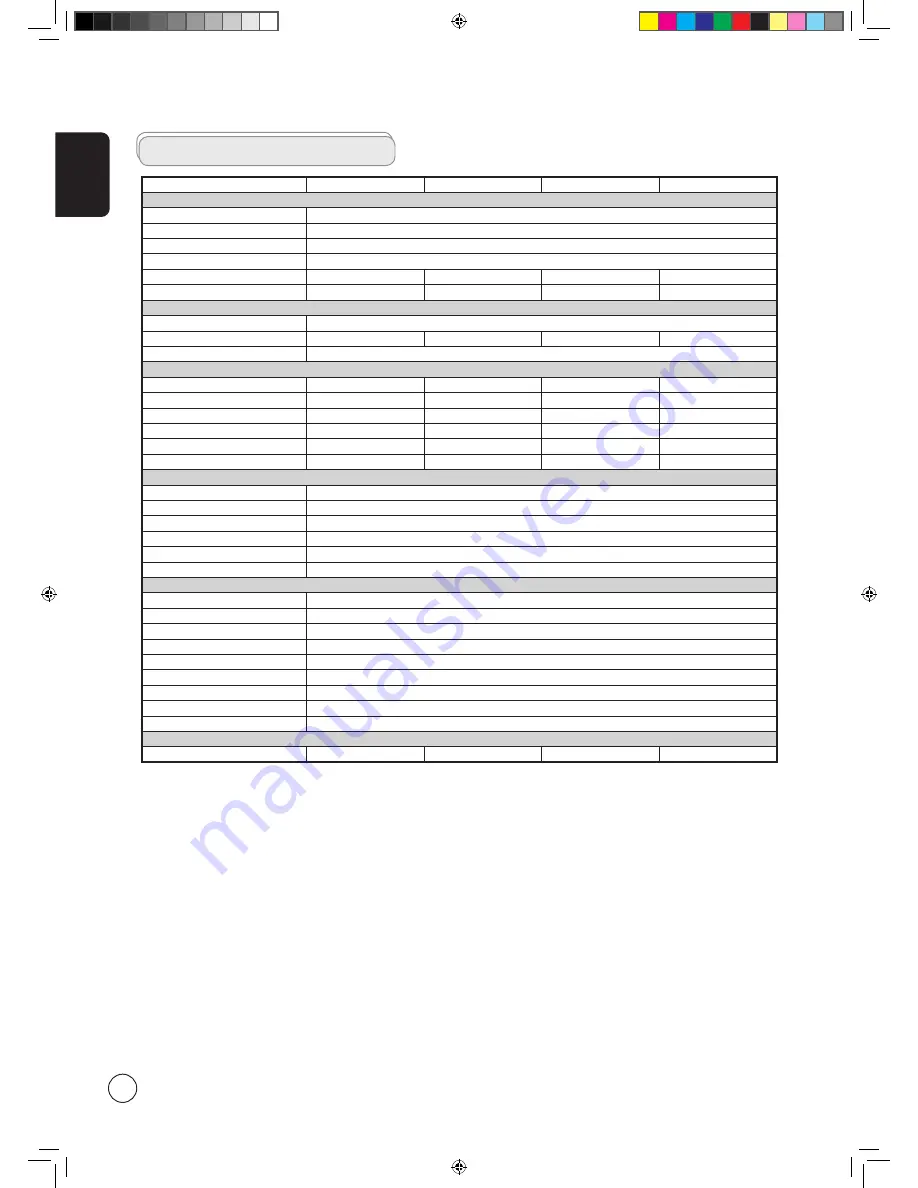
Product specifications

Model

AT2720

AT3220

AT3720

AT4220

Panel spec

Resolution (pixels)

1366 x 768

Brightness (tpe.)

500 nit

Contrast Ratio (tpe.)

1200:1

Display colour

16.7 M

Viewing angle (tpe.)

H: 176

o

 ; V:176

o

H: 176

o

 ; V:176

o

H: 176

o

 ; V:176

o

H: 178

o

 ; V:178

o

Response (tpe.)

6.5 ms (gray to gray)

8 ms (gray to gray)

8 ms (gray to gray)

8 ms (gray to gray)

Power supply

Input

100 V ~ 240 V - AC. (50~60 Hz)

Max. power consumption

161 W

185 W

235 W

291 W

Power saving

5 W

Mechanical

Dimensions (W x H x D mm)

693 x 529 x 195

814 x 610 x 261

944 x 692 x 261

1071 x 794 x 311

Weight (Kg)

12.08

17.7

24

32.3

Weight (lbs)

26.9

39

52.9

71.15

Gross weight (Kg)

14.4

21.06

28

38.6

Gross weight (lbs)

32

46.9

61.7

85.8

Wall Mounting

200mm x 100mm

400mm x 200mm

400mm x 200mm

400mm x 200mm

Analog TV system

TV Colour system

PAL, SECAM

Sound system

B/G/D/K/I/L

Stereo system

NICAM / A2

TV Tuner System

PLL, 45.25 Mhz - 862.25 Mhz

Subtitles

Teletext 1.5

Analog TV-tuner quantity

1

Terminal

Analog Tuner In

Yes

AV1-SCART

CVBS (In/Out), RGB (In), Audio R/L

AV2-SCART

CVBS (In/Out), RGB (In), Audio R/L

AV3-COMPONENT

YPbPr, YCbCr, Audio R/L

AV3-CVBS

CVBS, Audio R/L share with AV3-COMPONENT

HDMI 1

YES

HDMI 2

YES

PC D-sub in

Yes

PC audio-in 

Yes

Audio system

Speaker

5 W + 5 W

10 W + 10 W

10 W + 10 W

10 W + 10 W

Acer.TV.EU.UK.indb   16

6/23/2006   9:37:20 AM

Summary of Contents for 9951

Page 1: ...n this publication without obligation to notify any person of such revisions or changes Such changes will be incorporated in new editions of this manual or supplementary documents and publications This company makes no representations or warranties either expressed or implied with respect to the contents hereof and specifically disclaims the implied warranties of merchantability or fitness for a p...

Page 2: ...assembling this equipment 13 Do not overload an electrical AC outlet power strip or convenience receptical The overall system load must not exceed 80 of the branch circuit rating If power strips are used the load should not exceed 80 of the power strip input rating 14 Some products are equipped with a three wire electrical grounding type plug that has a third pin for grounding This plug only fits ...

Page 3: ... If any of the items is missing then please contact your retailer Remote control x1 AAA batteries x2 Power cord x1 User s Guide Quick Guide The power cord supplied varies according to your region Front panel view 1 Power On Off 2 Menu key 3 Channel 4 Volume 5 Input key Your LCD TV overview 2 MENU Menu key Turns the OSD menu ON and OFF 3 CH CH Channel up When the OSD is on functions the same as the...

Page 4: ...tch 2 AC in 3 HDMI 4 VGA in 5 PC Audio in 6 AV Audio L R CVBS COMPONENT 7 SCART 8 Analog antenna 4 3 2 1 2 1 AV3 Pr Pb Y 8 7 6 5 For AV3 Composite and component inputs share the same audio ports Acer TV EU UK indb 4 6 23 2006 9 37 03 AM ...

Page 5: ... TV image 11 Directional keys OK VOL up down CH up down 12 WIDE Press to toggle scaling mode between 4 3 16 9 Panorama and Letterbox 1 2 3 modes 13 MPX Press to select the sound input displayed in the top right hand corner mono stereo bilingual 14 VOL Press to increase or decrease the volume 15 CH up down Press to sequentially select the TV channel 9 8 TTX M I X M P X W I D E INDEX SUBTITLE SUBPAG...

Page 6: ...he Setup Wizard will guide you to complete the language selection and channel scanning Press the OK key to begin the setup process Step 1 Select the setup language you prefer Step 2 Please select country Step 3 Ensure that your co axial cables are connected correctly before proceeding Step 4 Scan for analog channels Step 5 Setup is now complete You are ready to begin watching TV If you leave the s...

Page 7: ...he rear of your LCD TV as shown below Source IN Acer recommends the following priority for connection types HDMI COMPONENT SCART Composite TV OUT SCART out only works with analog broadcasts Y Yellow Red White Blue Green R W R R W R W B G R B G Y Y AUDIO COMPOSITE COMPONENT SCART AV3 AV3 or DVD VCR STB or HDMI D Sub D Sub AV Recorder SCART B G Acer TV EU UK indb 7 6 23 2006 9 37 07 AM ...

Page 8: ...ment to the TV you need to select the correct input source Press the corresponding button on the remote control to select the correct input source Input button guide 1 TV key Toggle Analog TV ATV between input sources 2 AV key Toggle AV HDMI1 and HDMI2 between input sources 3 SCART key Toggle SCART1 and SCART2 between input sources 4 PC key Toggle VGA between input sources 1 2 3 4 For VGA input Ac...

Page 9: ...ress the MENU button on the remote control or the MENU button on the control panel 2 Select your desired menu by using the up and down directional keys to switch between the five menus 3 Use the directional keys to interact with the menu The up down directions will scroll through the menu options while left right will adjust the different settings for example in the Picture menu settings such as b...

Page 10: ...t the sliding scale Press OK to save 4 The Audio menu can also be used to adjust the treble balance sound effects and other important sound related settings Adjusting the channel management 1 Press the Menu key to bring up the OSD 2 Using the directional keys select Channel management from the OSD 3 Use the directional keys to navigate the menus 4 The Channel management menu can be used to adjust ...

Page 11: ...1 Press the MENU key on the remote control to bring up the OSD 2 Use the directional keys to navigate to the Settings menu Then select Set PIN see note 3 Enter a four digit password Type it again and press OK to reconfirm 4 Press MENU to exit To enable this feature The default PIN for this TV is 0000 First enter 0000 when you want to change the PIN If you forget your PIN please enter 6163 to reset...

Page 12: ... setup wizard all available channels were listed If you need to reorder for new channels please follow the steps below Reordering for channels 1 Press the MENU key on the remote control to bring up the OSD 2 Use the directional keys to navigate and select Channel Management 3 Highlight Reorder Then select the channel you wish to reorder and press OK to confirm Move to the right channel number and ...

Page 13: ...d select Channel Management 3 Highlight Auto Scan Then select Start and press OK to begin 4 Select OK and press MENU to exit Re scan for channels The first time you completed the setup wizard all available channels were listed If you need to re scan for new channels please follow the steps below Acer TV EU UK indb 13 6 23 2006 9 37 18 AM ...

Page 14: ...r widescreen modes including 4 3 16 9 Panorama and Letterbox 1 2 and 3 4 3 For 4 3 standard pictures A side bar appears on each side 16 9 In this mode the whole picture is stretched toward each side of the screen Panorama In this mode the picture is progressively stretched toward each side of the screen Letterbox 1 2 and 3 In this mode the picture is enlarged linearly to fit the screen The top and...

Page 15: ...era camcorder or other peripheral being connected at the same time Switch off one of the other peripherals The ghost or double image may be caused by obstruction to the antenna due to high rise buildings or hills Using a highly directional antenna may improve the picture quality The horizontal dotted lines shown on the pictures may be caused by electrical interference e g hair dryer nearby neon li...

Page 16: ...94 x 311 Weight Kg 12 08 17 7 24 32 3 Weight lbs 26 9 39 52 9 71 15 Gross weight Kg 14 4 21 06 28 38 6 Gross weight lbs 32 46 9 61 7 85 8 Wall Mounting 200mm x 100mm 400mm x 200mm 400mm x 200mm 400mm x 200mm Analog TV system TV Colour system PAL SECAM Sound system B G D K I L Stereo system NICAM A2 TV Tuner System PLL 45 25 Mhz 862 25 Mhz Subtitles Teletext 1 5 Analog TV tuner quantity 1 Terminal ...

Reviews: