System Utilities
2-22
Shell Secure Flash Utility SOP (For Service BIOS)
NOTE:
Plug the AC power adapter to a power source before performing the Shell Secure Flash Utility.
1.
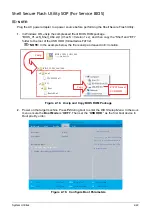
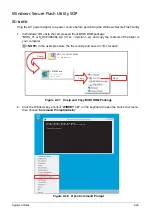
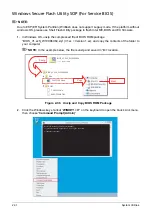
In Windows OS, unzip the compressed file of BIOS ROM package
“BIOS_V1.xxS_Shell_X64.zip” (V1.xxS = Version 1.xx), and then copy the “Shell” and “EFI”
folder to the root of the USB HDD (formatted as FAT32).
NOTE:
In the example below, the file is unzip and saved in E:\ location.
Figure 2-18. Unzip and Copy BIOS ROM Package
2.
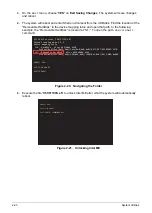
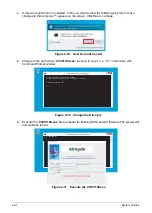
Power on the target machine. Press
F2
during boot to enter the
BIOS Setup Menu
. In the
Boot
menu ensure the
Boot Mode
is “
UEFI
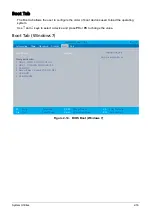
”. Then set the “
USB HDD
:” as the first boot device in
Boot priority order
.
Figure 2-19. Configure Boot Parameters
%,(//B;
7\SH
]LS$UFKLYH
%,26B96B6KHOOB;
6KHOO
(),
&96HIL
%RRW
FAT32 format
USB HDD
Copy
Unzip
%RRW[HIL
InsydeH20 Setup Utility
Rev. 5.0
Information Main Security
Boot
Exit
Boot Mode:
[UEFI]
Secure Boot: [Enabled]
Boot priority order:
1. USB HDD :Sony Storage Media
2. Windows Boot Manager (HFS256G39TND-N210A)
Item Specific Help
Use <↑> or <↓> to select a device, then
press <F5> to move it down the list, or
<F6> to move it up the list. Press <Esc>
to escape the menu
F1
Help
↑ ↓
Select Item
F5/F6
Change Values
F9
Setup Defaults
Esc
Exit
←→
Select Menu
Enter
Select
►
Sub-Menu
F10
Save and Exit
Summary of Contents for A315-53G
Page 1: ...A315 53 A315 53G S E R V I C E G U I D E ...
Page 23: ...Hardware Specifications and Configurations 1 16 Figure 1 8 System Block Diagram Discrete ...
Page 224: ...5 84 Service and Maintenance Figure 5 129 Disconnecting the Cables UMA C A F D B E G H I ...
Page 230: ...5 90 Service and Maintenance Figure 5 139 Connecting the Cables UMA C A F D B E G H I ...
Page 301: ...CHAPTER 8 Online Support Information Online Support Information 8 2 Introduction 8 2 ...
Page 303: ......

