background image

1-

1 Introduction

Introduction

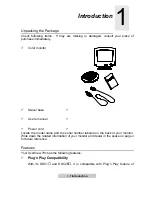
Unpacking the Package

Check following items.  If they are missing or damaged, consult your place of
purchase immediately.

ü


Color monitor

ü


Swivel base


ü


ü


User’s manual


ü


ü


Power cord

ü


Locate the model name and the serial number labeled on the back of your monitor.
Write down the related information of your monitor and dealer in the space on page ii
for future reference.

Features

Your AcerView 78c has the following features:

ü

 Plug’n Play Compatibility

With its DDC1

 and DDC2B

, it is compatible with Plug’n Play feature of

1

Summary of Contents for AcerView 78c

Page 1: ...AcerView 78c Color Monitor 17 43cm CRT Size 15 7 39 8cm Max Viewable Area User s Manual ...

Page 2: ...claims any warranties merchantability or fitness for any particular purpose Further Acer Peripherals Incorporated reserves the right to revise this publication and to make changes from time to time in the contents hereof without obligation of Acer Peripherals Incorporated to notify any person of such revision or changes Fill in here For the convenience of service write following related informatio...

Page 3: ... a plug having a third grounding pin This plug will only fit into a grounding type power outlet This is a safety feature If you are unable to insert the plug into the outlet contact your electrician to make the necessary outlet changes Never push objects of any kind or spill liquid of any kind into this product Do not attempt to service this product yourself as opening or removing covers may expos...

Page 4: ...following measures Reorient or relocate the receiving antenna Increase the separation between the equipment and receiver Connect the equipment into an outlet on a circuit different from that to which the receiver is connected Consult the dealer or an experienced radio television technician for help Notice The changes or modifications not expressly approved by the party responsible for compliance c...

Page 5: ...y 92 31 ECC These directives refer to EMC Canadian Department of Communications Regulatory Statement This digital apparatus does not exceed Class B limits for radio noise emissions from digital apparatus set out in the Radio Interference Regulations of the Canadian Department of Communications ...

Page 6: ...the Monitor 3 1 A Look at the Control Panel 3 1 Adjusting the Monitor 3 1 Panel key introduction 3 1 Selecting page and making adjustments 3 2 Page 1 Display control 3 2 Page 2 Degaussing and Color Weighting 3 3 Page 3 User Mode Display 3 4 Timing Setting 3 5 Reset to Defaults 3 5 Factory Preset Timings 3 6 Chapter 4 Troubleshooting and Useful Hints 4 1 Troubleshooting 4 1 Maintenance 4 2 Need Mor...

Page 7: ...se ü ü User s manual ü ü Power cord ü Locate the model name and the serial number labeled on the back of your monitor Write down the related information of your monitor and dealer in the space on page ii for future reference Features Your AcerView 78c has the following features ü Plug n Play Compatibility With its DDC1 and DDC2B it is compatible with Plug n Play feature of 1 ...

Page 8: ...1 2 Introduction Windows 95 ...

Page 9: ...nction The power management complies with VESA DPMS standard When the system is idle off mode the monitor automatically cuts its power consumption up to 95 ü Green Commitment Your monitor is packaged in recycled packing materials and no CFCs are used in the manufacturing process It is in compliance with the US government s Energy Star standards and the rigorous standards of the Scandinavian countr...

Page 10: ......

Page 11: ...ng the Swivel Base Place the monitor on its side Locate the arrow and the four slots at the bottom of the monitor As directed by the arrow inscribed on the swivel base insert the four pegs on the base into the slots at the bottom of the monitor 2 ...

Page 12: ...2 2 Getting Started Push the swivel base gently toward the front of the monitor until it is locked Place the monitor back to its normal position ...

Page 13: ...lug the signal cable into the video signal port of your computer and fix it with the two screws Connect the power cord to the monitor and attach it to power source Turn on the computer and the monitor F If you connect the monitor to an Apple Macintosh through a D Sub cable you need to buy a Macintosh adapter to connect the video signal port of your computer and the monitor signal cable ...

Page 14: ......

Page 15: ...ntrol panel to make necessary settings Panel key introduction Page switches between function control pages Three pages each containing its functions controls are available display control degaussing and color weighting user mode display Left Low adjusts the setting to left or to a lower value Right High adjusts the setting to right or to a higher value Select Save lets you select or save a setting...

Page 16: ...below P2 P Select s P1 Contrast Press to locate the page Press or to locate the desired function icon Press to select the icon Press or to adjust the setting Press to save the setting Repeat the steps above to change other settings Function Icons Contrast adjusts the difference between the light and dark areas V Size adjusts the vertical display height Brightness adjusts the brightness of the disp...

Page 17: ...e default factory color settings C1 to C5 You can adjust the settings manually by entering any default factory color setting To degauss Press to locate the page Press or to locate the function icon Press to select the function and degauss Press to save the status To adjust color weight Press to locate the page Press or to locate the default setting you prefer C1 C5 If you want to select the factor...

Page 18: ...ve factory defaults by re selecting the setting icon Following is the setting of each factory default Factory Default Color Temperature C1 9300K C2 6500K C3 5500K C4 7100K C5 11500K Page 3 User Mode Display This page shows the current resolution horizontal and vertical frequency status ...

Page 19: ...KHz to 86 KHz and vertical frequency from 50 Hz to 120 Hz However due to different resolution settings do not exceed the following maximum vertical refresh rate to avoid possible damages to your monitor Resolution Maximum Vertical Refresh Rate Hz 800 x 600 130 1024 x 768 106 1280 x 1024 80 F To set the timing and the refresh rate see the user s guide of your video card Reset to Defaults Press and ...

Page 20: ...VGA 640 x 400 70 31 47 VGA 640 x 480 60 31 47 VGA 640 x 480 75 37 50 VGA 640 x 480 85 43 27 VESA 800 x 600 75 46 88 VESA 1024 x 768 75 60 02 SVGA 800 x 600 72 48 09 SVGA 800 x 600 85 53 67 UVGA 1024 x 768 60 48 37 UVGA 1024 x 768 70 56 48 UVGA 1024 x 768 85 68 68 VESA 1280 x 1024 75 79 97 VESA 1280 x 960 85 85 93 ...

Page 21: ...o sync signal must be specified for the monitor q Power saving mode Press any key and move the mouse to deactivate the mode q Signal cable connector pins If there are bent or missing pins consult your place of purchase ü The picture is scrolling or unstable Check q Signal connector pin assignments Replace with a correct one if they are not operative q Signal cable connector pins If there are bent ...

Page 22: ... û û Do not attempt to open the monitor You may be hurt by electric shock For service call your place of purchase û û Do not use your monitor when magnets or electronic products are operating nearby û û Do not use harsh chemicals or strong cleaning solvents to clean the monitor screen Wipe it with clean soft clothes applied with mild solution û û Do not place anything on your monitor Bad ventilati...

Page 23: ...4 3 Troubleshooting and Useful Hints Need More Help If your problems remain after checking this manual please contact your place of purchase or e mail us at stevenleung api com tw ...

Page 24: ...solution 1280 x 1024 Horizontal Frequency 30 86 KHz Vertical Frequency 50 120 Hz Video Bandwidth 135MHz Video Input 15 pin mini D sub connector Adjustable Timing 13 factory preset 9 user mode User s Control Intelligent On Screen Display OSD 4 buttons X Radiation DHHS PTB Regulatory Compliance UL CSA FCC B TÜV Ergonomics MPRII VCCI CE ISO 9241 3 D N S F TCO 95 optional Plug Play DDC1 2B USB optiona...

Page 25: ...5 5 Specifications Humidity Operating Storage 20 90 10 90 Dimensions W x H x D 422 mm W x 440 mm H x 458 mm D Weight net 17 4 Kg ...

Reviews: