background image


6

Chapter 2 Display Controls 


General Instructions 

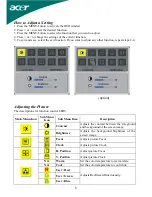
Press the power button to turn the monitor on or off. The other control buttons are located at front 
panel of the monitor (See Figure 2-1). By changing these settings, the picture can be adjusted to your 
personal preferences. 

z


The power cord should be connected. 

z


Connect the video cable from the monitor to the video card. 

z


Press the power button to turn on the monitor position. The power indicator will light up. 
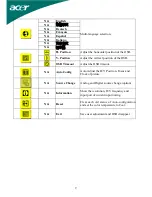
 

Figure 2-1 

External Controls 

Auto Adjust Key/Exit 

MENU/ENTER 

2 < 

5  LED 

3 > 

  / Power Key 

Summary of Contents for AL2416W

Page 1: ... Adjustment 4 Detaching LCD Monitor from Its Stand 4 Interface for Arm Applications 5 Connecting the Display 5 Connecting the AC Power 5 Power Management System 5 Chapter 2 Display Controls 6 General Instructions 6 Front Panel Control 7 How to Adjust a Setting 8 Adjusting the Picture 8 Chapter 3 Technical Information 10 Specifications 10 Standard Timing Table 13 Troubleshooting 15 English ...

Page 2: ...use harmful interference to radio communications However there is no guarantee that interference will not occur in a particular installation If this equipment does cause harmful interference to radio or television reception which can be determined by turning the equipment off and on the user is encouraged to try to correct the interference by one or more of the following measures Reposition or rel...

Page 3: ... damaged 7 Only use the supplied main lead to connect the monitor For a nominal current up to 6A and a device weight above 3 kg a line not lighter than H05VV F 3G 0 75 mm2 must be used Lamp Disposal LAMP S INSIDE THIS PRODUCT CONTAIN MERCURY AND MUST BE RECYCLED OR DISPOSED OF ACCORDING TO LOCAL STATE OR FEDERAL LAWS FOR MORE INFORMATION CONTACT THE ELECTRONIC INDUSTRIES ALLIANCE AT WWW EIAE ORG F...

Page 4: ... Monitor User s Manual Quick Setup Guide 1 8M Power Cord 1 8M Monitor to PC D SUB Cable 1 8M Monitor to PC DVI Cable option If you find that any of these items is missing or appears damaged contact your dealer immediately Viewing Angle Adjustment The LCD Monitor is designed to allow users to have a comfortable viewing angle The viewing angle can be adjusted from 5 to 15 See fig 1 1 Figure 1 1 Warn...

Page 5: ...nd of the signal cable to the LCD Monitor s D SUB or DVI option port See Fig 1 4 3 Connect the other end of the signal cable to the D SUB or DVI option port on your PC 4 Make sure connections are secure Figure 1 4 Connecting the AC Power 1 Connect the power cord to the LCD Monitor See Fig 1 5 2 Connect the power cord to an AC power source Figure 1 5 Power Management System This LCD Monitor complie...

Page 6: ...ee Figure 2 1 By changing these settings the picture can be adjusted to your personal preferences z The power cord should be connected z Connect the video cable from the monitor to the video card z Press the power button to turn on the monitor position The power indicator will light up Figure 2 1 External Controls 1 Auto Adjust Key Exit 4 MENU ENTER 2 5 LED 3 6 Power Key ...

Page 7: ...ivate the Auto Adjustment function The Auto Adjustment function is used to set the HPos VPos Clock and Focus NOTES Do not install the monitor in a location near heat sources such as radiators or air ducts or in a place subject to direct sunlight or excessive dust or mechanical vibration or shock Save the original shipping carton and packing materials as they will come in handy if you ever have to ...

Page 8: ...on Adjusting the Picture The descriptions for function control LEDS Main Menu Icon Sub Menu Icon Sub Menu Item Description Contrast Adjusts the contrast between the foreground and background of the screen image Brightness Adjusts the background brightness of the screen image Focus Adjusts picture Focus Clock Adjusts picture Clock H Position Adjust picture Focus V Position Adjust picture Clock N A ...

Page 9: ...on of the OSD OSD Timeout Adjust the OSD timeout N A Auto Config Auto Adjust the H V Position Focus and Clock of picture N A Source Change Analog and Digital source change option N A Information Show the resolution H V frequency and input port of current input timing N A Reset Clear each old status of Auto configuration and set the color temperature to Cool N A Exit Save user adjustment and OSD di...

Page 10: ...ge 1800 Vrms typical Lamp Current 6 0 mA rms typical Viewing Angle Vertical 178 Horizontal 178 Video Input Signal Input Impedance Polarity Amplitude Multi mode Supported Analogue RGB 0 7Vp p Digital TMDS 75 Ohm 2 Positive Negative 0 0 7 0 05 Vp Horizontal Frequency 24 80 KHz Vertical Frequency 49 75 Hz Control Power switch On Off switch with LED indicator OSD Brightness Contrast Horizontal Positio...

Page 11: ...nchronization Polarity Positive and negative Plug Play Supports VESA DDC2B functions External Connection Power Input AC input AC socket 1 8M with 15 pin D sub connector Video Cable 1 8M with DVI connector option Environment Operating Condition Storage Condition Temperature Relative Humidity Temperature Relative Humidity 5 C to 40 C 41 F to 104 F 20 to 80 20 C to 60 C 4 F to140 F 5 to 85 Power Supp...

Page 12: ...1 12 13 14 15 NC SDA H Sync V Sync SCL Digital Video Input Connector DVI D option Pin Assignment of DVI D connector 1 TX2 9 TX1 17 TX0 2 TX2 10 TX1 18 TX0 3 Shield TX2 TX4 11 Shield TX1 TX3 19 Shield TX0 TX5 4 NC 12 NC 20 NC 5 NC 13 NC 21 NC 6 DDC Serial Clock 14 5V power 22 Shield TXC 7 DDC Serial Data 15 Ground 5V 23 TXC 8 NC 16 Hot plug detect 24 TXC Pin assignment for DVI D Connector option ...

Page 13: ...x480 37 861 832 640 40 16 120 31 5 VESA 480 72Hz 72 809 520 480 3 1 20 640x480 37 5 840 640 64 16 120 31 5 VESA 480 75Hz 75 500 480 3 1 16 720x400 31 469 900 720 108 18 54 28 322 VGA 400 TEXT 70 087 449 400 2 12 35 832x624 49 725 1152 832 64 32 224 57 2832 APPLE MAC 800 74 55 667 624 3 1 39 800x600 35 156 1024 800 72 24 128 36 SVGA 56 25 625 600 2 1 22 800x600 37 879 1056 800 128 40 88 40 VESA 600...

Page 14: ... 1 36 75 00 1800 1280 112 96 312 135 00 1280x960 75Hz 75 00 1000 960 3 1 36 1280x1024 64 1688 1280 112 48 248 108 VESA 1024 60Hz 60 1066 1024 3 1 38 1280x1024 80 1688 1280 144 16 248 135 VESA 1024 75Hz 75 1066 1024 3 1 38 1600x1200 75 2160 1600 192 64 304 162 VGSA 1200 60Hz 60 1250 1200 50 1 46 1920x1200 74 6 2592 1920 200 136 336 193 VGSA 1200 60Hz 60 1245 1200 6 3 36 Note Mode 640x350 640x400 an...

Page 15: ...he normal PC operating environment PROBLEM There is no picture on LCD Monitor If there s no picture on the LCD Monitor please perform the following steps 1 Make sure the power indicator on the LCD Monitor is ON all connections are secured and the system is running on the correct timing Refer to Chapter 3 for information on timing 2 Turn off the LCD Monitor and then turn it back on again If there i...

Reviews: