3 System upgrade
60
6
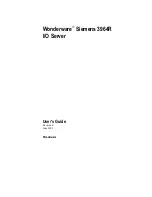
Press down the retainer lever to lock the CPU in place
(2)
.
7
Apply approximately 0.1ml of the thermal grease compound to
the top of the CPU.
8
Move the handle of the retaining clip slightly in a direction away
from the heatsink.
9
Align the heatsink fan assembly to the heatsink base
(1)
.
Note:
Make sure to install both sides of the retention clips.
10 Secure the retaining clip to the tabs in the heatsink base by
aligning the clip holes over the tabs
(2)
.
Summary of Contents for Altos G5350
Page 1: ...Acer Altos G5350 Series User s Guide ...
Page 10: ...x ...
Page 11: ...1 System tour ...
Page 31: ...21 5 4 pin power cable connector 6 I2 C bus interface connector No Code Description ...
Page 32: ...1 System tour 22 ...
Page 33: ...2 System setup ...
Page 43: ...3 System upgrade ...
Page 88: ...3 System upgrade 78 ...
Page 89: ...4 BIOS setup ...
Page 123: ...113 Save Changes Saves changes made in the BIOS setup Parameter Description ...
Page 124: ...4 BIOS setup 114 ...
Page 125: ...5 Troubleshooting ...
Page 136: ...5 Troubleshooting 126 ...
Page 137: ...Appendix A System management utility ...
Page 144: ...Appendix A System management utility 134 ...
Page 145: ...Appendix B Acer Altos G5350 rack installation guide ...
Page 146: ...This appendix shows you how to set up the Altos G5350 server in a rack mount configuration ...
Page 161: ...Appendix C SCSI RAID configuration ...
Page 162: ...This appendix shows you how to create a RAID volume in your SCSI drives ...