

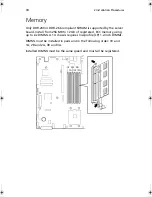
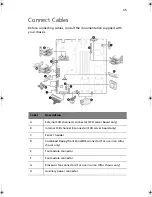


1 Description
22
Security
Intrusion Switch Monitoring
To help prevent unauthorized entry or use of the server, Acer Advance
Server Management server management software monitors the chassis
intrusion switch if one is installed. Opening an access cover will
transmit an alarm signal to the server board, where BMC firmware and
server management software process the signal. The system can be
configured through ASMe to respond to an intrusion a number of
ways, including powering down or locking the keyboard.
Software Locks
The BIOS Setup and the System Setup Utility (SSU) provide a number of
security features to prevent unauthorized or accidental access to the
system. Once the security measures are enabled, you can access the
system only after you enter the correct password(s). For example:
•
Enable the keyboard lockout timer so that the server requires a
password to reactivate the keyboard and mouse after a specified
time out period¾1 to 120 minutes.
•
Set and enable a supervisor password.
•
Set and enable a user password.
•
Set secure mode to prevent keyboard or mouse input and to
prevent use of the front panel reset and power switches.
•
Activate a hot key combination to enter secure mode quickly.
•
Disable writing to the diskette drive when secure mode is set.
•
Disable access to the boot sector of the operating system hard disk
drive.
Using Passwords
You can set either the user password, the supervisor password, or both
passwords. If only the user password is set, you:
•
Must enter the user password to enter BIOS Setup or the SSU.
•
Must enter the user password to boot the server if Password on
Boot is enabled in either the BIOS Setup or SSU.
BS811.f/cppl!!Qbhf!33!!Uvftebz-!Opwfncfs!37-!3113!!21;19!BN
Summary of Contents for Altos R700 Series
Page 1: ...Altos R700 Series User s guide ...
Page 10: ...x ...
Page 11: ...1 Description ...
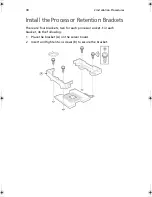
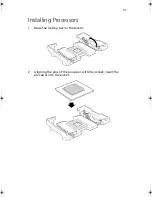
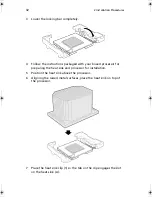
Page 37: ...2 Installation Procedures ...
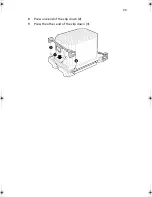
Page 43: ...33 8 Press one end of the clip down 2 9 Press the other end of the clip down 3 ...
Page 48: ...2 Installation Procedures 38 ...
Page 49: ...3 Upgrading ...
Page 54: ...3 Upgrading 44 ...
Page 55: ...4 Configuration Software and Utilities ...
Page 56: ...4 Configuration Software and Utilities 46 ...
Page 63: ...53 4 Press Enter 5 The boot process continues When finished a system prompt displays ...
Page 90: ...4 Configuration Software and Utilities 80 ...
Page 91: ...5 Solving Problems ...
Page 94: ...5 Solving Problems 84 hardware and operating system list on the Acer Customer Support website ...
Page 105: ...6 Technical Reference ...
Page 106: ...6 Technical Reference 96 ...
Page 124: ...6 Technical Reference 114 ...
Page 125: ...Appendix A Equipment Log and Power Consumption Worksheets ...
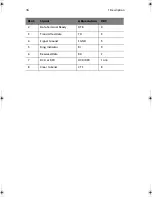
Page 127: ...117 Hard Disk Drive 5 Item Manufacturer Name and Model Name Serial Number Date Installed ...
Page 132: ...Appendix A Equipment Log and Power Consumption Worksheets 122 ...


