

41
Cautions
These warnings and cautions apply throughout this chapter. Only a
technically qualified person should configure the server board.
Cautions
:
System power on/off
: The power button DOES NOT completely
turn off the system AC power, 5V standby is still active whenever
the system is plugged in. To remove power from system, you must
unplug the AC power cord from the wall outlet. Make sure the AC
power cord is unplugged before you open the chassis, add, or
remove any components.
Hazardous conditions, devices & cables
: Hazardous electrical
conditions may be present on power, telephone, and
communication cables. Turn off the server and disconnect the
power cord, telecommunications systems, networks, and modems
attached to the server before opening it. Otherwise, personal
injury or equipment damage can result.
Electrostatic discharge (ESD) & ESD protection
: ESD can
damage disk drives, boards, and other parts. We recommend that
you perform all procedures in this chapter only at an ESD
workstation. If one is not available, provide some ESD protection
by wearing an antistatic wrist strap attached to chassis ground
(any unpainted metal surface) on your server when handling
parts.
ESD and handling boards
: Always handle boards carefully. They
can be extremely sensitive to ESD. Hold boards only by their
edges. After removing a board from its protective wrapper or
from the server, place the board component side up on a
grounded, static free surface. Use a conductive foam pad if
available but not the board wrapper. Do not slide board over any
surface.
Installing or removing jumpers
: A jumper is a small plastic
encased conductor that slips over two jumper pins. Some jumpers
have a small tab on top that you can grip with your fingertips or
with a pair of fine needle nosed pliers. If your jumpers do not
have such a tab, take care when using needle nosed pliers to
BS811.f/cppl!!Qbhf!52!!Uvftebz-!Opwfncfs!37-!3113!!21;19!BN
Summary of Contents for Altos R700 Series
Page 1: ...Altos R700 Series User s guide ...
Page 10: ...x ...
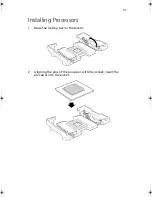
Page 11: ...1 Description ...
Page 37: ...2 Installation Procedures ...
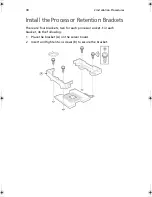
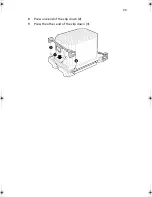
Page 43: ...33 8 Press one end of the clip down 2 9 Press the other end of the clip down 3 ...
Page 48: ...2 Installation Procedures 38 ...
Page 49: ...3 Upgrading ...
Page 54: ...3 Upgrading 44 ...
Page 55: ...4 Configuration Software and Utilities ...
Page 56: ...4 Configuration Software and Utilities 46 ...
Page 63: ...53 4 Press Enter 5 The boot process continues When finished a system prompt displays ...
Page 90: ...4 Configuration Software and Utilities 80 ...
Page 91: ...5 Solving Problems ...
Page 94: ...5 Solving Problems 84 hardware and operating system list on the Acer Customer Support website ...
Page 105: ...6 Technical Reference ...
Page 106: ...6 Technical Reference 96 ...
Page 124: ...6 Technical Reference 114 ...
Page 125: ...Appendix A Equipment Log and Power Consumption Worksheets ...
Page 127: ...117 Hard Disk Drive 5 Item Manufacturer Name and Model Name Serial Number Date Installed ...
Page 132: ...Appendix A Equipment Log and Power Consumption Worksheets 122 ...


