


3 Upgrading
42
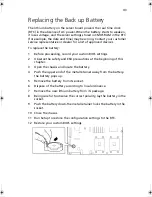
remove or install a jumper; grip the narrow sides of the jumper
with the pliers, never the wide sides. Gripping the wide sides can
damage the contacts inside the jumper, causing intermittent
problems with the function controlled by that jumper. Take care
to grip with, but not squeeze, the pliers or other tool you use to
remove a jumper, or you may bend or break the stake pins on the
board.
BS811.f/cppl!!Qbhf!53!!Uvftebz-!Opwfncfs!37-!3113!!21;19!BN
Summary of Contents for Altos R700 Series
Page 1: ...Altos R700 Series User s guide ...
Page 10: ...x ...
Page 11: ...1 Description ...
Page 37: ...2 Installation Procedures ...
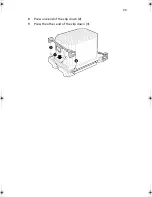
Page 43: ...33 8 Press one end of the clip down 2 9 Press the other end of the clip down 3 ...
Page 48: ...2 Installation Procedures 38 ...
Page 49: ...3 Upgrading ...
Page 54: ...3 Upgrading 44 ...
Page 55: ...4 Configuration Software and Utilities ...
Page 56: ...4 Configuration Software and Utilities 46 ...
Page 63: ...53 4 Press Enter 5 The boot process continues When finished a system prompt displays ...
Page 90: ...4 Configuration Software and Utilities 80 ...
Page 91: ...5 Solving Problems ...
Page 94: ...5 Solving Problems 84 hardware and operating system list on the Acer Customer Support website ...
Page 105: ...6 Technical Reference ...
Page 106: ...6 Technical Reference 96 ...
Page 124: ...6 Technical Reference 114 ...
Page 125: ...Appendix A Equipment Log and Power Consumption Worksheets ...
Page 127: ...117 Hard Disk Drive 5 Item Manufacturer Name and Model Name Serial Number Date Installed ...
Page 132: ...Appendix A Equipment Log and Power Consumption Worksheets 122 ...


