


4 Configuration Software and Utilities
58
•
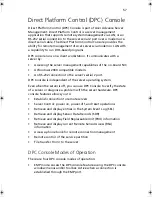
DPC over LAN mode. Access the DPC console features using the
DPC console window menus and/or toolbar. Active when a
connection is established through the LAN.
•
Re-direct mode. Active when the server is running BIOS console
redirection. In this mode, the DPC console launches a separate
window. The window operates as an ANSI terminal and
communicates with the server through the port. Character-based
commands you type in the DPC Console go directly to the server,
and the DPC Console displays the text that you would normally see
on the server console.
To use this mode, you must configure the Console Redirection
option of BIOS Setup for Redirect mode. Enabling Console
Redirection requires that the Boot Time Diagnostics Screen be
Enabled in BIOS Setup. If the redirection window does not display
information, the Console Redirection is either incorrectly
configured or disabled, the EMP is disabled in BIOS Setup, or the
server is in protected mode. For DPC to function, the server must
NOT be in graphics mode.
•
If the DPC console fails to connect in EMP within 10 seconds and
the server can operate in Redirect mode, a prompt is displayed
with the option to switch to Re-direct mode.
•
Service Partition mode. Entered when the server reboots from the
service partition and the DPC Console has successfully connected to
the server through a modem. This mode allows running of DOS-
based programs that are stored on the service partition and
transferring of files.
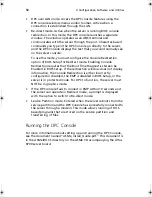
Running the DPC Console
For more information about setting up and running the DPC Console,
see the document named “ASMe_Install_Guide.pdf.” This document is
in the ASMe\DOCS directory on the ASMe CD accompanying the Altos
R700 server board.
BS811.f/cppl!!Qbhf!69!!Uvftebz-!Opwfncfs!37-!3113!!21;19!BN
Summary of Contents for Altos R700 Series
Page 1: ...Altos R700 Series User s guide ...
Page 10: ...x ...
Page 11: ...1 Description ...
Page 37: ...2 Installation Procedures ...
Page 43: ...33 8 Press one end of the clip down 2 9 Press the other end of the clip down 3 ...
Page 48: ...2 Installation Procedures 38 ...
Page 49: ...3 Upgrading ...
Page 54: ...3 Upgrading 44 ...
Page 55: ...4 Configuration Software and Utilities ...
Page 56: ...4 Configuration Software and Utilities 46 ...
Page 63: ...53 4 Press Enter 5 The boot process continues When finished a system prompt displays ...
Page 90: ...4 Configuration Software and Utilities 80 ...
Page 91: ...5 Solving Problems ...
Page 94: ...5 Solving Problems 84 hardware and operating system list on the Acer Customer Support website ...
Page 105: ...6 Technical Reference ...
Page 106: ...6 Technical Reference 96 ...
Page 124: ...6 Technical Reference 114 ...
Page 125: ...Appendix A Equipment Log and Power Consumption Worksheets ...
Page 127: ...117 Hard Disk Drive 5 Item Manufacturer Name and Model Name Serial Number Date Installed ...
Page 132: ...Appendix A Equipment Log and Power Consumption Worksheets 122 ...


