


59
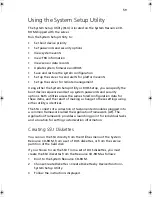
Using the System Setup Utility
The System Setup Utility (SSU) is located on the System Resource CD-
ROM shipped with the server.
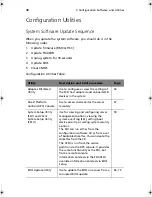
Run the System Setup Utility to:
•
Set boot device priority
•
Set passwords and security options
•
View system events
•
View FRU information
•
View sensor data records
•
Update system firmware and BIOS
•
Save and restore the system configuration
•
Set up the server to send alerts for platform events
•
Set up the server for remote management
Using either the System Setup Utility or BIOS Setup, you can specify the
boot device sequence and set up system passwords and security
options. Both utilities access the same stored configuration data for
these items, and the result of making a change to these settings using
either utility is identical.
The SSU consists of a collection of task-oriented modules plugged into
a common framework called the Application Framework (AF). The
Application Framework provides a launching point for individual tasks
and a location for setting customization information.
Creating SSU Diskettes
You can run the SSU directly from the Utilities menu of the System
Resource CD-ROM, from a set of DOS diskettes, or from the service
partition of the hard disk.
If you choose to run the SSU from a set of DOS diskettes, you must
create the SSU diskettes from the Resource CD-ROM as follows:
1
Boot to the System Resource CD-ROM.
2
Choose Create Diskettes > Create Diskettes by Device/Function >
System Setup Utility.
3
Follow the instructions displayed.
BS811.f/cppl!!Qbhf!6:!!Uvftebz-!Opwfncfs!37-!3113!!21;19!BN
Summary of Contents for Altos R700 Series
Page 1: ...Altos R700 Series User s guide ...
Page 10: ...x ...
Page 11: ...1 Description ...
Page 37: ...2 Installation Procedures ...
Page 43: ...33 8 Press one end of the clip down 2 9 Press the other end of the clip down 3 ...
Page 48: ...2 Installation Procedures 38 ...
Page 49: ...3 Upgrading ...
Page 54: ...3 Upgrading 44 ...
Page 55: ...4 Configuration Software and Utilities ...
Page 56: ...4 Configuration Software and Utilities 46 ...
Page 63: ...53 4 Press Enter 5 The boot process continues When finished a system prompt displays ...
Page 90: ...4 Configuration Software and Utilities 80 ...
Page 91: ...5 Solving Problems ...
Page 94: ...5 Solving Problems 84 hardware and operating system list on the Acer Customer Support website ...
Page 105: ...6 Technical Reference ...
Page 106: ...6 Technical Reference 96 ...
Page 124: ...6 Technical Reference 114 ...
Page 125: ...Appendix A Equipment Log and Power Consumption Worksheets ...
Page 127: ...117 Hard Disk Drive 5 Item Manufacturer Name and Model Name Serial Number Date Installed ...
Page 132: ...Appendix A Equipment Log and Power Consumption Worksheets 122 ...


