

63
1
From the SSU Main window, choose
Security
.
2
Click the
User Password
button.
3
If you are changing passwords, enter the old password in the first
box.
4
Enter the new password (or leave blank to clear).
5
Confirm the password by entering it again (or leave blank to
clear).
6
Click
OK
to save the password and return to the Security window.
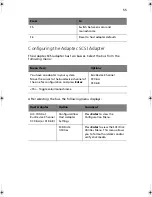
Setting Security Options
For a description of security features, see “Security” on page 22.
To set the security options:
1
In the Security window, click the
Options
button.
2
For each option, select the desired setting from the list. The
options are:
•
Security Hot Key
: The key combination that can be used to
put the server into secure mode.
•
Secure Mode Timer
: If no keyboard or mouse activity occurs
during the chosen time interval, the server enters secure
mode.
•
Secure Mode Boot
: Enable forces the server to boot directly
into secure mode.
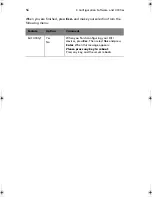
•
Video Blanking
: Enable turns off the video when the server is
in secure mode.
•
Floppy Write
: Enable prevents writing to the diskette drive
while the server is in secure mode.
•
Power Switch Inhibit
: Enable prevents the power and reset
buttons from functioning when the server is in secure mode.
Disable allows the power and reset buttons to function
normally when the server is in secure mode.
3
Click
Save
to save the settings and return to the Security window.
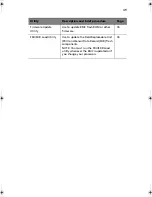
Viewing the System Event Log
To view the System Event Log (SEL):
BS811.f/cppl!!Qbhf!74!!Uvftebz-!Opwfncfs!37-!3113!!21;19!BN
Summary of Contents for Altos R700 Series
Page 1: ...Altos R700 Series User s guide ...
Page 10: ...x ...
Page 11: ...1 Description ...
Page 37: ...2 Installation Procedures ...
Page 43: ...33 8 Press one end of the clip down 2 9 Press the other end of the clip down 3 ...
Page 48: ...2 Installation Procedures 38 ...
Page 49: ...3 Upgrading ...
Page 54: ...3 Upgrading 44 ...
Page 55: ...4 Configuration Software and Utilities ...
Page 56: ...4 Configuration Software and Utilities 46 ...
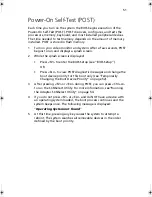
Page 63: ...53 4 Press Enter 5 The boot process continues When finished a system prompt displays ...
Page 90: ...4 Configuration Software and Utilities 80 ...
Page 91: ...5 Solving Problems ...
Page 94: ...5 Solving Problems 84 hardware and operating system list on the Acer Customer Support website ...
Page 105: ...6 Technical Reference ...
Page 106: ...6 Technical Reference 96 ...
Page 124: ...6 Technical Reference 114 ...
Page 125: ...Appendix A Equipment Log and Power Consumption Worksheets ...
Page 127: ...117 Hard Disk Drive 5 Item Manufacturer Name and Model Name Serial Number Date Installed ...
Page 132: ...Appendix A Equipment Log and Power Consumption Worksheets 122 ...


