4-6
Troubleshooting
4.
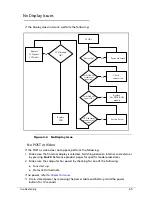
Connect the power and reboot the computer.
5.
Connect an external monitor to the computer and switch between the internal
display and the external display is by pressing
Fn+F5
.
6.
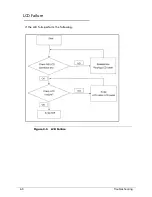
If the POST or video appears on the external display only, refer to
LCD Failure
.
7.
Disconnect power and all external devices including port replicators or docking
stations. Remove any memory cards and CD/DVD discs.
8.
Start the computer. If the computer boots correctly, add the devices one by one until
the failure point is discovered.
9.
Reseat the memory modules.
10.
Remove the drives (refer to
Maintenance Flowchart
).
11.
If the Issue is still not resolved, refer to
Online Support Information
.
Abnormal Video
0
If the video appears abnormal, perform the following:
1.
Boot the computer.
If permanent vertical/horizontal lines or dark spots appear in the same location,
the LCD is faulty and should be replaced. Refer to Disassembly Process.
If extensive pixel damage is present (different colored spots in the same locations
on the screen), the LCD is faulty and should be replaced. Refer to
Maintenance
Flowchart
.
NOTE:
NOTE
:
Make sure that the computer is not running on battery alone as this may reduce
display brightness.
2.
Adjust the brightness to its highest level. Refer to the User Manual for instructions on
adjusting the settings. If the display is too dim at the highest brightness setting, the
LCD is faulty and should be replaced. Refer to
Disassembly Process
.
3.
Check the display resolution is correctly configured:
Minimize or close all Windows.
If display size is only abnormal in an application, check the view settings and
control/mouse wheel zoom feature in the application.
If desktop display resolution is not normal, right-click on the desktop and select
Personalize Display Settings
.
Click and drag the Resolution slider to the desired resolution.
Click
Apply
and check the display. Readjust if necessary.
4.
Roll back the video driver to the previous version if updated.
5.
Remove and reinstall the video driver.
6.
Check the Device Manager to determine that:
The device is properly installed. There are no red Xs or yellow exclamation marks
There are no device conflicts
No hardware is listed under
Other Devices
7.
If the Issue is still not resolved, refer to
Online Support Information
.
8.
Run the
Windows Memory Diagnostic
from the operating system DVD and follow the
on-screen prompts.
Summary of Contents for AOD257
Page 1: ...Aspire One D257 Happy 2 SERVICEGUIDE ...
Page 10: ...x ...
Page 11: ...CHAPTER 1 Hardware Specifications ...
Page 14: ...1 4 ...
Page 55: ...CHAPTER 2 System Utilities ...
Page 81: ...CHAPTER 3 Machine Maintenance Procedures ...
Page 83: ...3 3 Camera Module Installation 3 40 ...
Page 84: ...3 4 ...
Page 107: ...Machine Maintenance Procedures 3 27 ID Size Quantity Screw Type C M2 0 3 0 NI 2 ...
Page 116: ...3 36 Machine Maintenance Procedures Figure 3 33 LCD Panel ...
Page 121: ...CHAPTER 4 Troubleshooting ...
Page 127: ...Troubleshooting 4 7 9 If the issue is still not resolved refer to Online Support Information ...
Page 144: ...4 24 Troubleshooting ...
Page 145: ...CHAPTER 5 Jumper and Connector Locations ...
Page 152: ...5 8 Jumper and Connector Locations ...
Page 153: ...CHAPTER 6 FRU Field Replaceable Unit List ...
Page 154: ...6 2 Exploded Diagrams 6 4 FRU List 6 7 Screw List 6 28 ...
Page 181: ...CHAPTER 7 Model Definition and Configuration ...
Page 182: ...1 2 Aspire One D257 7 1 Aspire One Happy 2 7 109 ...
Page 388: ...7 206 Model Definition and Configuration ...
Page 389: ...CHAPTER 8 Test Compatible Components ...
Page 390: ...8 2 Microsoft Windows 7 Environment Test 8 4 ...
Page 398: ...8 10 Test Compatible Components ...
Page 399: ...Test Compatible Components 8 11 ...
Page 400: ...8 12 Test Compatible Components ...
Page 401: ...CHAPTER 9 Online Support Information ...
Page 402: ...9 2 Introduction 9 3 ...
Page 404: ...9 4 Online Support Information ...


