background image

Chapter 4

77

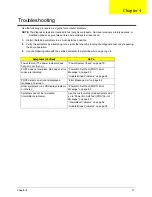
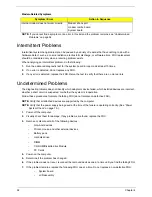
Use the following procedure as a guide for computer problems.

NOTE: 

The diagnostic tests are intended to test only Acer products. Non-Acer products, prototype cards, or 

modified options can give false errors and invalid system responses.

1.

Obtain the failing symptoms in as much detail as possible.

2.

Verify the symptoms by attempting to re-create the failure by running the diagnostic test or by repeating 
the same operation.

3.

Use the following table with the verified symptom to determine which page to go to.

Symptoms (Verified)

Go To

Power failure. (The power indicator does 
not go on or stay on.)

“Power System Check” on page 79.

POST does not complete. No beep or error 
codes are indicated.

“Power-On Self-Test (POST) Error 
Message” on page 80

“Undetermined Problems” on page 92

POST detects an error and displayed 
messages on screen.

“Error Message List” on page 82

Other symptoms (i.e. LCD display problems 
or others).

“Power-On Self-Test (POST) Error 
Message” on page 80

Symptoms cannot be re-created 
(intermittent problems).

Use the customer-reported symptoms and 
go to “Power-On Self-Test (POST) Error 
Message” on page 80

“Intermittent Problems” on page 92

“Undetermined Problems” on page 92

Troubleshooting

Chapter 4

Summary of Contents for Aspire 4350

Page 1: ...Aspire 4750 and 4750G Series Service Guide PRINTED IN TAIWAN Service guide files and updates are available on the ACER CSD web for more information please refer to http csd acer com tw ...

Page 2: ...II Revision History Please refer to the table below for the updates made on Aspire 4750 and 4750G Series service guide Date Chapter Updates ...

Page 3: ...r expressed or implied with respect to the contents hereof and specifically disclaims any warranties of merchantability or fitness for any particular purpose Any Acer Incorporated software described in this manual is sold or licensed as is Should the programs prove defective following their purchase the buyer and not Acer Incorporated its distributor or its dealer assumes the entire cost of all ne...

Page 4: ... bits and pieces of additional information related to the current topic WARNING Alerts you to any damage that might result from doing or not doing specific actions CAUTION Gives precautionary measures to avoid possible hardware or software problems IMPORTANT Reminds you to do specific actions relevant to the accomplishment of procedures ...

Page 5: ... NOT be covered in this generic service guide In such cases please contact your regional offices or the responsible personnel channel to provide you with further technical details 2 Please note WHEN ORDERING FRU PARTS that you should check the most up to date information available on your regional web or channel If for whatever reason a part number change is made it will not be noted in the printe...

Page 6: ...VI ...

Page 7: ...s 34 External Module Disassembly Process 35 External Modules Disassembly Flowchart 35 Removing the Battery Pack 36 Removing the Optical Drive Module 37 Removing the Back Cover 38 Removing the Hard Disk Drive Module 39 Removing the Wireless LAN Card 40 Removing the DIMM Module 42 Main Unit Disassembly Process 43 Main Unit Disassembly Flowchart 43 Removing the Keyboard 44 Separating the Upper Case f...

Page 8: ...heck 78 Memory Check 79 Power System Check 79 Touchpad Check 80 Power On Self Test POST Error Message 80 Index of Error Messages 81 Phoenix BIOS Beep Codes 85 Index of Symptom to FRU Error Message 89 Intermittent Problems 92 Undetermined Problems 92 Main Board 93 Connector Locations 93 Clearing Password Check and BIOS Recovery 96 Clearing Password Check 96 BIOS Recovery by Crisis Disk 97 FRU Field...

Page 9: ...port Up to 4 GB of DDR3 1066 MHz memory upgradeable to 8 GB using two soDIMM modules Display 14 LED WXGA Graphics NVidia N12PGS N12PGV Integrated Intel Graphics Media Accelerator GMA HD Screen resolution support For UMA 1366 768 1360 768 1280 768 1280 720 1024 768 800 600 For Discrete 1366 768 1360 768 1280 768 1280 720 1024 768 800 600 HDMI Max Resolution 1900 1200 D Sub Max Resolution 2560 1600 ...

Page 10: ...ort for digital speakers MS Sound compatible Built in microphones Communication Integrated Acer Crystal Eye webcam WLAN IEEE 802 11b g n LAN Gigabit Ethernet Wake on LAN ready I O Ports Multi in 1 card reader SD MMC MS MS PRO xD USB ports 2 x 2 0 1 x 3 0 HDMI port with HDCP support External display VGA port Headphones speaker line out jack with S PDIF support Microphone in jack Line in jack Ethern...

Page 11: ...ches Weight 2 2 kg 4 85 lbs for UMA model 2 3 kg 5 07 lbs for Discreet model NOTE 1 means only for certain models 2 The specifications listed above are for reference only The exact configuration of your PC depends on the model purchased ...

Page 12: ...N Right Side USB x 1 CAMERA 49 MIC IN Mini Card 802 11a b g LVDS Dual Channel CRT Intel 56 LCD RGB CRT ODD 56 14 USB 2 0 1 1 ports High Definition Audio SATA x 2 SATA ports 6 ACPI 1 1 LPC I F HDD SD MMC MS MS Pro xD Azalia CODEC USB2 0 x 4 29 2CH SPEAKER HP1 Internal Analog MIC ETHERNET 10 100 1000Mb NPCE795P PCIE ports 8 NUVOTON 28 DDR3 800MHz 2GB 1GB 512MB Fan VRAM 27 49 17 18 19 20 21 22 23 24 ...

Page 13: ...on Turns the computer on and off 4 Keyboard For entering data into your computer 5 Touchpad Touch sensitive pointing device which functions like a computer mouse 6 HDD indicator Indicates when the hard disk drive is active Communication indicator Indicates the computer s wireless connectivity device status Power indicator Indicates the computer s power status Battery indicator Indicates the comput...

Page 14: ...omputer in Sleep mode Fn F5 Display toggle Switches display output between the display screen external monitor if connected and both Fn F6 Screen blank Turns the display screen backlight off to save power Press any key to return Fn F7 Touchpad toggle Turns the internal touchpad on and off Fn F8 Speaker toggle Turns the speakers on and off Fn Brightness up Increases the screen brightness Fn Brightn...

Page 15: ...device status Power indicator Indicates the computer s power status Battery indicator Indicates the computer s battery status 1 Charging The light shows amber when the battery is charging 2 Fully charged The light shows blue when in AC mode Item Description 1 Battery bay Houses the computer s battery pack Icon Item Description 1 DC in jack Connects to an AC adapter 2 Ethernet RJ 45 port Connects t...

Page 16: ...8 Chapter 1 5 USB 2 0 port Connect to USB 2 0 devices e g USB mouse USB camera Icon Item Description ...

Page 17: ...disk access indicator Lights up when the optical drive is active 5 Optical drive eject button Ejects the optical disk from the drive 6 Emergency eject hole Ejects the optical drive tray when the computer is turned off Note Insert a paper clip to the emergency eject hole to eject the optical drive tray when the computer is off 7 Kensington lock slot Connects to a Kensington compatible computer secu...

Page 18: ...pter 1 2 Battery release latch Releases the battery for removal 4 Memory compartment Houses the computer s main memory 5 Hard disk bay Houses the computer s hard disk secured with screws Icon Item Description ...

Page 19: ...00 40 BIOS Item Specification BIOS vendor Phoenix BIOS Version 1 0 Supported protocol ACPI 1 0b 2 0 3 0 compliance PCI 2 2 System HDD Password Security Control INT 13H Extenstions PnP BIOS 1 0a SMBIOS 2 4 BIOS Boot Specification Simple Boot Flag 1 0 Boot Block PCI Bus Power Management Interface Specification USB Specification 1 1 2 0 IEEE 1394 1 0 USB 1394 CD ROM Boot Up support PC Card Standard 1...

Page 20: ...B 2048MB 2048MB 1024MB 0MB 1024MB 1024MB 1024MB 2048MB 1024MB 2048MB 3072MB 2048MB 0MB 2048MB 2048MB 1024MB 3072MB 2048MB 2048MB 4096MB Item Specification LAN Chipset Broadcom BCM 57785 Supports LAN protocol 10 100 1000 Mbps LAN connector type RJ45 LAN connector location Left side Features Integrated 10 100 BASE T transceiver Wake on LAN support compliant with ACPI 2 0 PCI v2 2 Bluetooth Interface...

Page 21: ...RPM Performance Specifications Buffer size 8MB 8MB 8MB 16MB 16MB Interface SATA SATA SATA SATA SATA Max media transfer rate disk buffer Mbytes s 875 Max 3 0 Gbit s Buffer host data transfer 875 Max 3 0 Gbit s Buffer host data transfer 875 Max 3 0 Gbit s Buffer host data transfer Max 3 0 Gbit s Buffer host data transfer Max 3 0 Gbit s Buffer host data transfer DC Power Requirements Voltage toleranc...

Page 22: ...Video Book 1 1 DVD R Book 1 0 3 9G DVD R Book 2 0 4 7G General Authoring DVD R Version 1 0 DVD RW DVD RW Non CPRM CPRM DVD R Dual Loading mechanism Load Manual Release a Electrical Release Release Button b Release by ATAPI command c Emergency Release Power Requirement Input Voltage 5 V 5 Operating Blu Ray Disc Drive Item Specification Vendor model name W O BEZEL FOR WINDOWS7 1 HLDS BD COMBO 12 7mm...

Page 23: ...S US RW DVD DVD ROM Book 1 02 DVD Dual DVD Video Book 1 1 DVD R Book 1 0 3 9G DVD R Book 2 0 4 7G General Authoring DVD R Version 1 0 DVD RW DVD RW Non CPRM CPRM DVD R Dual Blu Ray BD R BD R DL BD RE BD RE DL Loading mechanism Load Manual Release a Electrical Release Release Button b Release by ATAPI command c Emergency Release Power Requirement Input Voltage 5 V 5 Operating Audio Interface Item S...

Page 24: ...ry Type Li ion Pack capacity 4400Ah Number of battery cell 6 Package configuration 3 cells in series 2 series in parallel LCD 14 inch Item Specification Vendor model name AUO CMI LG Samsung Screen Diagonal mm 14 inches Display resolution pixels 14 WXGA Glare Pixel Pitch 0 204 x 0 204 Pixel Arrangement R G B Vertical Stripe Display Mode Normally White Typical White Luminance NIT also called Brightn...

Page 25: ... OS initiated shutdown All devices in the system are turned off completely Working G0 S0 Individual devices such as the CPU and hard disc may be power managed in this state Suspend to RAM S3 CPU set power down VGA Suspend PCMCIA Suspend Audio Power Down Hard Disk Power Down CD ROM Power Down Super I O Low Power mode Save to Disk S4 Also called Hibernation Mode System saves all system states and da...

Page 26: ...18 Chapter 1 ...

Page 27: ...ithout entering BIOS Setup Utility please set the parameter to enabled Press F12 during POST to enter multi boot menu In this menu user can change boot device without entering BIOS SETUP Utility Phoenix SecureCore Tiano Setup Main CPU Type CPU Speed IDE0 Model Name IDE0 Serial Number ATAPI Model Name System BIOS Version VGA BIOS Version KBC Version Serial Number Asset Tag Number Product Name Manuf...

Page 28: ...ss Esc while you are in any of the menu options to go to the Exit menu In any menu you can load default settings by pressing F9 You can also press F10 to save any changes made and exit the BIOS Setup Utility NOTE You can change the value of a parameter if it is enclosed in square brackets Navigation keys for a particular menu are shown on the bottom of the screen Help for parameters are found in t...

Page 29: ...t Tag Number This field displays the asset tag number of the system Product Name This field shows product name of the system Manufacturer Name This field displays the manufacturer of this system UUID Number Universally Unique Identifier UUID is an identifier standard used in software construction standardized by the Open Software Foundation OSF as part of the Distributed Computing Environment DCE ...

Page 30: ...tem Specific Help Tab Shift Tab or Enter selects field System Time System Date Total Memory Video Memory Quiet Boot Network Boot F12 Boot Menu D2D Recovery SATAMode F1 Esc Help Exit Select Item Select Menu Change Values Select Sub Menu Enter F9 F10 Setup Defaults Save and Exit Information Security Boot Exit 10 10 11 23 2010 6144 KB 2048 MB Enabled Enabled Disabled Enabled AHCI Mode 10 Phoenix Secu...

Page 31: ... For Aspire 8530 Series only VGA Memory Shows the VGA memory size Quiet Boot Determines if Customer Logo will be displayed or not shows Summary Screen is disabled or enabled Enabled Customer Logo is displayed and Summary Screen is disabled Disabled Customer Logo is not displayed and Summary Screen is enabled Option Enabled or Disabled Network Boot Enables disables the system boot from LAN remote s...

Page 32: ...ssword Main F1 Esc Help Exit Select Item Select Menu Change Values Select Sub Menu Enter F9 F10 Setup Defaults Save and Exit Information Security Boot Exit Item Specific Help Set or clear the Supervisor account s password Supervisor Password s User Password s Set User Password Set Password Password on Boot i i HDD Password is HDD Set Supervisor Password Clear Clear Clear Enter Enter Disabled Enter...

Page 33: ... to enable the Password on boot parameter 5 When you are done press F10 to save the changes and exit the BIOS Setup Utility Removing a Password Follow these steps Parameter Description Option Supervisor Password Is Shows the setting of the Supervisor password Clear or Set User Password Is Shows the setting of the user password Clear or Set HDD Password Is Shows the setting of the hard disk passwor...

Page 34: ...Set Supervisor Password parameter and press the Enter key The Set Password box appears 2 Type the current password in the Enter Current Password field and press Enter 3 Type a password in the Enter New Password field Retype the password in the Confirm New Password field 4 Press Enter After setting the password the computer sets the User Password parameter to Set 5 If desired you can enable the Pas...

Page 35: ...Chapter 2 27 If the new password and confirm new password strings do not match the screen will display the following message ...

Page 36: ...se or to select a device then press F6 to move it up the list or F5 to move it down the list Press Esc to escape the menu Boot priority order F1 Esc Help Exit Select Item Select Menu Change Values Select Sub Menu Enter F9 F10 Setup Defaults Save and Exit Information Security Boot Exit 2 IDE CD DVD HL DT STDVDRAM GT34N 3 4 5 6 U Network Boot BRCM MBA Slot 0400 v14 4 3 USB HDD USB FDD SB CD DVD ROM ...

Page 37: ...ut saving setup data to CMOS Load Setup Default Load default values for all SETUP item Discard Changes Load previous values from CMOS for all SETUP items Save Changes Save Setup Data to CMOS Main Item Specific Help Exit System Setup and save your changes to CMOS F1 Esc Help Exit Select Item Select Menu Change Values Select Sub Menu Enter F9 F10 Setup Defaults Save and Exit Information Security Boo...

Page 38: ... power supply when you run the Flash utility If the battery pack does not contain enough power to finish BIOS flash you may not boot the system because the BIOS is not completely loaded Follow the steps below to run the Flash utility 1 Rename the BIOS file as XXXXXXX FD 2 Copy the XXXXXXX FD file to a bootable USB device containing the Crisis Disk 3 Turn off the system power 4 Insert the USB devic...

Page 39: ...ord error code will appear on the screen If you need to solve HDD password locked problem you can run unlock6 1 Key in unlock6 XXXXXX 0 XXXXXX is the HDD password error code 2 Select 2 and a list of master password will be diplayed 3 These passwords are master password Key in one of the pasword from the list to clear the original HDD password Example PS921OA ...

Page 40: ...32 Chapter 2 ...

Page 41: ...tools Wrist grounding strap and conductive mat for preventing electrostatic discharge Flat screwdriver Philips screwdriver Hex screwdriver Plastic flat screwdriver Plastic tweezers NOTE The screws for the different components vary in size During the disassembly process group the screws with the corresponding components to avoid mismatch when putting back the components Chapter 3 Machine Disassembl...

Page 42: ...ded into the following stages External module disassembly Main unit disassembly LCD module disassembly The flowcharts provided in the succeeding disassembly sections illustrate the entire disassembly sequence Observe the order of the sequence to avoid damage to any of the hardware components For example if you want to remove the main board you must first remove the keyboard then disassemble the in...

Page 43: ...the main board you must first remove the keyboard then disassemble the inside assembly frame in that order Item Screw Color Part No A M2 5 x L6 Black 86 00E12 536 B M3 x L4 Silver 86 9A524 4R0 C M2 x L3 Black 86 00F80 723 EXTERNAL MODULE DISASSEMBLY WLAN BOARD TURN OFF POWER AND PERIPHERALS UNPLUG POWER CABLES Cx1 BACK COVER DIMM MODULES REMOVE BATTERY PACK SD DUMMY CARD Cx1 ODD MODULE OPTICAL DIS...

Page 44: ...pen to slide the battery release latch to release the battery from the battery bay 3 Remove the battery from the battery bay Note Battery has been highlighted with the yellow circle as above image shows Please detach the battery and follow local regulations for disposal ...

Page 45: ...1 See Removing the Battery Pack on page 36 2 Remove the one screw A securing the optical drive module to the system 3 Slowly pull out the ODD module from the ODD drive bay Size Quantity Color Torque Part No M2 5 x L6 1 Black 3 0 kgf cm 86 00E12 536 ...

Page 46: ... disk drive module Removing the Back Cover 1 See Removing the Battery Pack on page 36 2 Release the three screws A and four captive screws securing the back cover Size Quantity Color Torque Part No M2 x L3 1 Black 1 6 kgf cm 86 00F80 723 Size Quantity Color Torque Part No M2 5 x L6 3 Black 3 0 kgf cm 86 00E12 536 ...

Page 47: ... Removing the Hard Disk Drive Module 1 See Removing the Battery Pack on page 36 2 See Removing the Back Cover on page 38 3 Remove the one screw C securing the hard disk drive module to the system Size Quantity Color Torque Part No M2 x L3 1 Black 1 6 kgf cm 86 00F80 723 ...

Page 48: ... pressing down on it or placing heavy objects on top of it 5 Remove the two screws B securing the hard disk to the bracket and remove the hard disk from the bracket Removing the Wireless LAN Card 1 See Removing the Battery Pack on page 36 2 See Removing the Back Cover on page 38 Size Quantity Color Torque Part No M3 x L4 2 Silver 3 0 kgf cm 86 9A524 4R0 ...

Page 49: ...the black cable from connector 1 and the white cable from connector 2 on the WLAN card 4 Remove the one screw C on the WLAN card and detach the card Size Quantity Color Torque Part No M2 x L3 1 Black 1 6 kgf cm 86 00F80 723 ...

Page 50: ...LAN card Removing the DIMM Module 1 See Removing the Battery Pack on page 36 2 See Removing the Back Cover on page 38 3 Push out the latches on both sides of the DIMM socket to release the DIMM then remove the DIMM module from the socket ...

Page 51: ...t No A M2 5 x L6 Black 86 00E12 536 C M2 x L3 Black 86 00F80 723 MAIN UNIT KEYBOARD MAIN UNIT DISASSEMBLY CPU SCREW X 5 RTC BATTERY A x 10 UPPER CASE C x 3 A x 2 SPEAKER MODULE C x 4 TOUCHPAD MODULE POWER BUTTON BOARD C x 1 USB BOARD BLUETOOTH MODULE MAIN BOARD Ax1 HEATSINK MODULE LCD MODULE Ax4 ...

Page 52: ...1 See Removing the Battery Pack on page 36 2 Remove the two screws A from the bottom cover 3 Turn the system over and release the latches securing the keyboard Size Quantity Color Torque Part No M2 5 x L6 2 Black 3 0 kgf cm 86 00E12 536 ...

Page 53: ...on the main board and detach the keyboard Separating the Upper Case from the Lower Case 1 See Removing the Battery Pack on page 36 2 See Removing the Optical Drive Module on page 37 3 See Removing the Back Cover on page 38 4 See Removing the Hard Disk Drive Module on page 39 5 See Removing the Wireless LAN Card on page 40 6 See Removing the DIMM Module on page 42 ...

Page 54: ...ve screws 9 x A 3 x C from the bottom panel 9 Disconnect the touchpad cable from TPAD1 and power button cable from PWRCN1 Size Quantity Color Torque Part No M2 5 x L6 1 9 Black 3 0 kgf cm 86 00E12 536 M2 x L3 10 12 Black 1 6 kgf cm 86 00F80 723 1 2 3 4 5 6 7 8 9 10 11 12 ...

Page 55: ... Removing the Touchpad Boards 1 See Removing the Battery Pack on page 36 2 See Removing the Optical Drive Module on page 37 3 See Removing the Back Cover on page 38 4 See Removing the Hard Disk Drive Module on page 39 5 See Removing the Wireless LAN Card on page 40 Size Quantity Color Torque Part No M2 5 x L6 1 Black 3 0 kgf cm 86 00E12 536 ...

Page 56: ...nd disconnect the touchpad cable from the connector 10 Pry to loosen and detach the touchpad board WARNING The touchpad board is glued to the upper case only remove the touchpad board if it is defective Note Circuit boards 10cm2 has been highlighted with the yellow square as shown in the figure above Please detach the circuit boards and follow the local regulations for disposal ...

Page 57: ... 3 See Removing the Back Cover on page 38 4 See Removing the Hard Disk Drive Module on page 39 5 See Removing the Wireless LAN Card on page 40 6 See Removing the DIMM Module on page 42 7 See Removing the Keyboard on page 44 8 See Separating the Upper Case from the Lower Case on page 45 9 Disconnect the speaker cable from the power button board ...

Page 58: ... 10 Release the speaker cables from the tape securing it 11 Remove the four screws C securing the left and right speakers to the upper case Size Quantity Color Torque Part No M2 x L3 4 Black 1 6 kgf cm 86 00F80 723 ...

Page 59: ...tical Drive Module on page 37 3 See Removing the Back Cover on page 38 4 See Removing the Hard Disk Drive Module on page 39 5 See Removing the Wireless LAN Card on page 40 6 See Removing the DIMM Module on page 42 7 See Removing the Keyboard on page 44 8 See Separating the Upper Case from the Lower Case on page 45 9 See Removing the Left and Right Speakers on page 49 ...

Page 60: ...ard and remove the power button board from the upper cover Removing the Bluetooth Module 1 See Removing the Battery Pack on page 36 2 See Removing the Optical Drive Module on page 37 3 See Removing the Back Cover on page 38 4 See Removing the Hard Disk Drive Module on page 39 Size Quantity Color Torque Part No M2 x L3 1 Black 1 6 kgf cm 86 00F80 723 ...

Page 61: ...ating the Upper Case from the Lower Case on page 45 9 Disconnect the Bluetooth cable from the main board 10 Remove the Bluetooth module from the lower case NOTE The Bluetooth module is glued to the lower case take care when removing it Removing the RTC Battery 1 See Removing the Battery Pack on page 36 2 See Removing the Optical Drive Module on page 37 ...

Page 62: ... RTC battery has been highlighted with the yellow circle as shown in the figure above Please detach the RTC battery and follow local regulations for disposal Removing the USB Board 1 See Removing the Battery Pack on page 36 2 See Removing the Optical Drive Module on page 37 3 See Removing the Back Cover on page 38 4 See Removing the Hard Disk Drive Module on page 39 5 See Removing the Wireless LAN...

Page 63: ...he Main Board 1 See Removing the Battery Pack on page 36 2 See Removing the Optical Drive Module on page 37 3 See Removing the Back Cover on page 38 4 See Removing the Hard Disk Drive Module on page 39 5 See Removing the Wireless LAN Card on page 40 6 See Removing the DIMM Module on page 42 7 See Removing the Keyboard on page 44 ...

Page 64: ... the Lower Case on page 45 9 See Removing the Bluetooth Module on page 52 10 See Removing the RTC Battery on page 53 11 See Removing the USB Board on page 54 12 Disconnect the USB cables from the main board 13 Disconnect LCD cable from the main board ...

Page 65: ... Remove the one screw A securing the main board in place 15 Carefully lift the main board and disconnect the DC in cable from the main board Size Quantity Color Torque Part No M2 5 x L6 1 Black 3 0 kgf cm 86 00E12 536 ...

Page 66: ...ack on page 36 2 See Removing the Optical Drive Module on page 37 3 See Removing the Back Cover on page 38 4 See Removing the Hard Disk Drive Module on page 39 5 See Removing the Wireless LAN Card on page 40 6 See Removing the DIMM Module on page 42 7 See Removing the Keyboard on page 44 8 See Separating the Upper Case from the Lower Case on page 45 9 See Removing the Bluetooth Module on page 52 1...

Page 67: ...Chapter 3 59 13 Disconnect the heatsink module cable from the main board 14 Loosen the captive screws in the order shown and remove the heatsink module from the main board 1 2 3 4 5 ...

Page 68: ...age 40 6 See Removing the DIMM Module on page 42 7 See Removing the Keyboard on page 44 8 See Separating the Upper Case from the Lower Case on page 45 9 See Removing the Bluetooth Module on page 52 10 See Removing the RTC Battery on page 53 11 See Removing the USB Board on page 54 12 See Removing the Main Board on page 55 13 See Removing the Heatsink Module on page 58 14 Using a flat screwdriver t...

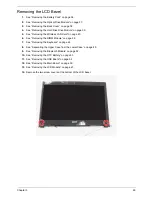
Page 69: ...t the corner as shown Removing the LCD Module 1 See Removing the Battery Pack on page 36 2 See Removing the Optical Drive Module on page 37 3 See Removing the Back Cover on page 38 4 See Removing the Hard Disk Drive Module on page 39 5 See Removing the Wireless LAN Card on page 40 6 See Removing the DIMM Module on page 42 ...

Page 70: ...etooth Module on page 52 10 See Removing the RTC Battery on page 53 11 See Removing the USB Board on page 54 12 See Removing the Main Board on page 55 13 Release the antenna cables from the latches 14 Carefully pull out the wireless antenna cables from the hole remove the tapes securing the cables and release the cables from the latches ...

Page 71: ...left and right hinges 16 Carefully remove the LCD module from the base unit NOTE When connecting the cables back to the unit please note that the cables should be routed well Size Quantity Color Torque Part No M2 5 x L6 4 Black 3 0 kgf cm 86 00E12 536 ...

Page 72: ...m Screw Color Part No C M2 x L3 Black 86 00F80 723 D M2 5 x L5 Black 86 00F87 735 E M2 5 x L4 Silver 86 00H36 534 LCD MODULE LCD BEZEL LCD ASSEMBLY LEFT LCD BRACKET Cx2 RIGHT LCD BRACKET Cx2 LCD FPC CABLE LCD BACK PANEL ANTENNAS LCD MODULE DISASSEMBLY WEB CAMERA Dx2 MICROPHONE Ex4 ...

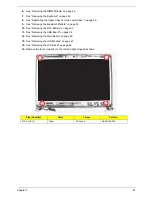
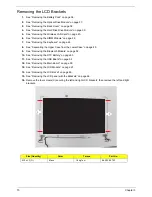
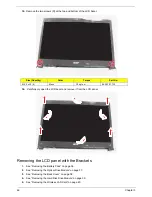
Page 73: ...reless LAN Card on page 40 6 See Removing the DIMM Module on page 42 7 See Removing the Keyboard on page 44 8 See Separating the Upper Case from the Lower Case on page 45 9 See Removing the Bluetooth Module on page 52 10 See Removing the RTC Battery on page 53 11 See Removing the USB Board on page 54 12 See Removing the Main Board on page 55 13 See Removing the LCD Module on page 61 14 Remove the ...

Page 74: ...moving the LCD panel with the Brackets 1 See Removing the Battery Pack on page 36 2 See Removing the Optical Drive Module on page 37 3 See Removing the Back Cover on page 38 4 See Removing the Hard Disk Drive Module on page 39 5 See Removing the Wireless LAN Card on page 40 Size Quantity Color Torque Part No M2 5 x L5 6 Black 3 0 kgf cm 86 00F87 735 ...

Page 75: ...luetooth Module on page 52 10 See Removing the RTC Battery on page 53 11 See Removing the USB Board on page 54 12 See Removing the Main Board on page 55 13 See Removing the LCD Module on page 61 14 See Removing the LCD Bezel on page 65 15 Remove the four screws E on the left and right hinges as shown Size Quantity Color Torque Part No M2 5 x L5 4 Silver 3 0 kgf cm 86 00H36 534 ...

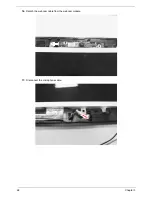
Page 76: ...68 Chapter 3 16 Detach the webcam cable from the webcam module 17 Disconnect the microphone cable ...

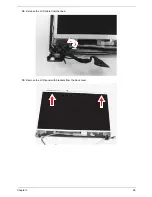
Page 77: ...Chapter 3 69 18 Release the LCD cable from the tape 19 Remove the LCD panel with brackets from the back cover ...

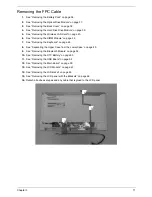
Page 78: ...See Separating the Upper Case from the Lower Case on page 45 9 See Removing the Bluetooth Module on page 52 10 See Removing the RTC Battery on page 53 11 See Removing the USB Board on page 54 12 See Removing the Main Board on page 55 13 See Removing the LCD Module on page 61 14 See Removing the LCD Bezel on page 65 15 See Removing the LCD panel with the Brackets on page 66 16 Remove the four screw...

Page 79: ...e on page 42 7 See Removing the Keyboard on page 44 8 See Separating the Upper Case from the Lower Case on page 45 9 See Removing the Bluetooth Module on page 52 10 See Removing the RTC Battery on page 53 11 See Removing the USB Board on page 54 12 See Removing the Main Board on page 55 13 See Removing the LCD Module on page 61 14 See Removing the LCD Bezel on page 65 15 See Removing the LCD panel...

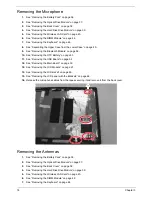
Page 80: ...he Wireless LAN Card on page 40 6 See Removing the DIMM Module on page 42 7 See Removing the Keyboard on page 44 8 See Separating the Upper Case from the Lower Case on page 45 9 See Removing the Bluetooth Module on page 52 10 See Removing the RTC Battery on page 53 11 See Removing the USB Board on page 54 12 See Removing the Main Board on page 55 13 See Removing the LCD Module on page 61 14 See Re...

Page 81: ...Chapter 3 73 16 Remove the web camera module from the LCD module back cover WARNING The web camera module is glued to the LCD module back cover only remove the web camera module if it is defective ...

Page 82: ...he RTC Battery on page 53 11 See Removing the USB Board on page 54 12 See Removing the Main Board on page 55 13 See Removing the LCD Module on page 61 14 See Removing the LCD Bezel on page 65 15 See Removing the LCD panel with the Brackets on page 66 16 Release the microphone cables from the tapes securing it and remove it from the back cover Removing the Antennas 1 See Removing the Battery Pack o...

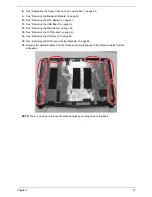
Page 83: ... Board on page 54 12 See Removing the Main Board on page 55 13 See Removing the LCD Module on page 61 14 See Removing the LCD Bezel on page 65 15 See Removing the LCD panel with the Brackets on page 66 16 Release the antenna cables from the latches and carefully peel off the antenna cables from the adhesives NOTE There is no need to remove the antenna unless you really need to replace it ...

Page 84: ...76 Chapter 3 ...

Page 85: ... which page to go to Symptoms Verified Go To Power failure The power indicator does not go on or stay on Power System Check on page 79 POST does not complete No beep or error codes are indicated Power On Self Test POST Error Message on page 80 Undetermined Problems on page 92 POST detects an error and displayed messages on screen Error Message List on page 82 Other symptoms i e LCD display problem...

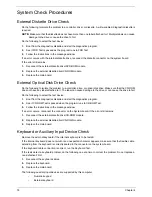
Page 86: ... to it The label can cause damage to the drive or can cause the drive to fail Do the following to select the test device 1 Boot from the diagnostics diskette and start the diagnostics program 2 See if CD ROM Test is passed when the program runs to CD ROM Test 3 Follow the instructions in the message window If an error occurs reconnect the connector on the System board If the error still remains 1 ...

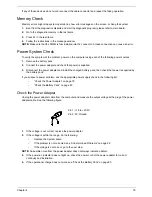
Page 87: ...install the charged battery pack then check that power is supplied by the battery pack If you suspect a power problem see the appropriate power supply check in the following list Check the Power Adapter on page 79 Check the Battery Pack on page 80 Check the Power Adapter Unplug the power adapter cable from the computer and measure the output voltage at the plug of the power adapter cable See the f...

Page 88: ...onnect the touchpad cables 2 Replace the touchpad 3 Replace the system board After you use the touchpad the pointer drifts on the screen for a short time This self acting pointer movement can occur when a slight steady pressure is applied to the touchpad pointer This symptom is not a hardware problem No service actions are necessary if the pointer movement stops in a short period of time Power On ...

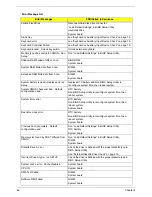
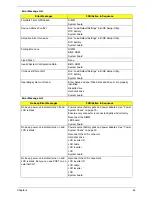
Page 89: ...Equipment Configuration Error 010 Memory Error at xxxx xxxx xxxxh R xxxxh W xxxxh 070 Real Time Clock Error 071 CMOS Battery Bad 072 CMOS Checksum Error 110 System disabled Incorrect password is specified No error code Battery critical LOW In this situation BIOS will issue 4 short beeps then shut down system no message will show No error code Thermal critical High In this situation BIOS will shut ...

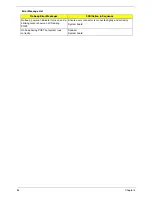
Page 90: ...gure system time then reboot system System CMOS checksum bad Default configuration used RTC battery Run BIOS Setup Utility to reconfigure system time then reboot system System timer error RTC battery Run BIOS Setup Utility to reconfigure system time then reboot system System board Real time clock error RTC battery Run BIOS Setup Utility to reconfigure system time then reboot system System board Pr...

Page 91: ...d disk drive System board Error Message List No beep Error Messages FRU Action in Sequence No beep power on indicator turns off and LCD is blank Power source battery pack and power adapter See Power System Check on page 79 Ensure every connector is connected tightly and correctly Reconnect the DIMM LED board System board No beep power on indicator turns on and LCD is blank Power source battery pac...

Page 92: ... and a blinking cursor shown on LCD during POST Ensure every connector is connected tightly and correctly System board No beep during POST but system runs correctly Speaker System board Error Message List No beep Error Messages FRU Action in Sequence ...

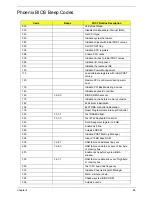
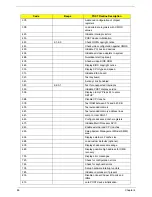
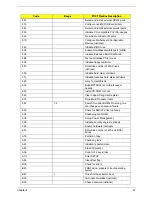
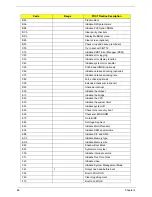
Page 93: ...ialize keyboard controller 16h 1 2 2 3 BIOS ROM checksum 17h Initialize cache before memory autosize 18h 8254 timer initialization 1Ah 8237 DMA controller initialization 1Ch Reset Programmable Interrupt Controller 20h 1 3 1 1 Test DRAM refresh 22h 1 3 1 3 Test 8742 Keyboard Controller 24h Set ES segment register to 4 GB 26h Enable A20 line 28h Autosize DRAM 29h Initialize POST Memory Manager 2Ah C...

Page 94: ...splay service 5Ah Display prompt Press F2 to enter SETUP 5Bh Disable CPU cache 5Ch Test RAM between 512 and 640 KB 60h Test extended memory 62h Test extended memory address lines 64h Jump to User Patch1 66h Configure advanced cache registers 67h Initialize Multi Processor APIC 68h Enable external and CPU caches 69h Setup System Management Mode SMM area 6Ah Display external L2 cache size 6Bh Load c...

Page 95: ...Jump to UserPatch2 93h Build MPTABLE for multi processor boards 95h Install CD ROM for boot 96h Clear huge ES segment register 97h Fixup Multi Processor table 98h 1 2 Search for option ROMs One long two short beeps on checksum failure 99h Check for SMART drive optional 9Ah Shadow option ROMs 9Ch Set up Power Management 9Dh Initialize security engine optional 9Eh Enable hardware interrupts 9Fh Dete...

Page 96: ...xtended checksum optional D2h Unknown interrupt E0h Initialize the chipset E1h Initialize the bridge E2h Initialize the CPU E3h Initialize the system timer E4h Initialize system I O E5h Check force recovery boot E6h Checksum BIOS ROM E7h Go to BIOS E8h Set Huge Segment E9h Initialize Multi Processor EAh Initialize OEM special code EBh Initialize PIC and DMA ECh Initialize Memory type EDh Initializ...

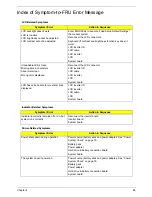
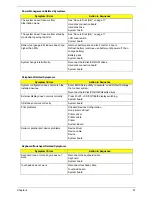
Page 97: ...ter ID LCD cable LCD inverter LCD System board LCD has extra horizontal or vertical lines displayed LCD inverter ID LCD inverter LCD cable LCD System board Indicator Related Symptoms Symptom Error Action in Sequence Indicator incorrectly remains off or on but system runs correctly Reconnect the inverter board Inverter board System board Power Related Symptoms Symptom Error Action in Sequence Power...

Page 98: ...system DIMM System board Speaker Related Symptoms Symptom Error Action in Sequence In Windows multimedia programs no sound comes from the computer Audio driver Speaker System board Internal speakers make noise or emit no sound Speaker System board Power Management Related Symptoms Symptom Error Action in Sequence The system will not enter hibernation See Save to Disk S4 on page 17 Keyboard if cont...

Page 99: ...n Sequence System configuration does not match the installed devices Enter BIOS Setup Utility to execute Load Default Settings then reboot system Reconnect hard disk CD ROM diskette drives External display does not work correctly Press Fn F5 LCD CRT Both display switching System board USB does not work correctly System board Print problems Onboard Devices Configuration Run printer self test Printe...

Page 100: ...ircuit is suspected or whether the system is inoperative Follow these procedures to isolate the failing FRU do not isolate non defective FRU NOTE Verify that all attached devices are supported by the computer NOTE Verify that the power supply being used at the time of the failure is operating correctly See Power System Check on page 79 1 Power off the computer 2 Visually check them for damage If a...

Page 101: ... 3 USBCN2 USB board cable connector 10 CHARGER_ LED1 Battery charge indicator 4 USBCN1 USB board cable connector 11 MEDIA_ LED1 Hard drive activity indicator 5 SW_R1 Touchpad button 12 COM_ LED1 Bluetooth Wireless network indicator 6 SW_L1 Touchpad button 13 PWRCN1 Power button board cable connector 7 PWR_LED1 Power indicator 14 LCD1 LCD cable connector Connector Locations Chapter 5 ...

Page 102: ...slot 13 WLAN1 WLAN module slot 4 DCIN1 DC power cable connector 14 G2201 Clear password hardware gap 5 RJ45 Ethernet jack 15 G2101 Clear CMOS hardware gap 6 FAN1 Fan connector 16 HDD1 HDD connector 7 CRT1 Monitor port 17 PCH1 Mobile Intel HM65 Express Chipset 8 HDMI1 HDMI out port 18 ODD1 SATA optical drive connector 9 USB1 USB port 19 VGA1 NVIDIA GeForce graphics controller 10 USB2 USB port ...

Page 103: ... card slot 12 DM1 2 Memory slots 1 and 2 4 DCIN1 DC power cable connector 13 WLAN1 WLAN module slot 5 RJ45 Ethernet jack 14 G2201 Clear password hardware gap 6 FAN1 Fan connector 15 G2101 Clear CMOS hardware gap 7 CRT1 Monitor port 16 HDD1 HDD connector 8 HDMI1 HDMI out port 17 PCH1 Mobile Intel HM65 Express Chipset 9 USB1 USB port 18 ODD1 SATA optical drive connector ...

Page 104: ...k the user needs to short the hardware gap to clear the password by following these steps Power off the system and remove the HDD AC adapter and battery from the computer Open the back cover of the computer and look for the hardware gap on the main board as shown in the picture s above Use an electric conductivity tool to short the two points of the hardware gap Plug in the AC adapter while retain...

Page 105: ... Fn Esc and then press the power button The system should be powered on with the Crisis BIOS Recovery process 4 BIOS Boot Block starts to restore the BIOS code from the Crisis Disk to BIOS ROM on the failed system 5 After the crisis flashing process is finished the system will restart After the Crisis Recovery process is finished the system should have a successful and workable BIOS after power on...

Page 106: ...98 Chapter 5 ...

Page 107: ...ge is made it will not be noted on the printed Service Guide For ACER AUTHORIZED SERVICE PROVIDERS your Acer office may have a DIFFERENT part number code from those given in the FRU list of this printed Service Guide You MUST use the local FRU list provided by your regional Acer office to order FRU parts for repair and service of customer machines NOTE To scrap or to return the defective parts you...

Page 108: ...100 Chapter 6 Exploded Diagram ...

Page 109: ...Chapter 6 101 ...

Page 110: ...05 BATTERY BTY PACK LI SANYO 6C 2 2AH BT 00603 111 BTY PACK LI SONY 6C 2 2AH SON BT 00604 049 BTY PACK LI PANA 6C 2 2AH PAN BT 00605 062 BTY PACK LI SDI 6C 2 2AH SDI BT 00606 008 BTY PACK LI PANA 6C 2 2AH SMP BT 00607 125 BTY PACK LI LG 6C 2 2AH SMP BT 00607 126 BTY PACK LI SDI 6C 2 2AH SMP BT 00607 127 BTY PACK LI LG 6C 2 2AH LG BT 0060G 001 BOARDS WLAN BOARDS WLAN 802 11BGN 2X2 ATHEROS HB97 HM N...

Page 111: ... MODULE BCM2070 V3 0 FW 2 2 3 BH 21100 010 CABLES POWER CABLES C A DC IN 65W MEC 50 RC801 001 C A DC IN 65W HL 50 RC801 001 C A DC IN 65W HT 50 RC801 001 C A DC IN 65W CMI 50 RC801 001 C A DC IN WEC 50 RC901 006 C A DC IN 90W HL 50 RC901 006 C A DC IN 90W HT 50 RC901 006 C A DC IN 90W CMI 50 RC901 006 FPC CABLES C A FPC FOR USB 3 0 CMI 50 RC901 003 Category Description Part Number ...

Page 112: ...D CABLES CODE SWISS 2 5A 250V 3P BK 27 01518 581 CODE 10A 250V 3P SWISS BK 27 01518 691 CORD ARGENTINE 10A 250V3G 1 8M 27 01518 0U1 CODE US 7A 125V BK 27 T30V1 001 CODE 10A 125V 3P US BK 27 01518 641 CORD 7A250V 2P 1830 KOREAN 27 01518 531 CODE UK 2 5A 250V 3P BK 27 01518 541 CODE 5A 250V 3P UK BK 27 03118 001 CODE JAPAN 7A 125V 2P BK 27 01518 551 CODE DENMARK 2 5A 250V 3P BK 27 01518 561 CODE 10A...

Page 113: ... CODE 7A 125V 2P JAPAN BK 27 01518 661 CORD 250V 10 16A 3P ISRAEL 27 01518 761 CORD USA W CNS 2 5A 125V 8121 27 01518 781 POWER CORD TAIWANESE BLACK 1 8 27 01518 A11 POWER CORD BRAZIL BLK 1 8M 27 01518 A41 POWER CODE ACA ACNZ ANNIE 27 03218 021 CODE 7 5A 250V 3P AUSTRALIA BK 27 03218 051 CODE 7A 125V JAPAN 2PIN BK 27 03518 161 CORD 1 83M BRAZIL BLK 27 01518 H81 CASE COVER BRACKET ASSEMBLY DUMMY CA...

Page 114: ...HDD BKT JE40 HR HON WIN 33 RC901 002 ASSY 60 HDD BKT JE40 HR 33 RC901 002 ASSY 60 HDD BKT JE40 HR MACKING 33 RC901 002 ASSY 60 HDD BKT JE40 HR HON WIN 33 RC901 002 ASSY 60 HDD BKT JE40 HR 33 RC901 002 ASSY 60 HDD BKT JE40 HR MACKING 33 RC901 002 ASSY 60 HDD BKT JE40 HR HON WIN 33 RC901 002 ASSY 60 HDD BKT JE40 HR 33 RC901 002 ASSY 60 HDD BKT JE40 HR MACKING 33 RC901 002 ASSY 60 HDD BKT JE40 HR HON...

Page 115: ... 35W PG KC 23101 DMP IC CPU SANDY BRIDGE I5 2410M 2 3G 35W PG KC 24101 DMP IC CPU SANDY BRIDGE I5 2520M 2 5G 35W PG KC 25201 DMP IC CPU SANDY BRIDGE I5 2540M 2 6G 35W PG KC 25401 DMP IC CPU SANDY BRIDGE I7 2620M 2 7G 35W PG KC 26201 DMP IC CPU SANDY BRIDGE I7 2630QM 2 0G 45W P KC 26301 QMP IC CPU SANDY BRIDGE I7 2720QM 2 2G 45W P KC 27201 QMP IC CPU SANDY BRIDGE I7 2820QM 2 3G 45W P KC 28201 QMP H...

Page 116: ...Y AC4T KB I140A 226 KB NSK AM20H HEBREW 86KEY AC4T KB I140A 230 KB MP 09G23HB 442 HEBREW 86KEY AC4T KB I140A 230 KB V104630DS3 HB HEBREW 86KEY AC4T KB I140A 230 KB NSK AM20A ARABIC 86KEY AC4T KB I140A 204 KB MP 09G23A0 442 ARABIC 86KEY AC4T KB I140A 204 KB V104630DS3 AR ARABIC 86KEY AC4T KB I140A 204 KB NSK AM21D US INT 86KEY AC4T KB I140A 229 KB MP 09G23U4 442 US INT 86KEY AC4T KB I140A 229 KB V1...

Page 117: ... 215 KB NSK AM21A BELGIA 87KEY AC4T KB I140A 205 KB MP 09G26B0 442 BELGIAN 87KEY AC4T KB I140A 205 KB V104630DK3 BE BELGIAN 87KEY AC4T KB I140A 205 KB NSK AM20G GERMAN 87KEY AC4T KB I140A 212 KB MP 09G26D0 442 GERMAN 87KEY AC4T KB I140A 212 KB V104630DK3 GR GERMAN 87KEY AC4T KB I140A 212 KB NSK AM20N NORWEG 87KEY AC4T KB I140A 219 KB MP 09G26N0 442 NORWEGIAN 87KEY AC4T KB I140A 219 KB V104630DK3 N...

Page 118: ...4T KB I140A 216 HINGE LCD R JE40 HR LH 33 RC901 003 HINGE LCD R JE40 HR SZS 33 RC901 003 HINGE LCD R JE40 HR JR 33 RC901 003 HINGE LCD L JE40 HR LH 33 RC901 004 HINGE LCD L JE40 HR SZS 33 RC901 004 HINGE LCD L JE40 HR JR 33 RC901 004 CAMERA CAMERA 1 3M 10P2TF103 LITEON 57 RC901 001 CAMERA 1 3M HF1316 P80A SS03 SUYIN 57 RC901 002 CABLES C A LCD CABLE JE40 HR 50 RC901 004 C A LCD CABLE_HL JE40 HR 50...

Page 119: ...ERVE MISCELLANEOUS JM31_CP _BEZLE_SCREW_MYLAR 47 N9B01 001 JM31 BEZLESCREWMYLAR JM 47 N9B01 001 LCD LCD NLED 14 WXGA ANT 2 W CAM 6M RC901 003 LCD 14 HD AU B140XW01 V8 G LK 14005 010 LCD 14 HD SEC LTN140AT01 G04 LK 14006 015 LCD 14 HD LG LP140WH1 TLA2 LED LK 14008 004 LCD 14 WXGA LG LP140WH4 TLC1 LK 14008 009 LCD 14 WXGA CMI BT140GW01 G LK 1400D 008 MAINBOARD JE40_HR MB UMA NON3G 10267 1M D MB RC80...

Page 120: ...B0NS CG KN 2GB03 021 SODIMM 2G ACR256X64D3S1333C9 KN 2GB07 004 SODIMM 2G EBJ21UE8BFU0 DJ F KN 2GB09 009 SODIMM 2G M471B5773CHS CH9 KN 2GB0B 026 SODIMM 2G AD73I1B1674EU DDR3 1333MHZ KN 2GB0C 006 SODIMM 2G HMT325S6BFR8C H9N0 KN 2GB0G 018 SODIMM 4G M471B5273BH1 CF8 KN 4GB0B 007 SODIMM 4G EBJ41UF8BAS0 DJ F KN 4GB09 001 SODIMM 4G M471B5273CH0 CH9 KN 4GB0B 010 SCREWS M2 L3 BLACK ZN 86 FR901 001 SCREW M3...

Page 121: ...Appendix A 113 Model Definition and Configuration Appendix A ...

Page 122: ... I170A 049 Continental AS4750G 338G50Mn EMEA Eastern Europe AS4750G 338G50Mn W7HP64ATEU7 MC MADISON_PRO1GBCbk_V3 2 4G 500_L 6L2 2 5R CB_bgn_0 3D_HG_ENQ1 Ci3330M MADISON_PRO 1G DDR3 64 16 8 SO4GBIII10 N500GB5 4KS NSM8XS 5 in 1 Build in 3rd WiFi 2x2 BGN N 6CELL2 2 90W SLO CRO KB I170A 049 Continental AS4750G 338G50Mn EMEA Czech AS4750G 338G50Mn W7HP64ATCZ2 MC MADISON_PRO1GBCbk_V3 2 4G 500_L 6L2 2 5R...

Page 123: ...0Mn EM W7HP64EMATZA2 MC MADISON_PRO1GBCbk_V3 2 4G 500_L 6L2 2 5R CB_bgn_0 3D_HG_ES61 Ci3330M MADISON_PRO 1G DDR3 64 16 8 SO4GBIII10 N500GB5 4KS NSM8XS 5 in 1 Build in 3rd WiFi 2x2 BGN N 6CELL2 2 90W US International KB I170A 056 AF AS4750G 338G50Mn EMEA Poland AS4750G 338G50Mn W7HP64ATPL1 MC MADISON_PRO1GBCbk_V3 2 4G 500_L 6L2 2 5R CB_bgn_0 3D_HG_PL11 Ci3330M MADISON_PRO 1G DDR3 64 16 8 SO4GBIII10...

Page 124: ...64ATFR1 MC MADISON_PRO1GBCbk_V3 2 4G 500_L 6L2 2 5R CB_bgn_0 3D_HG_FR21 Ci3330M MADISON_PRO 1G DDR3 64 16 8 SO4GBIII10 N500GB5 4KS NSM8XS 5 in 1 Build in 3rd WiFi 2x2 BGN N 6CELL2 2 90W French KB I170A 039 Continental AS4750G 336G50Mn EMEA Middle East AS4750G 336G50Mn EM W7HP64EMATME3 MC MADISON_PRO1GBCbk_V3 4G 2G 500_L 6L2 2 5R CB_bgn_0 3D_HG_ES81 Ci3330M MADISON_PRO 1G DDR3 64 16 8 SO4GBIII10 SO...

Page 125: ...750G 336G50Mn W7HP64ATCY1 MC MADISON_PRO1GBCbk_V3 4G 2G 500_L 6L2 2 5R CB_bgn_0 3D_HG_ES61 Ci3330M MADISON_PRO 1G DDR3 64 16 8 SO4GBIII10 SO2GBIII10 N500GB5 4KS NSM8XS 5 in 1 Build in 3rd WiFi 2x2 BGN N 6CELL2 2 90W UK KB I170A 055 UK AS4750G 336G50Mn EMEA Latvia AS4750G 336G50Mn W7HP64ATLV1 MC MADISON_PRO1GBCbk_V3 4G 2G 500_L 6L2 2 5R CB_bgn_0 3D_HG_RU22 Ci3330M MADISON_PRO 1G DDR3 64 16 8 SO4GBI...

Page 126: ... KB I170A 056 AF AS4750G 628G64Bn EMEA Holland AS4750G 628G64Bn W7HP64ATNL1 MC MADISON_PRO1GBCbk_V3 2 4G 640 BT 6L2 2 5R CB_bgn_0 3D_HG_NL11 Ci7620M MADISON_PRO 1G DDR3 64 16 8 SO4GBIII10 N640GB5 4KS NBDCB4XS 5 in 1 Build in 3rd WiFi 2x2 BGN BT 2 1 6CELL2 2 90W US International KB I170A 056 Continental AS4750G 628G64Bn EMEA Luxembourg AS4750G 628G64Bn W7HP64ATLU3 MC MADISON_PRO1GBCbk_V3 2 4G 640 B...

Page 127: ...inental AS4750G 434G64Mi EMEA Russia AS4750G 434G64Mi W7HP64RUATRU1 MC MADISON_PRO1GBCbk_V3 2 2G 640 6L2 2 5R CB_bg_0 3D_HG_RU11 Ci5430M MADISON_PRO 1G DDR3 64 16 8 SO2GBIII10 N640GB5 4KS NSM8XS 5 in 1 Build in 3rd WiFi BG N 6CELL2 2 90W Russian KB I170A 048 Continental AS4750G 334G32Mi EMEA Russia AS4750G 334G32Mi W7HP64RUATRU1 MC MADISON_PRO1GBCbk_V3 2 2G 320 BT 8L2 4 5R CB_bg_0 3D_HG_RU11 Ci333...

Page 128: ...4G50Mn EMEA Portugal AS4750G 334G50Mn W7HP64ATPT1 MC MADISON_PRO1GBCbk_V3 2 2G 500_L 8L2 4 5R CB_bgn_0 3D_HG_PT11 Ci3330M MADISON_PRO 1G DDR3 64 16 8 SO2GBIII10 N500GB5 4KS NSM8XS 5 in 1 Build in 3rd WiFi 2x2 BGN N 8CELL2 4 90W Portuguese KB I170A 047 Continental AS4750G 334G50Mn EMEA Portugal AS4750G 334G50Mn W7HP64ATPT1 MC MADISON_PRO1GBCbk_V3 2 2G 500_L 6L2 2 5R CB_bgn_0 3D_HG_PT11 Ci3330M MADI...

Page 129: ...al AS4750G 334G50Mn EMEA Eastern Europe AS4750G 334G50Mn W7HP64ATEU7 MC MADISON_PRO1GBCbk_V3 2 2G 500_L 8L2 4 5R CB_bgn_0 3D_HG_SL11 Ci3330M MADISON_PRO 1G DDR3 64 16 8 SO2GBIII10 N500GB5 4KS NSM8XS 5 in 1 Build in 3rd WiFi 2x2 BGN N 8CELL2 4 90W SLO CRO KB I170A 049 Continental AS4750G 334G50Mn EMEA Serbia Macedonia AS4750G 334G50Mn W7HP64ATCS1 MC MADISON_PRO1GBCbk_V3 2 2G 500_L 6L2 2 5R CB_bgn_0...

Page 130: ...ME2 MC MADISON_PRO1GBCbk_V3 4G 2G 500_L 8L2 4 5R CB_GN_0 3D_HG_AR21 Ci7620M MADISON_PRO 1G DDR3 64 16 8 SO4GBIII10 SO2GBIII10 N500GB5 4KS NSM8XS 5 in 1 Build in 3rd WiFi 2x2 BGN N 8CELL2 4 90W Arabic KB I170A 032 UK and US 110V AS4750G 626G50Mn EMEA Middle East AS4750G 626G50Mn EM W7HP64EMATME9 MC MADISON_PRO1GBCbk_V3 4G 2G 500_L 8L2 4 5R CB_GN_0 3D_HG_ES81 Ci7620M MADISON_PRO 1G DDR3 64 16 8 SO4G...

Page 131: ...EA Eastern Europe AS4750G 626G50Mn W7HP64ATEU5 MC MADISON_PRO1GBCbk_V3 4G 2G 500_L 8L2 4 5R CB_GN_0 3D_HG_RO11 Ci7620M MADISON_PRO 1G DDR3 64 16 8 SO4GBIII10 SO2GBIII10 N500GB5 4KS NSM8XS 5 in 1 Build in 3rd WiFi 2x2 BGN N 8CELL2 4 90W US International KB I170A 056 Continental AS4750G 626G50Mn EMEA Czech AS4750G 626G50Mn W7HP64ATCZ2 MC MADISON_PRO1GBCbk_V3 4G 2G 500_L 8L2 4 5R CB_GN_0 3D_HG_SK11 C...

Page 132: ...ental AS4750G 334G50Mn EMEA Middle East AS4750G 334G50Mn EM W7HP64EMATME6 MC MADISON_PRO1GBCbk_V3 2 2G 500_L 8L2 4 5R CB_GN_0 3D_HG_ES61 Ci3330M MADISON_PRO 1G DDR3 64 16 8 SO2GBIII10 N500GB5 4KS NSM8XS 5 in 1 Build in 3rd WiFi 2x2 BGN N 8CELL2 4 90W US International KB I170A 056 UK AS4750G 334G50Mn EMEA South Africa AS4750G 334G50Mn EM W7HP64EMATZA4 MC MADISON_PRO1GBCbk_V3 2 2G 500_L 8L2 4 5R CB_...

Page 133: ...aly AS4750G 334G50Mn W7HP64ATIT1 MC MADISON_PRO1GBCbk_V3 2 2G 500_L 8L2 4 5R CB_GN_0 3D_HG_IT11 Ci3330M MADISON_PRO 1G DDR3 64 16 8 SO2GBIII10 N500GB5 4KS NSM8XS 5 in 1 Build in 3rd WiFi 2x2 BGN N 8CELL2 4 90W Italian KB I170A 043 Italian AS4750G 334G50Mn EMEA Spain AS4750G 334G50Mn W7HP64ATES1 MC MADISON_PRO1GBCbk_V3 2 2G 500_L 8L2 4 5R CB_GN_0 3D_HG_ES51 Ci3330M MADISON_PRO 1G DDR3 64 16 8 SO2GB...

Page 134: ...Mn EMEA Ukraine AS4750G 434G64Mn W7HP64RUATUK1 MC MADISON_PRO1GBCbk_V3 2 2G 640 6L2 2 5R CB_GN_0 3D_HG_RU61 Ci5430M MADISON_PRO 1G DDR3 64 16 8 SO2GBIII10 N640GB5 4KS NSM8XS 5 in 1 Build in 3rd WiFi 2x2 BGN N 6CELL2 2 90W Russian KB I170A 048 Continental AS4750G 438G64Mn EMEA Ukraine AS4750G 438G64Mn W7HP64RUATUK1 MC MADISON_PRO1GBCbk_V3 2 4G 640 6L2 2 5R CB_GN_0 3D_HG_RU61 Ci5430M MADISON_PRO 1G ...

Page 135: ...4Mn EMEA Italy AS4750G 436G64Mn W7HP64ATIT1 MC MADISON_PRO1GBCbk_V3 4G 2G 640 8L2 4 5R CB_GN_0 3D_HG_IT11 Ci5430M MADISON_PRO 1G DDR3 64 16 8 SO4GBIII10 SO2GBIII10 N640GB5 4KS NSM8XS 5 in 1 Build in 3rd WiFi 2x2 BGN N 8CELL2 4 90W Italian KB I170A 043 Italian AS4750G 438G64Mn EMEA Italy AS4750G 438G64Mn W7HP64ATIT1 MC MADISON_PRO1GBCbk_V3 2 4G 640 6L2 2 5R CB_GN_0 3D_HG_IT11 Ci5430M MADISON_PRO 1G...

Page 136: ...64Mn EM W7HP64EMATME6 MC MADISON_PRO1GBCbk_V3 2 2G 640 6L2 2 5R CB_GN_0 3D_HG_ES61 Ci5430M MADISON_PRO 1G DDR3 64 16 8 SO2GBIII10 N640GB5 4KS NSM8XS 5 in 1 Build in 3rd WiFi 2x2 BGN N 6CELL2 2 90W US International KB I170A 056 UK AS4750G 434G64Mn EMEA South Africa AS4750G 434G64Mn EM W7HP64EMATZA4 MC MADISON_PRO1GBCbk_V3 2 2G 640 6L2 2 5R CB_GN_0 3D_HG_ES61 Ci5430M MADISON_PRO 1G DDR3 64 16 8 SO2G...

Page 137: ...438G64Mn EMEA South Africa AS4750G 438G64Mn EM W7HP64EMATZA1 MC MADISON_PRO1GBCbk_V3 2 4G 640 6L2 2 5R CB_GN_0 3D_HG_ES81 Ci5430M MADISON_PRO 1G DDR3 64 16 8 SO4GBIII10 N640GB5 4KS NSM8XS 5 in 1 Build in 3rd WiFi 2x2 BGN N 6CELL2 2 90W French KB I170A 039 Continental AS4750G 438G64Mn EMEA Middle East AS4750G 438G64Mn EM W7HP64EMATME3 MC MADISON_PRO1GBCbk_V3 2 4G 640 6L2 2 5R CB_GN_0 3D_HG_ES81 Ci5...

Page 138: ... BGN N 6CELL2 2 90W CZ SK KB I170A 035 Continental AS4750G 338G64Mn EMEA Spain AS4750G 338G64Mn W7HP64ATES1 MC MADISON_PRO1GBCbk_V3 2 4G 640 8L2 4 5R CB_GN_0 3D_HG_ES51 Ci3330M MADISON_PRO 1G DDR3 64 16 8 SO4GBIII10 N640GB5 4KS NSM8XS 5 in 1 Build in 3rd WiFi 2x2 BGN N 8CELL2 4 90W Spanish KB I170A 050 Continental AS4750G 336G50Mn EMEA Spain AS4750G 336G50Mn W7HP64ATES1 MC MADISON_PRO1GBCbk_V3 4G ...

Page 139: ...EA Greece AS4750G 436G64Mn W7HP64ATGR1 MC MADISON_PRO1GBCbk_V3 4G 2G 640 8L2 4 5R CB_GN_0 3D_HG_EL31 Ci5430M MADISON_PRO 1G DDR3 64 16 8 SO4GBIII10 SO2GBIII10 N640GB5 4KS NSM8XS 5 in 1 Build in 3rd WiFi 2x2 BGN N 8CELL2 4 90W Greek KB I170A 041 Continental AS4750G 624G50Mn EMEA Greece AS4750G 624G50Mn W7HP64ATGR1 MC MADISON_PRO1GBCbk_V3 2 2G 500_L 8L2 4 5R CB_GN_0 3D_HG_EL31 Ci7620M MADISON_PRO 1G...

Page 140: ...d Continental AS4750G 434G50Mn EMEA Israel AS4750G 434G50Mn W7HP64ATIL1 MC PARK_XT512Cbk_V3 2 2G 500_L 6L2 2 5R CB_bgn_0 3D_HG_HE31 Ci5430M PARK_XT 512M DDR3 64 16 4 SO2GBIII10 N500GB5 4KS NSM8XS 5 in 1 Build in 3rd WiFi 2x2 BGN N 6CELL2 2 65W US International w Hebrew KB I170A 057 Israel AS4750G 333G25Mi EMEA Russia AS4750G 333G25Mi W7HP64RUATRU1 MC PARK_XT512Cbk_V3 2G 1G 250 BT 6L2 2 5R CB_bg_0 ...

Page 141: ...32Mn W7HP64ATCS1 MC UMACbk 2 2G 320 6L2 2 5R CB_bgn_0 3D_HG_SL11 Ci3330M UMA N SO2GBIII10 N320GB5 4KS NSM8XS 5 in 1 Build in 3rd WiFi 2x2 BGN N 6CELL2 2 65W SLO CRO KB I170A 049 Continental AS4750 334G32Mn EMEA Portugal AS4750 334G32Mn W7HP64ATPT1 MC UMACbk 2 2G 320 6L2 2 5R CB_bgn_0 3D_HG_PT11 Ci3330M UMA N SO2GBIII10 N320GB5 4KS NSM8XS 5 in 1 Build in 3rd WiFi 2x2 BGN N 6CELL2 2 65W Portuguese K...

Page 142: ...S 5 in 1 Build in 3rd WiFi 2x2 BGN N 6CELL2 2 65W US International KB I170A 056 Continental AS4750 334G32Mn EMEA Eastern Europe AS4750 334G32Mn W7HP64ATEU5 MC UMACbk 2 2G 320 6L2 2 5R CB_bgn_0 3D_HG_RO11 Ci3330M UMA N SO2GBIII10 N320GB5 4KS NSM8XS 5 in 1 Build in 3rd WiFi 2x2 BGN N 6CELL2 2 65W US International KB I170A 056 Continental AS4750 334G32Mn EMEA Eastern Europe AS4750 334G32Mn W7HP64ATEU...

Page 143: ...r compatible Windows operating system for each model Refer to the following lists for components adapter cards and peripherals which have passed these tests Regarding configuration combination and test procedures please refer to the Compatibility Test Report released by the Acer Mobile System Testing Department Test Compatible Components Appendix B ...

Page 144: ...house TC 37MPK VGA HDMI Panasonic USB 3G Card Huawei mobile connect E220 USB Modem 3G E220 HSDPA UMTS EDGE GPRS GSM Huawei USB Camera Canon Digital IXUS 860 IS Digital Compact Camera 8 0 Megapixel CCD sensor DIGIC III with Face Detection AF AE FE 28mm wide angle lens with optical Image Stabilizer Media storage SD SDHC MMC MMCplus built in SD32MB Canon USB Flash Drive A Data PD16 Vista 16GB A Data ...

Page 145: ...ONY MS PRO 2GB Memory Card SONY SanDisk Meomry Stick Micro M2 8GB Card SanDisk Multimedia Card RS MMC 128MB Memory Card Sandisk RS MMC Mobile 256MB Memory Card PQI Transcend MMC plus 4GB Card Transcend Turbo 200X 2GB MMC Card A DATA SD Card 4GB SD PRO Memory Card RiDATA SanDisk multi use SD Class2 Memory Card 2GB SanDisk SD card 2GB 150x Hi Speed Apacer SanDisk microSDHC 4GB Card with Adapter SanD...

Page 146: ...138 Appendix B ...

Page 147: ...otebook Desktop and Server models including Service guides for all models User s manuals Training materials Bios updates Software utilities Spare parts lists TABs Technical Announcement Bulletin For these purposes we have included an Acrobat File to facilitate the problem free downloading of our technical material Also contained on this website are Detailed information on Acer s International Trav...

Page 148: ...140 Appendix C ...
Page 149: ...Recovery Disk 30 D DIMM module removing 42 display hotkeys 6 E External CD ROM Drive Check 78 External Module Disassembly Flowchart 35 F Flash Utility 30 front view 7 FRU Field Replaceable Unit List 99 H Hard disk 13 HDD 13 HDD1 module removing 39 Hibernation mode hotkey 6 hotkeys 6 HW Gap position 96 I Intermittent Problems 92 K Keyboard 16 keyboard hotkeys 6 Keyboard or Auxiliary Input Device Ch...

Page 150: ...ry Pack 80 Power On Self Test POST Error Message 80 Processor 11 S Screw List 34 speakers hotkey 6 System 4 Block Diagram 4 System Check Procedures 78 System Memory 11 System Utilities 19 T Test Compatible Components 135 touchpad and button boards removing 47 Touchpad Check 80 Troubleshooting 77 U Undetermined Problems 92 utility BIOS 19 30 V view bottom 9 front 7 left 7 rear 7 right 9 view front ...

Reviews: