background image

Chapter 4

162

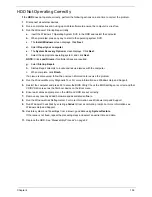
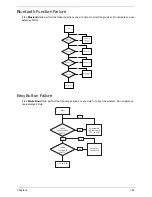
Bluetooth Function Failure

If the 

Bluetooth

 fails, perform the following actions one at a time to correct the problem. Do not replace a non-

defective FRUs:

Easy Button Failure

If the 

Media Board

 fails, perform the following actions one at a time to correct the problem. Do not replace a 

non-defective FRUs:

Start

Reconnect the

cable to the

module

Check BT cable

connected

Check BT cable

Swap the cable

Check BT Module

Swap BT Module

Check Function Board

Swap Function

Board

Swap Mainboard

OK

OK

OK

OK

NG

NG

NG

NG

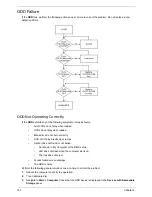
Start

Check 

function /B to 

M/B FFC 

Re -assemble 

the function /B 

FFC to M/B

OK

NG

Check 

function /B  

and FFC

OK

Swap The 
function /B 

OK

NG

Swap M/B

Start

Check 

function /B to 

M/B FFC 

Re -assemble 

the function /B 

FFC to M/B

OK

NG

Check 

function /B  

and FFC

OK

Swap The 
function /B 

OK

NG

Swap M/B

Summary of Contents for Aspire 5534 Series

Page 1: ...Aspire 5534 Series Service Guide PRINTED IN TAIWAN Service guide files and updates are available on the ACER CSD web for more information please refer to http csd acer com tw ...

Page 2: ...II Revision History Please refer to the table below for the updates made on this service guide Date Chapter Updates ...

Page 3: ...tations or warranties either expressed or implied with respect to the contents hereof and specifically disclaims any warranties of merchantability or fitness for any particular purpose Any Acer Incorporated software described in this manual is sold or licensed as is Should the programs prove defective following their purchase the buyer and not Acer Incorporated its distributor or its dealer assume...

Page 4: ...N MESSAGES Denotes actual messages that appear on screen NOTE Gives bits and pieces of additional information related to the current topic WARNING Alerts you to any damage that might result from doing or not doing specific actions CAUTION Gives precautionary measures to avoid possible hardware or software problems IMPORTANT Reminds you to do specific actions relevant to the accomplishment of proce...

Page 5: ... NOT be covered in this generic service guide In such cases please contact your regional offices or the responsible personnel channel to provide you with further technical details 2 Please note WHEN ORDERING FRU PARTS that you should check the most up to date information available on your regional web or channel If for whatever reason a part number change is made it will not be noted in the printe...

Page 6: ...VI ...

Page 7: ...Power 31 Boot 32 Exit 33 BIOS Flash Utility 34 DOS Flash Utility 35 WinFlash Utility 36 Remove HDD BIOS Password Utilities 37 Removing BIOS Passwords 38 Miscellaneous Utilities 39 Machine Disassembly and Replacement 43 Disassembly Requirements 43 Related Information 43 43 General Information 44 Pre disassembly Instructions 44 Disassembly Process 44 External Module Disassembly Process 45 External M...

Page 8: ...sembly Procedure 103 Replacing the Antennas 103 Replacing the Microphone 104 Replacing the LCD Brackets 105 Replacing the FPC Cable 107 Replacing the LCD Panel 108 Replacing the Camera Board 109 Replacing the LCD Bezel 109 Main Unit Reassembly Process 112 Replacing the LCD Module 112 Replacing the CPU 113 Replacing the Thermal Module 114 Replacing the Fan 116 Replacing the Mainboard 118 Replacing ...

Page 9: ...er Failures 164 Intermittent Problems 164 Undetermined Problems 165 POST Code Tables 166 Sec 166 Memory 166 DLL Timing Control Registers RCOMP settings 167 BDS Specific action 168 Each PEIM entry point used in 80_PORT 168 Jumper and Connector Locations 173 Top View 173 Bottom View 174 Clearing Password Check and BIOS Recovery 175 Clearing Password Check 175 BIOS Recovery by Crisis Disk 176 FRU Fie...

Page 10: ...X Table of Contents ...

Page 11: ...nk 802 11b g System Memory Dual channel support Up to 2 GB of DDR2 667 MHz memory upgradeable to 4 GB using two soDIMM modules Display and graphics 15 6 HD 1366 x 768 16 9 aspect ratio ATI Radeon HD 3200 Graphics Storage subsystem 2 5 hard disk drive DVD Super Multi double layer drive Multi in 1 card reader Audio subsystem Two built in stereo speakers High definition audio support MS Sound compati...

Page 12: ...5 W AC adapter ENERGY STAR Special keys and controls 99 100 103 key keyboard Touchpad pointing device I O interface Multi in 1 card reader SD MMC MS MS PRO xD USB 2 0 port External display VGA port Headphones speaker line out jack Microphone in jack Ethernet RJ 45 port DC in jack for AC adapter Environment Temperature Operating 5 C to 35 C Non operating 20 C to 65 C Humidity non condensing Operati...

Page 13: ...xpress 1x port 1 Port 3 Port 12 Port 5 MINI Card 1 WLAN Port 0 Dual Channel BANK 0 1 2 3 200pin DDRII SO DIMM X2 1 8V DDRII 667 800 Memory BUS DDRII Clock Generator SLG8SP626VTR Thermal Sensor ADM1032 ATI M92 S2 LP VRAM 512MB 64M16 x 4 PCI Express 8x DDR3 uFCBGA 528 uFCBGA 631 HDMI Conn HDA Codec ALC269X GR Phone Jack x2 Digital MIC LID SW Cap sensor Board Gen1 5 in 1 socket Card Reader RTS5159 Po...

Page 14: ...en Also called Liquid Crystal Display LCD displays computer output 4 Power button indicator Turns the computer on and off while indicating the computer s power status 5 Keyboard For entering data into your computer 6 TouchPad Touch sensitive pointing device which functions like a computer mouse 7 Click buttons left and right The left and right buttons function like the left and right mouse buttons...

Page 15: ...akers Left and right speakers deliver stereo audio output No Icon Item Description 1 Battery Indicator Indicates the computer s battery status 1 Charging The light shows amber when the battery is charging 2 Fully charged The light shows blue when in AC mode 2 5 in 1 card reader Accepts Secure Digital SD MultiMediaCard MMC Memory Stick MS Memory Stick PRO MS PRO xDPicture Card xD Note Push to remov...

Page 16: ...ilable 2 Ventilation slots Enable the computer to stay cool even after prolonged use 3 External display VGA port Connects to a display device e g external monitor LCD projector 4 USB 2 0 port Connect to USB 2 0 devices e g USB mouse USB camera 5 Microphone in jack Accepts inputs from external microphones Headphones speaker line out jack Connects to audio line out devices e g speakers headphones No...

Page 17: ...to an AC adapter No Icon Item Description 1 Battery bay Houses the computer s battery pack Note The battery shown is for reference only Your PC may have a different battery depending on the model purchased 2 Battery lock Locks the battery in position 3 Memory compartment Houses the computer s main memory 4 Hard Disk Bay Houses the computer s hard disk secured with screws 5 Ventilation slots and or...

Page 18: ...tes the status of Bluetooth communication Wireless LAN Indicates the status of Wireless LAN communication 3G communication Indicates the status of 3G communication HDD Indicates when the hard disk drive is active Num Lock Lights up when Num Lock is activated Caps Lock Lights up when Caps Lock is activated Battery Indicates the computer s battery status 1 Charging The battery light shows amber when...

Page 19: ...d keep it and your fingers dry and clean The TouchPad is sensitive to finger movement hence the lighter the touch the better the response Tapping too hard will not increase the TouchPad s responsiveness Function Left Button 2 Right Button 3 Main TouchPad 1 Execute Quickly click twice Tap twice at the same speed as double clicking a mouse button Select Click once Tap once Drag Click and hold then u...

Page 20: ... are in uppercase Num Lock Fn F11 When Num Lock is on the embedded keypad is in numeric mode The keys function as a calculator complete with the arithmetic operators and Use this mode when you need to do a lot of numeric data entry A better solution would be to connect an external keypad Scroll Lock Fn F12 When Scroll Lock is on the screen moves one line up or down when you press the up or down ar...

Page 21: ...Search for a file or folder L Lock your computer if you are connected to a network domain or switch users if you re not connected to a network domain M Minimizes all windows R Open the Run dialog box U Open Ease of Access Center BREAK Display the System Properties dialog box TAB Cycle through programs on the taskbar CTRL F Search for computers if you are on a network Note Depending on your edition...

Page 22: ... F3 Bluetooth communication switch Enables disables the Bluetooth function Fn F4 Sleep Puts the computer in Sleep mode Fn F5 Display toggle Switches display output between the display screen external monitor if connected and both Fn F6 Screen blank Turns the display screen backlight off to save power Press any key to return Fn F8 Speaker toggle Turns the speakers on and off Fn Brightness up Increa...

Page 23: ... Hold Alt Gr and then press the 5 key at the upper center of the keyboard NOTE Some fonts and software do not support the Euro symbol See www microsoft com typography faq faq12 htm for more information The US dollar sign 1 Open a text editor or word processor 2 Hold Shift and then press the 4 key at the upper center of the keyboard NOTE This function varies according to the language settings ...

Page 24: ...dge Item CPU Speed Cores Mfg Tech Cache Size Package Core Voltage Acer P N L310 1 2 GHz 2 65 nm 1 MB Micro PGA Variable KC AL002 310 TF20 1 6 GHz 1 65 nm 512 kB Micro PGA Variable KC ATF02 200 CPU Temperature Celsius Fan Speed RPM SPL Spec dBA 45 3100 28 50 3500 31 55 3900 34 63 4400 37 75 4700 40 Item Specification Chipset AMD RS780MN chipset Package 21MM 528 FCBGA Features CPU HyperTransport Int...

Page 25: ... 8GB Supports DIMM type 200 pin 1 8V DDRII SODIMM Supports DIMM Speed 667MHZ Item Specification Chipset Integrated VGA solution for AMD RS780MN UMA On board VGA solution for ATI M92 S2 LP DIS Package 21MM 528 FCBGA Integrated with Northbridge Features Highly optimized 128 bit engine capable of processing multiple pixels per clock Fully DirectX 10 0 compliant including full speed 32 bit floating po...

Page 26: ...325AS Capacity MB 250 320 500 Bytes per sector 512 512 512 Data heads 2 4 4 Drive Format Disks 1 2 2 Spindle speed RPM 5400 5400 5400 Performance Specifications Buffer size 8 MB 8MB 8 MB Interface SATA SATA SATA Internal transfer rate Mbits sec max 1175 830 1175 I O data transfer rate Mbytes sec max 875 Mbits s maximum 845 Mbits s maximum DC Power Requirements Voltage 5 0V 5 Item Specifications Ve...

Page 27: ...or Model Name Western Digital WD1600BEVT 22ZCTO Western Digital WD2500BEVT 22ZCT0 Western Digital WD3200BEVT 22ZCT0 Western Digital WD5000BEVT 22ZAT0 Capacity MB 160 250 320 500 Bytes per sector 512 Data heads 2 4 3 4 Drive Format Disks 1 2 2 2 Spindle speed RPM 5400 Performance Specifications Buffer size 8 MB Interface SATA Internal transfer rate Mbits sec max N A I O data transfer rate Mbytes se...

Page 28: ...Specification With CD Diskette With DVD Diskette Transfer rate MB sec Sustained 3 600 KB sec Sustained 10 800 KB sec Buffer Memory 2 MB Interface SATA Applicable disc formats CD R RW DVD R RW Loading mechanism Emergency Release draw open hole Power Requirement Input Voltage DC 5 V 5 Item Specification BIOS vendor Insyde BIOS Version 3 5 BIOS Features Flash ROM 1MB Support ISIPP Support multi boot ...

Page 29: ...nsumption watt TBD 4 17 Watt Weight without inverter TBD 429g Physical Size mm TBD 359 5 H typ 217 1 V typ 3 8 D max Electrical Interface TBD TBD Viewing Angle degree Horizontal Right Left Vertical Upper Lower TBD TBD Item Specification Audio Controller Realtek ALC269X GR for High Definition Audio Codec Features MIC IN AC coupled input 100mVP P maximum Headphone out 1VP P Built in Speaker 2 Watt 8...

Page 30: ...02 11a 802 11b 802 11g 802 11n 23 MBit s 4 3 MBit s 19 MBit s 130 MBit s Protocols Data transmit receive IEEE WLAN Standard IEEE 802 11a b g Draft N1 802 11d 802 11e 802 11i 802 11h Wi Fi Alliance Wi Fi Certified for 802 11 a 802 11 b 802 11 g WMM WPA and WPA2 Wi Fi Alliance Draft N1 and 802 11n certifications expected when available Security Authentication WPA7 and WPA27 802 1X LEAP EAP TLS PEAP ...

Page 31: ...Chapter 1 21 Pack capacity 4400 mAh Number of battery cells 6 Package configuration 3S2P Item Specification ...

Page 32: ...22 Chapter 1 ...

Page 33: ...e boot device without entering BIOS SETUP Utility Navigating the BIOS Utility There are six menu options Information Main Advanced Security Power Boot and Exit Follow these instructions To choose a menu use the left and right arrow keys To choose an item use the up and down arrow keys To change the value of a parameter press F5 or F6 A plus sign indicates the item has sub items Press Enter to expa...

Page 34: ...ber Universally Unique Identifier UUID is an identifier standard used in software construction standardized by the Open Software Foundation OSF as part of the Distributed Computing Environment DCE InsydeH20 Setup Utility Rev 3 5 F1 ESC Help Exit Select Item Select Menu Change Values Select SubMenu Enter F9 F10 Setup Default Save and Exit AMD Athlon tm X2 Dual Core Processor L310 1200 MHz WDC WD250...

Page 35: ...te server Option Enabled or Disabled F12 Boot Menu Enables disables Boot Menu during POST Option Enabled or Enabled D2D Recovery Enables disables D2D Recovery function The function allows the user to create a hidden partition on hard disc drive to store operation system and restore the system to factory defaults Option Enabled or Disabled SATA Mode Control the mode in which the SATA controller sho...

Page 36: ...nu PCI Slot 4 IRQ Priority PCI Slot 5 IRQ Priority PCI Slot 6 IRQ Priority Manual IRQ selection does not guarantee a PCI slot device will be configured as chosen PnP ISA cards are assigned resources first Boot Configuration Enter the Boot Configuration menu Numlock Item Specific Help PCI Configuration F1 ESC Help Exit Select Item Select Menu Change Values Select SubMenu Enter F9 F10 Setup Default ...

Page 37: ...USB Configuration Enter the USB Configuration menu USB 2 0 USB Legacy Chipset Configuration Enter the Chipset Configuration menu PCI Express Configurations GPP Slots Power Limit W Port 2 10 Features Gen2 High Speed Mode Link ASPM Link Width Slots Power Limit W L1 Immediate ACK Compliance Mode ACPI Table Features Control Enter the ACPI Table Features Control menu FACP C2 Latency Value FACP C3 Laten...

Page 38: ...en user password is set this password protects the BIOS Setup Utility from unauthorized access The user can enter Setup menu only and does not have right to change the value of parameters Set Hdd Password Enter HDD password Power on password Defines whether a password is required or not while the events defined in this group happened The following sub options are all required the Supervisor passwo...

Page 39: ...ter to Set 4 If desired you can opt to enable the Password on boot parameter 5 When you are done press F10 to save the changes and exit the BIOS Setup Utility Removing a Password Follow these steps 1 Use the and keys to highlight the Set Supervisor Password parameter and press the Enter key The Set Password box appears 2 Type the current password in the Enter Current Password field and press Enter...

Page 40: ... When you are done press F10 to save the changes and exit the BIOS Setup Utility If the verification is OK the screen will display as following The password setting is complete after the user presses Enter If the current password entered does not match the actual current password the screen will show you the Setup Warning If the new password and confirm new password strings do not match the screen...

Page 41: ...or Disable ACPI S1 S3 Sleep State N A ACPI S3 Enable or Disable ACPI S1 S3 Sleep State N A Wake on PME Disable or Enable wake up when the system power is off and a PCI Power Management Enable wake up event occurs N A Auto wake on S5 Disable or Enable auto wake up by date and time or at a fixed time everyday N A Item Specific Help These items control various CPU parameters F1 ESC Help Exit Select I...

Page 42: ...he list Press Esc to escape the menu F1 ESC Help Exit Select Item Select Menu Change Values Select SubMenu Enter F9 F10 Setup Default Save and Exit Boot priority order 1 IDE0 WDC WD2500BEVT 22ZCT0 2 IDE1 TSSTcorp CDDVDW TS U633A 3 USB FDD 4 Network Boot Realtek Boot Agent 5 USB HDD 6 USB CDROM Boot priority order 1 IDE0 WDC WD2500BEVT 22ZCT0 2 IDE1 TSSTcorp CDDVDW TS U633A 3 USB FDD 4 Network Boot...

Page 43: ... all SETUP item Discard Changes Load previous values from CMOS for all SETUP items Save Changes Save Setup Data to CMOS Item Specific Help Exit System Setup and save your changes to CMOS F1 ESC Help Exit Select Item Select Menu Change Values Select SubMenu Enter F9 F10 Setup Default Save and Exit Exit Saving Changes Exit Discarding Changes Load Setup Defaults Discard Changes Save Changes Exit Savi...

Page 44: ...34 Chapter 2 BIOS Flash Utility The BIOS flash memory update is required for the following conditions New versions of system programs New features or options Restore a BIOS when it becomes corrupted ...

Page 45: ...tinue 5 Flash is complete when the message Flash programming complete displays Item Specific Help Use or to select a device then press F5 to move it down the list or F6 to move it up the list Press Esc to escape the menu F1 ESC Help Exit Select Item Select Menu Change Values Select SubMenu Enter F9 F10 Setup Default Save and Exit Boot priority order 1 IDE0 WDC WD2500BEVT 22ZCT0 2 IDE1 TSSTcorp CDD...

Page 46: ...rm the following steps to use the WinFlash Utility 1 Double click the WinFlash executable 2 Click OK to begin the update A progress screen displays 3 When the process is complete close all programs and applications and reboot the system ...

Page 47: ...Make a note of the key 76943488 in the example 4 Boot up the system to a removable bootable drive containing DOS and the UnlockHD EXE program and open a DOS prompt For instructions on changing boot priority see Boot on page 32 5 Enter the UnlockHD EXE command and input the key to create an unlock code Make a note of the result for example 46548274 6 Reboot to the hard disk and wait for the error c...

Page 48: ...s System Disabled displays on the screen See the image below To reset the BIOS password run clnpwd exe as follows 1 From a DOS prompt Execute clnpwd exe 2 Press 1 or 2 to clean the desired password shown on the screen The on screen message determines whether the function is successful or not ...

Page 49: ...2 to change the boot sequence to HDD CD ROM LAN Floppy Using DMITools The DMI Desktop Management Interface Tool copies BIOS information to eeprom to be used in the DMI pool for hardware management When the BIOS displays Verifying DMI pool data it is checking the table correlates with the hardware before sending to the operating system Windows etc To update the DMI Pool perform the following steps ...

Page 50: ...t dmitools wp Acer Example 3 Write Serial Number to EEPROM Input dmitools ws 01234567890123456789 Example 4 Write UUID to EEPROM Input dmitools wu Example 5 Write Asset Tag to EEPROM Input dmitools wa Acer Asstag Using the LAN MAC Utility Perform the following steps to write MAC information to eeprom 1 Use a text editor for example Notepad to edit the MAC CFG file as shown WriteData 001122334455 M...

Page 51: ...Chapter 2 41 ...

Page 52: ...42 Chapter 2 ...

Page 53: ...screwdriver q Plastic tweezers NOTE The screws for the different components vary in size During the disassembly process group the screws with the corresponding components to avoid mismatch when putting back the components Related Information The product previews seen in the disassembly procedures may not represent the final product color or configuration IMPORTANT Cable paths and positioning may n...

Page 54: ...assembly q Main unit disassembly q LCD module disassembly The flowcharts provided in the succeeding disassembly sections illustrate the entire disassembly sequence Observe the order of the sequence to avoid damage to any of the hardware components For example if you want to remove the Mainboard you must first remove the Keyboard and LCD Module then disassemble the inside assembly frame in that ord...

Page 55: ...lowchart Screw List Step Screw Quantity Part No HDD Module M2 5 3 2 86 PEA02 003 HDD Carrier M3 3 4 86 PEA02 008 WLAN Board M2 3 1 86 PEA02 001 ODD Module M2 5 3 1 86 PEA02 009 ODD Bracket M2 3 silver 2 86 PEA02 002 Disconnect power and signal cables from system Remove Battery Turn off system and peripherals power Remove DIMMs Remove WLAN Remove HDD Remove ODD Remove Lower Covers Remove Dummy Card...

Page 56: ...e Battery Pack 1 Turn the computer over 2 Slide the battery lock unlock latch to the unlock position 3 Slide and hold the battery release latch to the release position 1 then slide out the battery pack from the main unit 2 1 2 ...

Page 57: ... Module 1 See Removing the Battery Pack on page 46 2 Loosen the two captive screws in the HDD Cover 3 Lift the HDD cover up using the finger tab to remove Six tabs hold the door in place 4 Remove the two screws securing the HDD Module in place ...

Page 58: ... arrow to disconnect the HDD from the interface connector 6 Lift the hard disk drive module out of the bay NOTE To prevent damage to device avoid pressing down on it or placing heavy objects on top of it Step Size Quantity Screw Type HDD Module M2 5 3 2 ...

Page 59: ...securing the hard disk to the carrier 8 Remove the HDD from the carrier Removing the Optical Disk Drive Module 1 See Removing the Battery Pack on page 46 2 Loosen the three captive screws in the HDD Cover Step Size Quantity Screw Type HDD Carrier M3 3 4 ...

Page 60: ...50 Chapter 3 3 Lift the HDD cover up using the finger tab to remove Six tabs hold the door in place 4 Remove the screw securing the ODD module ...

Page 61: ...er 3 51 5 Slide the ODD module out of the assembly 6 Remove the screws securing the ODD bracket and remove the ODD bracket from the optical disk drive module Step Size Quantity Screw Type ODD Module M2 5 3 1 ...

Page 62: ... 3 7 Insert an appropriate tool into the manual ODD tray release to open the ODD tray 8 Press down on the ODD bezel securing clip and pull the bezel out of the ODD Step Size Quantity Screw Type ODD Bracket M2 3 2 ...

Page 63: ...sing the thumb tab indicated by the circle below to release the seven clips securing the cover in place 4 Identify the SODIMM to remove The image below shows the locations of SODIMM slot 0 and SODIMM slot 1 Slot 0 must be populated first when installing or replacing defective memory 5 Push out the release latches on both sides of SODIMM socket 1 to release the memory module 0 1 ...

Page 64: ...54 Chapter 3 6 Remove the DIMM 7 Push out the release latches on both sides of SODIMM socket 0 to release the DIMM 8 Remove the DIMM ...

Page 65: ...Chapter 3 55 ...

Page 66: ... in the HDD Cover 3 Lift the HDD cover up to remove Use the finger tab to release the six clips securing the cover in place NOTE The HDD is also located under this cover 4 Disconnect the Antenna cables from the WLAN Board NOTE Cable placement is White to the AUX terminal right and Black to the MAIN terminal left ...

Page 67: ...Chapter 3 57 5 Remove the single screw securing the WLAN Board in place 6 Remove the WLAN Board from the Mainboard Step Size Quantity Screw Type WLAN Board M2 3 1 ...

Page 68: ...t Step Screw Quantity Part No Upper Cover M2 5 8 18 86 PEA02 006 Upper Cover M2 5 6 7 86 PEA02 007 Button Board M2 3 3 86 PEA02 002 TouchPad Bracket M2 3 1 86 PEA02 002 Power Board M2 5 3 1 86 PEA02 001 Speaker Module M2 5 3 4 86 PEA02 001 Media Board M2 5 3 1 86 PEA02 001 Remove Mainboard Remove Keyboard Remove Upper Cover Remove LCD Module Remove Power Board Remove External Modules before procee...

Page 69: ... 5 6 1 86 PEA02 007 Mainboard M2 5 6 1 86 PEA02 007 Mainboard Fan M2 5 6 1 86 PEA02 007 LCD Module M2 5 6 3 86 PEA02 007 Fan M2 5 6 1 86 PEA02 007 Thermal Module M2 5 6 spring tension 4 86 PEA02 004 Step Screw Quantity Part No ...

Page 70: ...id to the full extent 3 Unlock the six securing latches by pressing down with a suitable plastic tool then sliding along the back edge of the keyboard IMPORTANT The use of metal tools may damage the outer casing Use plastic tools where available 4 Pull up on the center of the keyboard to release the two tabs on each side and lift the Keyboard away from the Upper Cover as shown IMPORTANT Do not rem...

Page 71: ...Chapter 3 61 6 Open the Keyboard FFC securing latch as shown then disconnect the FFC and remove the Keyboard ...

Page 72: ...al Modules Disassembly Flowchart on page 45 2 Remove the screws securing the Upper Cover to the Lower Cover 3 Turn the computer over and disconnect the following cables from the Mainboard a Disconnect the Speaker Cable as shown Step Size Quantity Screw Type Upper Cover M2 5 8 18 ...

Page 73: ... Release the locking latch and disconnect the Power Board FFC as shown c Release the locking latch and disconnect the Button Board FFC as shown d Release the locking latch and disconnect the Media Board FFC as shown ...

Page 74: ...64 Chapter 3 4 Remove the seven securing screws from the Upper Cover 5 Starting at a top corner pry apart the Upper and Lower Covers as shown Step Size Quantity Screw Type Upper Cover M2 5 6 7 ...

Page 75: ...Chapter 3 65 6 Working from the back corners toward the back center pry apart the covers to release the securing hooks on the top edge as shown 7 Lift the cover away from the assembly ...

Page 76: ...1 See Removing the Upper Cover on page 62 2 Remove the mylar sheet covering the Button Board 3 Lift the securing latch and disconnect the single FFC connecting the Button Board to the Touchpad 4 Pull the Mainboard FFC through the opening in the upper cover and separate it from the adhesive securing it in place 5 Detach the button board FFC from the adhesive ...

Page 77: ...the three screws securing the button board to the Upper Cover 7 Pull the Mainboard FFC through the cover as shown IMPORTANT Ensure that the FFC is not torn off during removal Step Size Quantity Screw Type Button Board M2 3 3 ...

Page 78: ...cket to the Upper Cover 3 Pull the bracket up from under the securing tabs along the top edge NOTE It may be necessary to use a tool to first push the securing tabs back so that the bracket may be more readily removed 4 Slide the Touchpad Bracket out from the slots in the upper cover Step Size Quantity Screw Type TouchPad Bracket M2 3 1 ...

Page 79: ...Chapter 3 69 ...

Page 80: ... the Lower Cover 3 Pull the FFC up to remove it from the adhesive securing it to the Speaker Module 4 Tilt the board 90 degrees to clear the securing tab IMPORTANT The FFC is soldered to the power board Take care when lifting to minimize bending of the connection lest breakage occur Step Size Quantity Screw Type Power Board M2 5 3 1 ...

Page 81: ...Chapter 3 71 5 Lift the Power Board from the Lower Cover ...

Page 82: ...ift the right side speaker out from the Lower Cover and peel back the mylar to expose the speaker wire as shown 4 Peel back the mylar sheet to expose the speaker cable all the way to the left speaker 5 Remove the Speaker Cable from the cable channel Ensure that the cable is free from all cable clips Step Size Quantity Screw Type Speaker Module M2 5 3 4 ...

Page 83: ...Chapter 3 73 6 Lift the right side speaker out from the Lower Cover as shown ...

Page 84: ... the Speaker Modules on page 72 2 Remove the single screw securing the Media Board to the Lower Cover 3 Peel back any mylar adhered to the Media Board 4 Tilt the Media Board up to clear the securing pins Step Size Quantity Screw Type Media Board M2 5 3 1 ...

Page 85: ...Chapter 3 75 5 Remove the Media Board pulling the FFC through the cover as shown IMPORTANT Ensure that the FFC is not torn off during removal ...

Page 86: ...apter 3 Removing the Bluetooth Module 1 See Removing the Upper Cover on page 62 2 Disconnect the cable from the Bluetooth Module 3 Lift the Bluetooth Module left side first to remove it from the Lower Cover ...

Page 87: ...I O Board 1 See Removing the Upper Cover on page 62 2 Open the locking latch and disconnect the FFC from the Mainboard 3 Disconnect the cable from the Mainboard 4 Remove the single screw securing the I O Board to the Lower Cover ...

Page 88: ...78 Chapter 3 5 Tilt the board up as indicated and carefully flip the board over 6 Remove the adhesive securing the I O Board cable to the Lower Cover Step Size Quantity Screw Type I O Board M2 5 6 1 ...

Page 89: ...Chapter 3 79 7 Disconnect the I O Board Cable from the I O Board ...

Page 90: ...d on page 77 2 Remove the DC In Socket from the well on the bottom cover 3 Remove the DC cable from the securing clips as shown NOTE If replacing the DC cable the mainboard must be lifted to access the connector See Removing the Mainboard on page 81 for instructions ...

Page 91: ...Chapter 3 81 Removing the Mainboard 1 See Removing the DC In Cable on page 80 2 Disconnect the Microphone cable from the Mainboard 3 Disconnect the Bluetooth cable from the Mainboard ...

Page 92: ...Fan to the Lower Cover as indicated 5 Lift the Mainboard right side first to release the I O ports and separate the board from the Lower Cover NOTE Please detach the mainboard and follow local regulations for disposal Step Size Quantity Screw Type Mainboard M2 5 6 2 ...

Page 93: ...Chapter 3 83 6 Reach under the mainboard to unplug the LVDS cable 7 Disconnect the DC In Cable from the mainboard ...

Page 94: ...the adhesive strip securing the WLAN cables in place 3 Remove the sponge securing the cables in the cable channel 4 Remove the Antenna cables from the cable channel on the Lower Cover as shown all the way to the hinge well 5 Remove the Microphone cable from the securing clips as shown ...

Page 95: ...r Cover securing the LCD Module to the Lower Cover IMPORTANT Ensure that the LCD cables are free from all cable clips before removing the LCD Module 7 Using both hands lift the LCD Module away from the Lower Cover Step Size Quantity Screw Type LCD Module M2 5 6 3 ...

Page 96: ...n 1 See Removing the Mainboard on page 81 2 Disconnect the fan cable from the Mainboard 3 Remove the single screw securing the fan to the Mainboard 4 Lift the fan away from the Mainboard Step Size Quantity Screw Type Fan M2 5 6 1 ...

Page 97: ...Chapter 3 87 ...

Page 98: ...n on page 86 2 Remove the four screws securing the Thermal Module to the Mainboard in the following order 1 2 3 4 3 Grasp the Thermal Module by the CPU heat sink and lift clear of the Mainboard as shown Step Size Quantity Screw Type Thermal Module M2 5 6 4 1 2 3 4 ...

Page 99: ...89 Removing the CPU 1 See Removing the Thermal Module on page 88 2 Using a flat blade screw driver rotate the CPU screw 180 counter clockwise to release the CPU from the socket 3 Lift the CPU clear of the socket ...

Page 100: ... in the same position NOTE The product previews seen in the disassembly procedures may not represent the final product color or configuration LCD Module Disassembly Flowchart Screw List Step Screw Quantity Part No LCD Bezel M2 5 4 4 86 PEA02 003 LCD Panel M2 3 4 86 PEA02 002 Remove LCD Panel Remove LCD Bezel Remove LCD FPC Cable Remove LCD Panel from Main Unit before proceeding Remove LCD Brackets...

Page 101: ...el to the LCD cover 3 Starting from the inside top edge pry the bezel away from the panel Continue moving along the top prying the bezel away from the LCD Module If necessary use a plastic pry to release the corners of the bezel 4 Release the bottom edge of the bezel separating the securing clips Step Size Quantity Screw Type LCD Bezel M2 5 4 4 p ...

Page 102: ...92 Chapter 3 5 Pry apart the hinge covers as shown 6 Release the bottom edges of the LCD Module 7 Lift up the bezel and remove it from the LCD Module ...

Page 103: ...Chapter 3 93 ...

Page 104: ...94 Chapter 3 Removing the Camera Board 1 See Removing the LCD Bezel on page 91 2 Remove the Camera Board from the LCD Module 3 Disconnect the cable from the Camera Board as shown ...

Page 105: ...See Lift up the bezel and remove it from the LCD Module on page 92 2 Remove the four screws securing the LCD Panel to the LCD Module 3 Lift the LCD Panel out of the LCD Module front edge first Step Size Quantity Screw Type LCD Panel M2 3 4 ...

Page 106: ...page 95 2 Turn the LCD panel over on a clean surface 3 Lift the camera cable to detach the adhesive securing the cable to the LCD Panel 4 Carefully lift the adhesive tape securing the LVDS cable connector to the LCD Panel 5 Hold the adhesive tape clear of the LCD Panel ...

Page 107: ...Chapter 3 97 6 Disconnect the LCD cable as shown and remove the cable from the LCD Panel ...

Page 108: ...he LCD Panel on page 95 2 Pick up the antenna cable so the bracket can clear the cable 3 Lift the top of the left LCD Bracket up and slide out from under the antenna cable 4 Lift the top of the right LCD Bracket up and slide out from under the antenna cable ...

Page 109: ...o the antenna cables 3 Remove the Microphone cable from the shielding along the bottom edge of the LCD Cover 4 Lift up the shielding where it covers the Microphone cable and lift the cable as shown to remove the adhesive securing it to the LCD Cover 5 Lift the Microphone Module upward to detach the adhesive holding it in place ...

Page 110: ...100 Chapter 3 ...

Page 111: ...antenna cables 3 Lift up the shielding holding the right Antenna cable in place Ensure that the cable is free from all fasteners 4 Carefully pry up the right Antenna pad as shown and remove the pad from the LCD Module IMPORTANT A strong adhesive is used to secure the Antenna pad in place Take care not to bend the pad during removal ...

Page 112: ...na cable in place Ensure that the cable is free from all fasteners 6 Carefully pry up the left Antenna pad and remove the pad from the LCD Module IMPORTANT A strong adhesive is used to secure the Antenna pad in place Take care not to bend the pad during removal ...

Page 113: ... Antennas 1 Adhere the Left Antenna Pad White cable to the LCD Cover as shown 2 Replace the shielding to secure the left Antenna cable in place Ensure that the cable passes under all fasteners 3 Adhere the Left Antenna Pad Black cable to the LCD Cover as shown ...

Page 114: ...cable in place Ensure that the cable passes under all fasteners Replacing the Microphone 1 Push the Microphone Module in place as shown 2 Press the cable onto the LCD cover as shown to secure it in place Adhere the shielding tabs where they cover the Microphone cable ...

Page 115: ...able under the shielding tabs along the bottom edge of the LCD Cover 4 Apply tape to secure the Microphone cable to the antenna cables Replacing the LCD Brackets 1 Lift the antenna cable and slide the left LCD Bracket under the antenna cable ...

Page 116: ...racket on the LCD cover so the LCD Cover pins penetrate the bracket 3 Lift the antenna cable and slide the right LCD Bracket under the antenna cable 4 Place the LCD bracket on the LCD cover so the LCD Cover pins penetrate the bracket ...

Page 117: ...Chapter 3 107 Replacing the FPC Cable 1 Connect the LCD cable as shown 2 Adhere the clear adhesive tape to the LCD Panel 3 Adhere the camera cable to the LCD Panel ...

Page 118: ...Panel 1 Place the LCD Panel into of the LCD Cover back edge first aligning the pins with the holes in the mounting tabs 2 Insert the four screws to secure the LCD Panel to the LCD Module Step Size Quantity Screw Type LCD Panel M2 3 4 ...

Page 119: ... Place the Camera Board into the LCD Module so that the mounting pins are aligned and press down to secure to the adhesive NOTE Be sure the magnet rests next to the post on the LCD cover as shown Replacing the LCD Bezel 1 Route the LVDS cable through the cable channel and hinge cover as shown ...

Page 120: ... cover as shown 3 Connect the left and right hinge cover part of the LCD bezel making sure that the cables pass through the holes 4 Press down on the bottom edge of the bezel until the securing clips snap into place 5 Continue pressing down along the edges working towards the top of the LCD Module ...

Page 121: ...Chapter 3 111 IMPORTANT If any of the clips do not readily snap into place check to make sure that none of the cables have been incorrectly routed and are blocking the clip ...

Page 122: ...sing both hands place the LCD Module into the Lower Cover 2 Replace the three screws on the rear of the Lower Cover to secure the LCD Module to the Lower Cover 3 Insert the Microphone cable into the securing clips as shown Step Size Quantity Screw Type LCD Module M2 5 6 3 ...

Page 123: ... adhesive strip to secure the WLAN cables in place Replacing the CPU 1 Place the CPU into the socket IMPORTANT Be sure to align the socket marker with the indicator on the CPU The socket is a Zero Insertion Force ZIF socket If the CPU does not drop into the socket check to make sure the socket is unlocked and the pins of the CPU ar straight Never force a CPU into a ZIF socket ...

Page 124: ...RTANT Ensure all heat pads are in place before replacing the Thermal Module The following thermal pads are approved for use Eapus XR PE 1 Remove all traces of thermal grease or pad adhesive from the CPU and thermal module using a lint free cloth or cotton swab and Isopropyl Alcohol Acetone or other approved cleaning agent 2 Place the pads as shown ...

Page 125: ...Chapter 3 115 3 Grasp the Thermal Module by the CPU heat sink and place onto the Mainboard as shown ...

Page 126: ...4 Insert the four screws to secure the Thermal Module to the Mainboard in the following order 1 2 3 4 Replacing the Fan 1 Place the fan onto the Mainboard Step Size Quantity Screw Type Thermal Module M2 5 6 4 1 2 3 4 ...

Page 127: ...Chapter 3 117 2 Insert the single screw to secure the fan to the Mainboard 3 Connect the fan cable to the Mainboard Step Size Quantity Screw Type Fan M2 5 6 1 ...

Page 128: ...ter 3 Replacing the Mainboard 1 Connect the DC In Cable to the mainboard 2 Reach under the mainboard to plug in the LVDS cable 3 Insert the Mainboard right side first aligning the I O ports with the Lower Cover ...

Page 129: ...Chapter 3 119 4 Insert the LVDS cable into the cable channel as shown 5 Insert the DC In cable into the securing clips as shown ...

Page 130: ...120 Chapter 3 6 Insert the two screws securing the Mainboard and Fan to the Lower Cover as indicated 7 Connect the Microphone Cable to the Mainboard Step Size Quantity Screw Type Mainboard M2 5 5 2 ...

Page 131: ...t the I O Board Cable to the I O Board 2 Apply the adhesive to secure the I O Board cable to the Lower Cover 3 Insert the board into the lower cover so the white tab is under the securing clip in the lower cover taking care to align the screw holes ...

Page 132: ...122 Chapter 3 4 Insert the single screw to secure the I O Board to the Lower Cover 5 Connect the cable to the Mainboard Step Size Quantity Screw Type I O Board M2 5 6 1 ...

Page 133: ... FFC to the Mainboard and close the locking latch Replacing the Bluetooth Module 1 Insert the Bluetooth Module right side first and press down on the top to attach it to the Lower Cover 2 Connect the cable to the Bluetooth Module ...

Page 134: ... Mainboard Replacing the Media Board 1 Insert the Media Board FFC through the cover as shown 2 Holding the mylar back insert the Media Board under the securing clips in the upper cover and place on the upper cover so the aligning pins are in the holes ...

Page 135: ... to the Media Board and insert the single screw to secure the Media Board to the Lower Cover Replacing the Speaker Modules 1 Place the right side speaker onto the Lower Cover as shown Step Size Quantity Screw Type Media Board M2 5 3 1 ...

Page 136: ...e right side speaker into the Lower Cover and peel back the mylar to expose the wire guides as shown 3 Peel back the mylar and insert the Speaker Cable into the cable channel Ensure that the cable passes under all cable clips ...

Page 137: ...Board into the Lower Cover so the slot on the Power Board hooks onto the securing tab in the upper cover IMPORTANT The FFC is soldered to the power board Take care when lifting to minimize bending of the connection lest breakage occur 2 Adhere the FFC to the Speaker Module Step Size Quantity Screw Type Speaker Module M2 5 3 4 ...

Page 138: ...3 Insert the single screw to secure the Power Board to the Lower Cover Replacing the Touchpad Bracket 1 Slide the Touchpad Bracket into the slots in the upper cover Step Size Quantity Screw Type Power Board M2 5 3 1 ...

Page 139: ...129 2 Push the bracket down until it is secured under the tabs along the top edge 3 Insert the single screw to secure the Touchpad Bracket to the Upper Cover Step Size Quantity Screw Type TouchPad Bracket M2 3 1 ...

Page 140: ...oard FFC through the cover as shown 2 Replace the three screws to secure the button board to the Upper Cover 3 Slide the aminboard FFC through the cutout in the upper cover and adhere the FFCs to the upper cover Step Size Quantity Screw Type Button Board M2 3 4 ...

Page 141: ... 131 4 Connect the single FFC to the Touchpad and close the securing latch 5 Replace the mylar sheet covering the Button Board Replacing the Upper Cover 1 Place the Upper Cover on the assembly bottom edge first ...

Page 142: ...132 Chapter 3 2 Starting at the bottom edge press the edges of the upper cover and lower cover together An audible click signifies that the securing clips are engaged ...

Page 143: ...Chapter 3 133 3 Insert the seven securing screws into the Upper Cover 4 Turn the computer over and connect the following cables to the Mainboard Step Size Quantity Screw Type Upper Cover M2 5 6 7 ...

Page 144: ...134 Chapter 3 a Connect the Power Board FFC and close the locking latch as shown b Connect the Speaker Cable as shown c Connect the Button Board FFC and close the locking latch as shown ...

Page 145: ...Chapter 3 135 d Connect the Media Board FFC and close the locking latch as shown e Connect the Media Board FFC and close the locking latch as shown ...

Page 146: ... computer over and insert the screws to secure the Upper Cover to the Lower Cover Replacing the Keyboard 1 Connect the FFC and close the Keyboard FFC securing latch as shown Step Size Quantity Screw Type Upper Cover M2 5 8 18 ...

Page 147: ...Chapter 3 137 2 Insert the keyboard so that the bottom tabs enter the slots in the upper cover 3 Press down on the edges of the keyboard An audible click indicates that the securing clips have engaged ...

Page 148: ... 3 External Module Reassembly Process Replacing the WLAN Board 1 Insert the WLAN Board into the Mainboard 2 Insert the single screw to secure the WLAN Board in place Step Size Quantity Screw Type WLAN Board M2 3 1 ...

Page 149: ...T Ensure that the cables are tucked into the chassis to prevent them from being pinched when the lower covers are replaced Replacing the DIMM Modules 1 Identify the SODIMM to replace The image below shows the locations of SODIMM slot 0 and SODIMM slot 1 Slot 0 must be populated first when installing or replacing defective memory 2 Insert a DIMM into Slot 0 0 1 ...

Page 150: ... DIMM down into the socket as shown An audible click indicates the DIMM is properly installed 4 Insert a DIMM into Slot 1 5 Press the DIMM down into the socket as shown An audible click indicates the DIMM is properly installed ...

Page 151: ...le 1 Place the HDD into the carrier 2 Insert the four screws two each side to secure the hard disk to the carrier Carrier screw holes have been numbered 1 4 Insert the screws in numerical order 1 2 3 4 Step Size Quantity Screw Type HDD Carrier M3 3 4 ...

Page 152: ...isk drive module into the bay 4 Slide the HDD in the direction of the arrow to connect the HDD to the SATA interface connector 5 Insert the two screws to secure the HDD Module in place Step Size Quantity Screw Type HDD Module M2 5 4 2 ...

Page 153: ... the ODD bezel as shown 2 Slide the securing clip of the ODD bezel into the slot on the ODD module An audible click indicates the hook has engaged 3 Insert the two screws to secure the ODD bracket in place Step Size Quantity Screw Type ODD Bracket M2 3 2 ...

Page 154: ...144 Chapter 3 4 Slide the ODD module into the assembly 5 Insert the screw to secure the ODD module Step Size Quantity Screw Type ODD Module M2 5 3 1 ...

Page 155: ... 3 145 Replacing the Lower Covers 1 Place the HDD cover over the HDD bay Press until the six tabs in the door engage 2 Tighten the two captive screws in the HDD Cover 3 Place the Memory Cover on the memory bay ...

Page 156: ...146 Chapter 3 4 Press down until the seven clips in the cover snap into place 5 Tighten the two captive screws in the Memory Cover ...

Page 157: ...Chapter 3 147 Replacing the Battery 1 Slide the battery into the battery bay as shown 2 Slide the battery lock unlock latch to the lock position ...

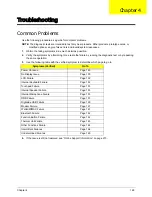
Page 158: ...lowing table with the verified symptom to determine which page to go to 4 If the Issue is still not resolved see Online Support Information on page 210 Symptoms Verified Go To Power On Issue Page 149 No Display Issue Page 150 LCD Failure Page 152 Internal Keyboard Failure Page 152 Touchpad Failure Page 153 Internal Speaker Failure Page 153 Internal Microphone Failure Page 155 ODD Failure Page 157 ...

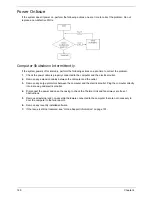
Page 159: ... outlet 2 Remove any extension cables between the computer and the outlet 3 Remove any surge protectors between the computer and the electrical outlet Plug the computer directly into a known good electrical outlet 4 Disconnect the power and open the casing to check the Thermal Unit and fan airways are free of obstructions 5 Remove all external and non essential hardware connected to the computer t...

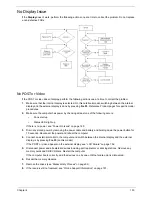
Page 160: ... power see Power On Issue on page 149 3 Drain any stored power by removing the power cable and battery and holding down the power button for 10 seconds Reconnect the power and reboot the computer 4 Connect an external monitor to the computer and switch between the internal display and the external display is by pressing Fn F5 on this model If the POST or video appears on the external display see L...

Page 161: ...he Resolution slider to the desired resolution e Click Apply and check the display Readjust if necessary 6 Roll back the video driver to the previous version if updated 7 Remove and reinstall the video driver 8 Check the Device Manager to determine that The device is properly installed There are no red Xs or yellow exclamation marks There are no device conflicts No hardware is listed under Other D...

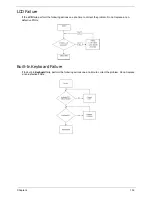
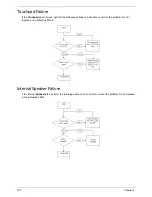
Page 162: ...he following actions one at a time to correct the problem Do not replace a non defective FRUs Built In Keyboard Failure If the built in Keyboard fails perform the following actions one at a time to correct the problem Do not replace a non defective FRUs ...

Page 163: ... perform the following actions one at a time to correct the problem Do not replace a non defective FRUs Internal Speaker Failure If the internal Speakers fail perform the following actions one at a time to correct the problem Do not replace a non defective FRUs ...

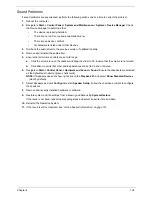
Page 164: ...ag the slider to 50 Ensure that the volume is not muted b Click Mixer to verify that other audio applications are set to 50 and not muted 6 Navigate to Start Control Panel Hardware and Sound Sound Ensure that Speakers are selected as the default audio device green check mark NOTE If Speakers does not show right click on the Playback tab and select Show Disabled Devices clear by default 7 Select Sp...

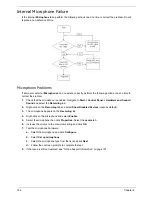
Page 165: ...d select the Recording tab 2 Right click on the Recording tab and select Show Disabled Devices clear by default 3 The microphone appears on the Recording tab 4 Right click on the microphone and select Enable 5 Select the microphone then click Properties Select the Levels tab 6 Increase the volume to the maximum setting and click OK 7 Test the microphone hardware a Select the microphone and click C...

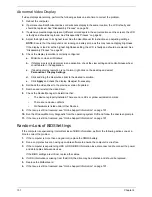
Page 166: ...ocate and resolve issues with the computer i When complete click Finish If an issue is discovered follow the onscreen information to resolve the problem 4 Run the Windows Memory Diagnostic Tool For more information see Windows Help and Support 5 Restart the computer and press F2 to enter the BIOS Utility Check the BIOS settings are correct and that CD DVD drive is set as the first boot device on t...

Page 167: ...s do not burn correctly DVD or CD play breaks up or jumps Optical drive not found or not active Not shown in My Computer or the BIOS setup LED does not flash when the computer starts up The tray does not eject Access failure screen displays The ODD is noisy Perform the following general solutions one at a time to correct the problem 1 Reboot the computer and retry the operation 2 Try an alternate ...

Page 168: ...oPlay b Select Use AutoPlay for all media and devices c In the Audio CD and DVD Movie fields select the desired player from the drop down menu 5 Check that the Regional Code is correct for the selected media IMPORTANT Region can only be changed a limited number of times After Changes remaining reaches zero the region cannot be changed even Windows is reinstalled or the drive is moved to another co...

Page 169: ...or bent or broken pins on the drive motherboard and cable connections c Try an alternate cable if available If the drive works with the new cable the original cable should be replaced 4 Reseat the drive ensuring and all cables are connected correctly 5 Replace the ODD See Disassembly Process on page 52 Drive Read Failure If discs cannot be read when inserted in the drive perform the following acti...

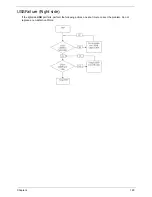
Page 170: ...Chapter 4 160 USB Failure Right side If the rightside USB port fails perform the following actions one at a time to correct the problem Do not replace a non defective FRUs ...

Page 171: ...e at a time to correct the problem Do not replace a non defective FRUs Start Reconnect the Antenna to the card Check Antenna to WLAN WiMAX C ard Check Antenna Swap the Antenna Check WLAN WiMAX Card Swap WLAN WiMAX Card Check Function Board Swap Function Board Swap Mainboard OK OK OK OK NG NG NG NG ...

Page 172: ...defective FRUs Start Reconnect the cable to the module Check BT cable connected Check BT cable Swap the cable Check BT Module Swap BT Module Check Function Board Swap Function Board Swap Mainboard OK OK OK OK NG NG NG NG Start Check function B to M B FFC Re assemble the function B FFC to M B OK NG Check function B and FFC OK Swap The function B OK NG Swap M B Start Check function B to M B FFC Re a...

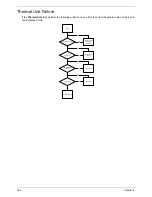
Page 173: ...wing actions one at a time to correct the problem Do not replace a non defective FRUs Start Reconnect the cable to the Mainboard Check Fan power cable Check Fan Swap the Thermal Module CPU Heatink well seated Seat it well Check CPU Swap CPU Swap Mainboard OK OK OK OK NG NG NG NG ...

Page 174: ... mouse driver 12 Check the Device Manager to determine that The device is properly installed There are no red Xs or yellow exclamation marks There are no device conflicts No hardware is listed under Other Devices 13 If the Issue is still not resolved see Online Support Information on page 191 Other Failures If the CRT Switch Dock LAN Port external MIC or Speakers PCI Express Card 5 in 1 Card Reade...

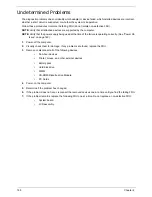
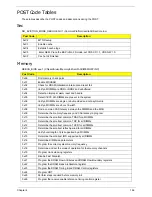
Page 175: ...failure is operating correctly See Power On Issue on page 149 1 Power off the computer 2 Visually check them for damage If any problems are found replace the FRU 3 Remove or disconnect all of the following devices Non Acer devices Printer mouse and other external devices Battery pack Hard disk drive DIMM CD ROM Diskette drive Module PC Cards 4 Power on the computer 5 Determine if the problem has c...

Page 176: ... x8 or x16 width 0x08 Find a common CAS latency between the DIMMS and the MCH 0x09 Determine the memory frequency and CAS latency to program 0x10 Determine the smallest common TRAS for all DIMMs 0x11 Determine the smallest common TRP for all DIMMs 0x12 Determine the smallest common TRCD for all DIMMs 0x13 Determine the smallest refresh period for all DIMMs 0x14 Verify burst length of 8 is supporte...

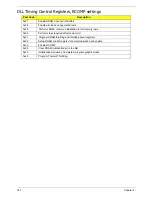
Page 177: ...EDEC memory initialization for all memory rows 0x30 Perform steps required after memory init 0x31 Program DRAM throttling and throttling event registers 0x32 Setup DRAM control register for normal operation and enable 0x33 Enable RCOMP 0x34 Clear DRAM initialization bit in the SB 0x35 Initialization Sequence Completed program graphic clocks 0x43 Program Thermal Throttling ...

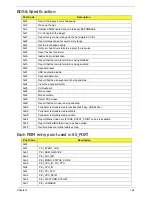
Page 178: ...led 0x90 Keyboard reset 0x91 USB Keyboard disable 0x92 Keyboard detection 0x93 Report that the usb keyboard is being enabled 0x94 Clear the keyboard buffer 0x95 Init Keyboard 0x98 Mouse reset 0x99 Mouse disable 0x9A Detect PS2 mouse 0x9B Report that the mouse is being enabled 0xB8 Peripheral removable media reset ex IsaFloppy USB device 0xB9 Peripheral removable media disable 0xBB Peripheral remov...

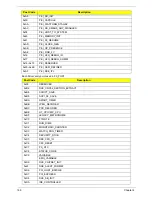
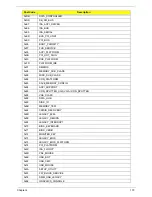
Page 179: ...PEI_OEM_DEFINED 0xAF PEI_DXE_IPL Post Code Description 0x30 RESERVED 0xB6 DXE_CRC32_SECTION_EXTRACT 0xB8 SCRIPT_SAVE 0xB9 ACPI_S3_SAVE 0xBA SMART_TIMER 0xBB JPEG_DECODER 0xBC PCX_DECODER 0xBE HT_CPU MP_CPU 0xBF LEGACY_METRONOME 0xC0 FTWLITE 0xC1 RUN_RIME 0xC2 MONOTONIC_COUNTER 0xC3 WATCH_DOG_TIMER 0xC4 SECURITY_STUB 0xC5 DXE_CPU_IO 0xC6 CF9_RESET 0xC7 PC_RTC 0xC8 STATUS_CODE 0xC9 VARIABLE EMU_VARI...

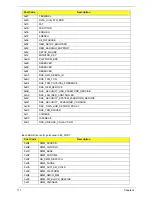
Page 180: ...M 0x83 SAVE_MEMORY_CONFIG 0x84 ACPI_SUPPORT 0x85 CON_SPLITTER_UGA_VGA CON_SPLITTER 0x88 VGA_CLASS 0x89 DATA_HUB 0x60 DISK_IO 0x8B MEMORY_TEST 0x62 CRISIS_RECOVERY 0x8D LEGACY_8259 0x8E LEGACY_REGION 0x8F LEGACY_INTERRUPT 0x70 BIOS_KEYBOARD 0x71 BIOS_VEDIO 0x72 MONITER_KEY 0x73 LEGACY_BIOS 0x75 LEGACY_BIOS_PLATFORM 0x76 PCI_PLATFORM 0x6C ISA_FLOOPY 0x6D PS2_MOUSE 0x6E USB_BOT 0x6F USB_CBI0 0x74 USB...

Page 181: ...XE_TPM_PHYSICAL_PRESENCE 0xB7 DXE_OEM_SERVICE 0x9B DXE_ SECURITY_HDD_PASSWORD_SERVICE 0xA9 DXE_LAN_IDER_CONTROLLER 0x9C DXE_ SECURITY_SYSTEM_PASSWORD_SERVICE 0x9D DXE_ SECURITY_ PASSWORD_CONSOLE 0xCB DXE_ DATA_HUB_RECORD_POLICY 0xB5 DXE_TPM_DRIVER 0x11 CHINESE 0xB0 JAPANESE 0xB1 DXE_UNICODE_COLLACTION Post Code Description 0xD4 SMM_ACCESS 0xDE SMM_CONTROL 0xCC SMM_BASE 0xD2 SMM_RUNTIME 0xDF SB_SMM...

Page 182: ...Chapter 4 172 0x92 SMM_IHISI 0x93 SMM_INT15_MICROCODE 0x94 SMM_PNP 0x95 SMM_INIT_PPM 0xD3 SMM_OEM_SERVICE Post Code Description ...

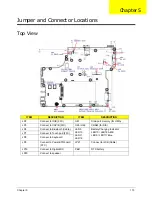
Page 183: ...onnect to CAP B FFC U65 U68 VRAM for DIS JP4 Connect to Bluetooth Cable LED9 LED10 LED11 LED12 Battery Charging Indicator LED10 LED12 AMB LED9 LED11 Blue JP7 Connect to Touch pad FFC JP8 Connect to Keyboard JP9 Connect to Power BTN board FFC JP21 Connect to IO B Cable JP19 Connect to Digital MIC PBJ1 RTC battery JP20 Connect to speaker Chapter 5 ...

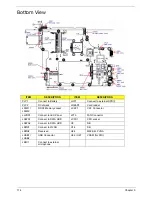
Page 184: ...D1 Card reader JDIM1 JDIM2 DDR2 Memory socket JCRT1 CRT Connector JLVDS1 Connect to LED Panel JP13 FAN Connector JSATA1 Connect to SATA ODD JCPU1 CPU socket JSATA2 Connect to SATA HDD U3 NB JMINI1 Connect to WLAN U14 SB JMINI2 Reserved U64 M92 S2LP VGA JUSB1 JUSB2 USB Connector U66 U67 VRAM for DIS JMIC1 Connect to external microphone ...

Page 185: ... clear the password by the following steps 1 Flash to BIOS v1 04 or later version and enter BIOS Setup Utility 2 Set the Supervisor password User Password and power on password Press F10 and save and exit After the Save the notebook auto re starts 3 After power on the system prompts to input the password Enter the password set in step 1 and allow the device to startup 4 Press and hold the power ke...

Page 186: ...r and Battery present If this function is enabled the system will force the BIOS to enter a special BIOS block called Boot Block Steps for BIOS Recovery from USB Storage Before doing this prepare the Crisis USB key The Crisis USB key could be made by executing the Crisis Disk program in another system with Windows XP OS Follow the steps below 1 Save ROM file file name JAL90x64 fd to the root direc...

Page 187: ...ons a part number change is made it will not be noted on the printed Service Guide For Acer AUTHORIZED SERVICE PROVIDERS your Acer office may have a DIFFERENT part number code from those given in the FRU list of this printed Service Guide You MUST use the local FRU list provided by your regional Acer office to order FRU parts for repair and service of customer machines NOTE To scrap or to return t...

Page 188: ...ms Main Assembly No Description P N No Description P N 1 Keyboard KB I170A 128 5 Fan 23 PEA02 001 2 Upper Cover 60 PJV02 001 6 Lower Cover 60 N6802 002 3 Mainboard MB PJU02 001 7 I O Board 55 PEA02 004 4 Thermal Unit 60 PE902 001 1 2 3 4 5 6 7 ...

Page 189: ... LCD Bezel 60 PJU02 001 6 LVDS Cable 50 PEA02 004 2 Left LCD Bracket 33 PEA02 005 7 Microphone and cable 23 PEA02 002 3 Camera 57 N6802 001 8 Right LCD bracket 33 PEA02 005 4 LCD Panel LK 15605 004 9 LCD Cover 60 PJV02 002 5 WLAN Antenna 50 PEA02 005 1 2 4 5 6 7 9 8 3 ...

Page 190: ...2 POWER BOARD W FFC 55 PEA02 002 IO BOARD W FFC 55 PEA02 004 Battery Battery SANYO AS 2009D Li Ion 3S2P SANYO 6 cell 4400mAh Main COMMON ID AS09D31 W Halogen Free BT 00603 082 Battery SANYO AS 2009D Li Ion 3S2P SANYO 6 cell 4400mAh Main COMMON AS09D31 BT 00603 090 Battery SONY AS 2009D Li Ion 3S2P SONY 6 cell 4400mAh Main COMMON ID AS09D41 W Halogen Free BT 00604 039 Battery SONY AS 2009D Li Ion 3...

Page 191: ...V5 004 POWER CORD ITALIAN 3 PIN 27 TAVV5 007 POWER CORD JP 3 PIN 27 TAVV5 009 IO BOARD CABLE 50 PEA02 002 DC IN CABLE 50 PEA02 003 LCD CABLE W CMOS CABLE 50 PEA02 004 ANTENNA WLAN 50 PEA02 005 CASE COVER BRACKET ASSEMBLY LCD HINGE R L 33 N6802 001 TP BRACKET 33 PEA02 001 HDD BRACKET 33 PEA02 002 ODD BRACKET 33 PEA02 004 NAME PLATE AS5534 40 PJV02 001 Category Acer Description Acer P N ...

Page 192: ...MOUDULE UMA 60 PE902 001 LCD BEZEL ASPIRE 60 PJU02 001 UPPER CASE ASSY ASPIRE INCL TP TP MYLAR 2 60 PJV02 001 LCD COVER ASPIRE 60 PJV02 002 CPU CPU AMD Athlon L310 PGA 1 2G 1M Dual Core KC AL002 310 CPU AMD Athlon TF20 PGA 1 6G 512K 638 15W G2 KC ATF02 200 FAN SINK SPEAK EARPHOE RTC Category Acer Description Acer P N ...

Page 193: ... HDD HGST 2 5 5400rpm 250GB HTS545025B9A300 Panther B SATA LF F W C60F KH 25007 015 HDD WD 2 5 5400rpm 250GB WD2500BEVT 22ZCT0 ML160 SATA LF F W 11 01A11 KH 25008 021 HDD TOSHIBA 2 5 5400rpm 320GB MK3255GSX Libra SATA LF F W FG011J KH 32004 002 HDD HGST 2 5 5400rpm 320GB HTS545032B9A300 Panther B SATA LF F W C60F KH 32007 007 HDD 320GB 5400RPM SATA WD WD3200BEVT 22ZCT0 ML160 LF F W 11 01A11 KH 320...

Page 194: ...0 Keyboard ACER EM 7Tv2 HM51 Internal 17 Standard 100KS Black US w Canadian French Texture KB I170A 142 LCD ASSY LEC LCD MODULE 15 6 WXGA GLARE W ANTENNA CCD 0 3M ASPIRE 6M PJU02 002 LCD Panel LED LCD AUO 15 6 W WXGA Glare B156XW03 V1 LF 220nit 8ms 500 1 LK 15605 004 LED LCD LPL 15 6 W WXGA Glare LP156WH3 TLA1 LF 200nit 8ms 500 1 LK 15608 003 LED LCD LPL 15 6 W WXGA Glare LP156WH3 TLA2 LF 200nit 8...

Page 195: ...X TS U633F LF W O bezel SATA HF Windows 7 KU 00801 034 ODD TOSHIBA Super Multi DRIVE 9 5mm Tray DL 8X TS U633A LF W O bezel AC02 SATA Windows 7 KU 00801 037 ODD PANASONIC Super Multi DRIVE 9 5mm Tray DL 8X UJ892 LF W O bezel SATA GBAS2 0 HF Windows7 KU 00807 068 ODD HLDS Super Multi DRIVE 9 5mm Tray DL 8X GU10N LF W O bezel SATA HF Windows 7 KU 0080D 049 Wireless LAN WIRELESS LAN BOARD 802 11BGN F...

Page 196: ...I NL 86 PEA02 002 SCREW M2 48D 4 0LK 5 5D 0 8T ZKNL 86 PEA02 003 SCREW M2 5D 4 15LK 5 5D ZK NLCR3 86 PEA02 004 EAX20_HDD_ERING_SCREW_CLIP 86 PEA02 005 SCREW M2 45D 8 0LK 5 5D 0 8T ZKNL 86 PEA02 006 SCREW M2 48D 6 0LK 5 5D 0 8T ZKNL 86 PEA02 007 SCREW M3 0D 3L K 5 0D ZK NLCR3 86 PEA02 008 SCREW M2 5D 3 2L K 6D NI 86 PEA02 009 ...

Page 197: ...Chapter 6 187 ...

Page 198: ... CB_bgn_0 3D_AN_TR31 AS5534 314G32Mn LX PJU02 029 PA Chile AS5534 314G32Mn EM W7HP64EMATCL3 MC UMACcs 2 2G 320 6L2 2 5R CB_bgn_0 3D_AN_ES51 AS5534 312G25Mn LX PJU08 017 PA ACLA Spanish AS5534 312G25Mn EM W7ST32EMATEA4 MC UMACcs 2 1G 250 6L2 2 5R CB_bgn_0 3D_AN_EN31 AS5534 312G25Mn LX PJU08 016 PA ACLA Spanish AS5534 312G25Mn EM W7ST32EMATEA1 MC UMACcs 2 1G 250 6L2 2 5R CB_bgn_0 3D_AN_ES51 AS5534 3...

Page 199: ...7ST32EMATEA1 MC UMACcs 2 1G 160 6L2 2 5R CB_bgn_0 3D_AN_ES51 AS5534 202G16Mn LX PJU08 003 PA ACLA Spanish AS5534 202G16Mn EM W7ST32EMATEA3 MC UMACcs 2 1G 160 6L2 2 5R CB_bgn_0 3D_AN_ES51 AS5534 202G16Mn LX PJU08 002 PA ACLA Portuguese AS5534 202G16Mn EM W7ST32EMATXC3 MC UMACcs 2 1G 160 6L2 2 5R CB_bgn_0 3D_AN_EN61 AS5534 202G16Mn LX PJU08 001 PA ACLA Portuguese AS5534 202G16Mn EM W7ST32EMATXC2 MC ...

Page 200: ...320 6L2 2 5R CB_bgn_0 3D_AN_FR84 AS5534 204G32Mn LX PJU02 049 PA Canada AS5534 204G32Mn W7HP64ATCA2 MC UMACcs 2 2G 320 6L2 2 5R CB_bgn_0 3D_AN_FR82 AS5534 204G32Mn LX PJU02 048 PA Canada AS5534 204G32Mn W7HP64ATCA2 MC UMACcs 2 2G 320 6L2 2 5R CB_bgn_0 3D_AN_FR81 AS5534 203G32Mn LX PJU02 047 PA USA AS5534 203G32Mn W7HP64ATUS1 MC UMACcs 2G 1G 320 6L2 2 5R CB_bgn_0 3D_AN_FRB5 AS5534 203G32Mn LX PJU02...

Page 201: ... 314G32Mn EM W7HP64EMATXC3 MC UMACcs 2 2G 320 6L2 2 5R CB_bgn_0 3D_AN_EN61 AS5534 314G32Mn LX PJU02 024 PA ACLA Portuguese AS5534 314G32Mn EM W7HP64EMATXC2 MC UMACcs 2 2G 320 6L2 2 5R CB_bgn_0 3D_AN_XC21 AS5534 314G25Mn LX PJU02 011 PA Canada AS5534 314G25Mn W7HP64ATCA2 MC UMACcs 2 2G 250 6L2 2 5R CB_bgn_0 3D_AN_FR84 AS5534 314G25Mn LX PJU02 010 PA Canada AS5534 314G25Mn W7HP64ATCA2 MC UMACcs 2 2G...

Page 202: ... 314G32Mn LX PJV02 007 PA USA AS5534 314G32Mn W7HP64ATUS1 MC UMAcs 2 2G 320 6L2 2 5R CB_bgn_AN_FRB2 AS5534 314G32Mn LX PJV02 006 PA USA AS5534 314G32Mn W7HP64ATUS1 MC UMAcs 2 2G 320 6L2 2 5R CB_bgn_AN_FRB1 AS5534 314G32Mn LX PJV02 005 PA Canada AS5534 314G32Mn W7HP64ATCA2 MC UMAcs 2 2G 320 6L2 2 5R CB_bgn_AN_FR84 AS5534 314G32Mn LX PJV02 004 PA Canada AS5534 314G32Mn W7HP64ATCA2 MC UMAcs 2 2G 320 ...

Page 203: ...NLED15 6 WXGAGS UMA N SO1GBII6 SO1GBII6 AS5534 202G25Mn LX PJU08 010 AATF20 NLED15 6 WXGAGS UMA N SO1GBII6 SO1GBII6 AS5534 202G25Mn LX PJU08 008 AATF20 NLED15 6 WXGAGS UMA N SO1GBII6 SO1GBII6 AS5534 202G25Mn LX PJU08 007 AATF20 NLED15 6 WXGAGS UMA N SO1GBII6 SO1GBII6 AS5534 202G16Mn LX PJU08 006 AATF20 NLED15 6 WXGAGS UMA N SO1GBII6 SO1GBII6 AS5534 202G16Mn LX PJU08 005 AATF20 NLED15 6 WXGAGS UMA ...

Page 204: ...NLED15 6 WXGAGS UMA N SO2GBII6 SO2GBII6 AS5534 204G32Mn LX PJU02 052 AATF20 NLED15 6 WXGAGS UMA N SO2GBII6 SO2GBII6 AS5534 204G32Mn LX PJU02 051 AATF20 NLED15 6 WXGAGS UMA N SO2GBII6 SO2GBII6 AS5534 204G32Mn LX PJU02 050 AATF20 NLED15 6 WXGAGS UMA N SO2GBII6 SO2GBII6 AS5534 204G32Mn LX PJU02 049 AATF20 NLED15 6 WXGAGS UMA N SO2GBII6 SO2GBII6 AS5534 204G32Mn LX PJU02 048 AATF20 NLED15 6 WXGAGS UMA ...

Page 205: ...AAL310 NLED15 6 WXGAGS UMA N SO2GBII6 SO2GBII6 AS5534 314G32Mn LX PJU02 026 AAL310 NLED15 6 WXGAGS UMA N SO2GBII6 SO2GBII6 AS5534 314G32Mn LX PJU02 025 AAL310 NLED15 6 WXGAGS UMA N SO2GBII6 SO2GBII6 AS5534 314G32Mn LX PJU02 024 AAL310 NLED15 6 WXGAGS UMA N SO2GBII6 SO2GBII6 AS5534 314G25Mn LX PJU02 011 AAL310 NLED15 6 WXGAGS UMA N SO2GBII6 SO2GBII6 AS5534 314G25Mn LX PJU02 010 AAL310 NLED15 6 WXGA...

Page 206: ...5534 314G32Mn LX PJV02 004 AAL310 NLED15 6 WXGAGS UMA N SO2GBII6 SO2GBII6 AS5534 314G32Mn LX PJV02 003 AAL310 NLED15 6 WXGAGS UMA N SO2GBII6 SO2GBII6 AS5534 202G25Mn S2 PJV0C 001 AATF20 NLED15 6 WXGAGS UMA N SO1GBII6 SO1GBII6 Model Acer Part No Memory 3 Memory 4 HDD 1 GB HDD 2 GB ODD AS5534 202G16Mn LX PJU02 072 N N N160GB5 4KS N NSM8XS9 5 AS5534 312G25Mn LX PJU02 018 N N N250GB5 4KS N NSM8XS9 5 A...

Page 207: ... 204G25Mn LX PJU02 065 N N N250GB5 4KS N NSM8XS9 5 AS5534 204G25Mn LX PJU02 064 N N N250GB5 4KS N NSM8XS9 5 AS5534 204G25Mn LX PJU02 063 N N N250GB5 4KS N NSM8XS9 5 AS5534 204G25Mn LX PJU02 061 N N N250GB5 4KS N NSM8XS9 5 AS5534 204G25Mn LX PJU02 062 N N N250GB5 4KS N NSM8XS9 5 AS5534 204G25Mn LX PJU02 060 N N N250GB5 4KS N NSM8XS9 5 AS5534 204G50Mn LX PJU02 059 N N N500GB5 4KS N NSM8XS9 5 AS5534 ...

Page 208: ... 314G25Mn LX PJU02 009 N N N250GB5 4KS N NSM8XS9 5 AS5534 312G32Mn LX PJU02 022 N N N320GB5 4KS N NSM8XS9 5 AS5534 312G25Mn LX PJU02 019 N N N250GB5 4KS N NSM8XS9 5 AS5534 312G32Mn LX PJU02 017 N N N320GB5 4KS N NSM8XS9 5 AS5534 314G32Mn LX PJU02 001 N N N320GB5 4KS N NSM8XS9 5 AS5534 202G25Mn LX PJU02 002 N N N250GB5 4KS N NSM8XS9 5 AS5534 314G32Mn LX PJU02 008 N N N320GB5 4KS N NSM8XS9 5 AS5534 ...

Page 209: ...Fi 1x2 BGN AS5534 312G25Mn LX PJU08 014 N McAfee 5 in 1 Build in 3rd WiFi 1x2 BGN AS5534 202G25Mn LX PJU08 012 N McAfee 5 in 1 Build in 3rd WiFi 1x2 BGN AS5534 202G25Mn LX PJU08 011 N McAfee 5 in 1 Build in 3rd WiFi 1x2 BGN AS5534 202G25Mn LX PJU08 010 N McAfee 5 in 1 Build in 3rd WiFi 1x2 BGN AS5534 202G25Mn LX PJU08 008 N McAfee 5 in 1 Build in 3rd WiFi 1x2 BGN AS5534 202G25Mn LX PJU08 007 N McA...

Page 210: ...N AS5534 202G25Mn LX PJU02 037 N McAfee 5 in 1 Build in 3rd WiFi 1x2 BGN AS5534 202G25Mn LX PJU02 036 N McAfee 5 in 1 Build in 3rd WiFi 1x2 BGN AS5534 202G16Mn LX PJU02 035 N McAfee 5 in 1 Build in 3rd WiFi 1x2 BGN AS5534 202G16Mn LX PJU02 034 N McAfee 5 in 1 Build in 3rd WiFi 1x2 BGN AS5534 202G16Mn LX PJU02 032 N McAfee 5 in 1 Build in 3rd WiFi 1x2 BGN AS5534 202G16Mn LX PJU02 031 N McAfee 5 in ...

Page 211: ...02 005 N McAfee 5 in 1 Build in 3rd WiFi 1x2 BGN AS5534 314G32Mn LX PJV02 004 N McAfee 5 in 1 Build in 3rd WiFi 1x2 BGN AS5534 314G32Mn LX PJV02 003 N McAfee 5 in 1 Build in 3rd WiFi 1x2 BGN AS5534 202G25Mn S2 PJV0C 001 N N 5 in 1 Build in 3rd WiFi 1x2 BGN Model Acer Part No Bluetooth VOIP Phone Finger Print NB Chipset SB Chipset AS5534 202G16Mn LX PJU02 072 N N N AMDRS780MN AMDSB710 AS5534 312G25...

Page 212: ...16Mn LX PJU08 004 N N N AMDRS780MN AMDSB710 AS5534 202G16Mn LX PJU08 003 N N N AMDRS780MN AMDSB710 AS5534 202G16Mn LX PJU08 002 N N N AMDRS780MN AMDSB710 AS5534 202G16Mn LX PJU08 001 N N N AMDRS780MN AMDSB710 AS5534 202G16Mn LX PJU0C 001 N N N AMDRS780MN AMDSB710 AS5534 202G16Mn LX PJU0C 002 N N N AMDRS780MN AMDSB710 AS5534 202G16Mn LX PJU0C 003 N N N AMDRS780MN AMDSB710 AS5534 202G16Mn LX PJU0C 0...

Page 213: ...32Mn LX PJU02 047 N N N AMDRS780MN AMDSB710 AS5534 203G32Mn LX PJU02 046 N N N AMDRS780MN AMDSB710 AS5534 203G32Mn LX PJU02 045 N N N AMDRS780MN AMDSB710 AS5534 203G32Mn LX PJU02 043 N N N AMDRS780MN AMDSB710 AS5534 203G32Mn LX PJU02 044 N N N AMDRS780MN AMDSB710 AS5534 203G32Mn LX PJU02 042 N N N AMDRS780MN AMDSB710 AS5534 202G25Mn LX PJU02 041 N N N AMDRS780MN AMDSB710 AS5534 202G25Mn LX PJU02 0...

Page 214: ...25Mn LX PJU02 009 N N N AMDRS780MN AMDSB710 AS5534 312G32Mn LX PJU02 022 N N N AMDRS780MN AMDSB710 AS5534 312G25Mn LX PJU02 019 N N N AMDRS780MN AMDSB710 AS5534 312G32Mn LX PJU02 017 N N N AMDRS780MN AMDSB710 AS5534 314G32Mn LX PJU02 001 N N N AMDRS780MN AMDSB710 AS5534 202G25Mn LX PJU02 002 N N N AMDRS780MN AMDSB710 AS5534 314G32Mn LX PJU02 008 N N N AMDRS780MN AMDSB710 AS5534 202G16Mn LX PJU0Y 0...

Page 215: ...S780MN AMDSB710 AS5534 314G32Mn LX PJV02 007 N N N AMDRS780MN AMDSB710 AS5534 314G32Mn LX PJV02 006 N N N AMDRS780MN AMDSB710 AS5534 314G32Mn LX PJV02 005 N N N AMDRS780MN AMDSB710 AS5534 314G32Mn LX PJV02 004 N N N AMDRS780MN AMDSB710 AS5534 314G32Mn LX PJV02 003 N N N AMDRS780MN AMDSB710 AS5534 202G25Mn S2 PJV0C 001 N N N AMDRS780MN AMDSB710 Model Acer Part No Bluetooth VOIP Phone Finger Print N...

Page 216: ...system functions are tested under Windows 7 environment Refer to the following lists for components adapter cards and peripherals which have passed these tests Regarding configuration combination and test procedures please refer to the Aspire 5534 series Compatibility Test Report released by the Acer Mobile System Testing Department Appendix B ...

Page 217: ...MON 2 2S3 ID AS09D73 W Halogen Free SIMPLO 6CELL2 2 Battery SIMPLO AS 2009D Li Ion 3S2P SAMSUNG 6 cell 4400mAh Main COMMON AS09D75 SIMPLO 6CELL2 2 Battery SIMPLO AS 2009D Li Ion 3S2P PANASONIC 6 cell 4400mAh Main COMMON 2 2CG ID AS09D71 W Halogen Free SIMPLO 6CELL2 2 Battery SIMPLO AS 2009D Li Ion 3S2P PANASONIC 6 cell 4400mAh Main COMMON 2 2CG ID AS09D71 W Halogen Free SONY 6CELL2 2 Battery SONY ...

Page 218: ...A 2 5 5400rpm 500GB MK5055GSX Libra SATA LF F W FG001J WD N160GB5 4K S HDD WD 2 5 5400rpm 160GB WD1600BEVT 22ZCTO ML160 SATA LF F W 11 01A11 WD N250GB5 4K S HDD WD 2 5 5400rpm 250GB WD2500BEVT 22ZCT0 ML160 SATA LF F W 11 01A11 WD N320GB5 4K S HDD WD 2 5 5400rpm 320GB WD3200BEVT 22ZCT0 ML160 SATA LF F W 11 01A11 WD N500GB5 4K S HDD WD 2 5 5400rpm 500GB WD5000BEVT 22ZAT0 ML250 SATA LF F W 01 01A01 K...

Page 219: ...lti DRIVE 9 5mm Tray DL 8X UJ892 LF W O bezel SATA GBAS2 0 HF TOSHIBA KU 00801 03 1 ODD TOSHIBA Super Multi DRIVE 9 5mm Tray DL 8X TS U633A LF W O bezel SATA GBAS2 0 SB Chipset AMD AMDSB710 AMD SB710 VGA Chip None UMA UMA AMD WiFi Antenna WNC PIFA PIFA Wireless LAN Foxconn 3rd WiFi 1x2 BGN Foxconn Wireless LAN Atheros HB93 1x2 BGN HM Foxconn 3rd WiFi BG Foxconn FOX_ATH_XB63 Foxconn Atheros XB63 mi...

Page 220: ...wnload information on all of Acer s Notebook Desktop and Server models including Service guides for all models User s manuals Bios updates Software utilities Spare parts lists TABs Technical Announcement Bulletin For these purposes we have included an Acrobat File to facilitate the problem free downloading of our technical material Also contained on this website are Detailed information on Acer s ...

Page 221: ...rd Removing 94 Replacing 109 caps lock on indicator 8 CPU Removing 89 Replacing 113 CPU Fan Replacing 116 D DC In Cable Removing 80 DIMM Module Removing 53 Replacing 139 Display 3 display hotkeys 12 E Euro Key 13 External Module Disassembly Flowchart 45 F Fan Removing 86 Replacing 116 Features 1 FLASH Utility 34 Flash Utility 34 FPC Cable Removing 96 Replacing 107 FRU Field Replaceable Unit List 1...

Page 222: ...wer Covers Replacing 145 M Main Unit Disassembly Flowchart 58 Mainboard Removing 81 Replacing 118 media access on indicator 8 Media Board Removing 74 Replacing 124 Microphone Removing 99 Replacing 104 Model Definition 188 N No Display Issue 150 num lock on indicator 8 O ODD Replacing 143 Online Support Information 210 optical drive module 49 P Panel 4 left 4 PC Card 8 Power Board Removing 70 Repla...

Page 223: ...0 Other Failures 164 Thermal Unit 163 Touchpad 153 USB 160 WLAN 161 U Undetermined Problems 165 Upper Cover Removing 62 Replacing 131 USB Failure Rightside 160 utility BIOS 23 34 V volume hotkeys 12 W Windows 2000 Environment Test 206 Wireless Function Failure 161 WLAN Antennas Removing 101 Replacing 103 WLAN Board Removing 56 Replacing 138 ...

Page 224: ...214 ...

Reviews: