Chapter 1
25
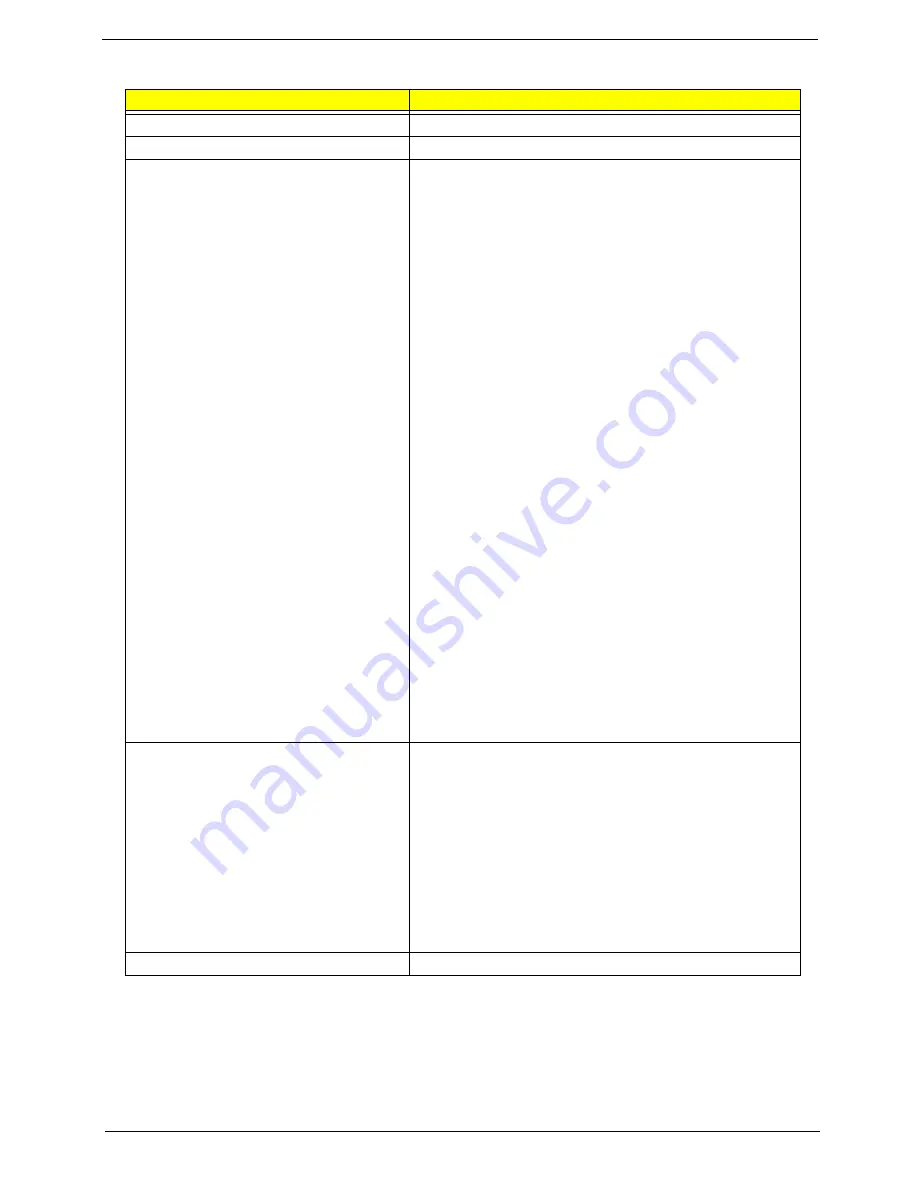
VGA Subsystem
Item
Specification
Chipset
NVidia Graphic
Package
nVIDIA MCP77
Features
•
Dual Head Display Controller
•
Full NVIDIA® nView™ multi-display technology
capability, with two independent display controllers
supporting a combination of any two of the following CRT,
TV,LVDS and HDMI/DVI/DP interfaces
•
Each controller can drive same or different display
contents to different resolutions and refresh rates
•
Video mirroring support
•
Display Cache support CRT Display DAC
•
300 MHz RAMDAC for analog displays with resolutions
up to and including 1920 ×1440 at 60 Hz depending on
dual head and video configurations.
•
Single channel TMDS interface for 25MHz to 165MHz
pixel data rate
•
Support version 1.1 of the Display Port interface standard
for flat panel display, Projectors, PCs and CE devices.
•
High-quality video scaling and filtering.
•
Up to WUXGA resolution support on HDMI, and up to
2560 X 1600 resolution supporting Display Port mode.
•
SPWG compliant
•
Support for LCD panel EDID
•
Power based on MCP67M:
•
+NB_CORE for MCP77M CORE Power(+1.0V)
•
+1.1V_NB for MCP77 Hyper Transport Power
•
+1.1V for Hyper Transport, PCI-E, Sleep mode Core
power, SATA Interface, TV DAC supply
•
+1.8V for LVDS digital supply
•
+3.3V for PLL, CRTDAC, RGB DAC supply, USB
Interface, CPU Interface, LAN MAC, Display
Discrete Graphic (MXM)
•
MSI MS-V115A3-9MGS256 (256MB)/ Yuan YSTP621GP
1(256MB)
•
NVIDIA NB9M-GS (G3-64 package)
•
Featuring:
•
16 Lane PCI Express support
•
LVDS Interface support
•
VGA support
•
Video out support
•
Upgradeable graphics
•
Power: 19V, 5V, 3.3V, 2.5V, 1.8V
Power
19V, 5V, 3.3V, 2.5V, 1.8V
Summary of Contents for Aspire 7230
Page 6: ...VI ...
Page 10: ...X Table of Contents ...
Page 92: ...82 Chapter 3 4 Grasp the Subwoofer Module and lift it up to remove ...
Page 94: ...84 Chapter 3 4 Lift the ExpressCard module away from the upper cover ...
Page 101: ...Chapter 3 91 4 Lift up the bezel and remove it from the LCD Module ...
Page 105: ...Chapter 3 95 5 Grasp the panel by both ends and lift to remove ...
Page 107: ...Chapter 3 97 4 Remove the LCD brackets by pulling away from the LCD Panel as shown ...
Page 110: ...100 Chapter 3 8 Connect the left and right Inverter cables 9 Connect the camera cable ...
Page 118: ...108 Chapter 3 4 Connect the two FFC cables as shown 5 Connect the cable as shown ...
Page 206: ...196 Appendix C ...

