144
Chapter 4
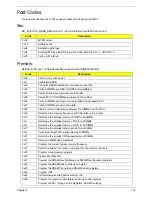
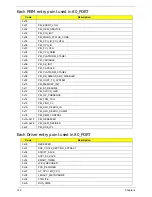
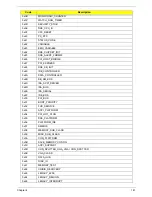
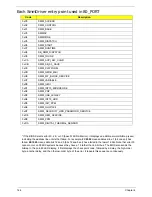
Each SmmDriver entry point used in 80_PORT
* If the BIOS detects error 2C, 2E, or 30 (base 512K RAM error), it displays an additional word-bitmap (xxxx)
indicating the address line or bits that failed. For example,
2C 0002
means address line 1 (bit one set) has
failed.
2E 1020
means data bits 12 and 5 (bits 12 and 5 set) have failed in the lower 16 bits. Note that error 30
cannot occur on 386SX systems because they have a 16 rather than 32-bit bus. The BIOS also sends the
bitmap to the port-80 LED display. It first displays the check point code, followed by a delay, the high-order
byte, another delay, and then the low-order byte of the error. It repeats this sequence continuously.
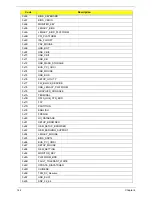
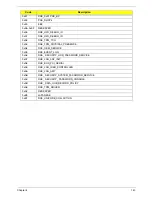
Code
Description
0xC0
SMM_ACCESS
0xC2
SMM_CONTROL
0xC1
SMM_BASE
0xC3
SMMAP
0xC4
SMMCORE
0xC5
SMM_DISPATCH
0xC6
SMM_START
0xC7 SMM_RUNTIME
0xC8 SB_SMM_DISPATCH
0xC9 SMM_THUNK
0xCA SMM_ACPI_SW_CHILD
0xCB SMM_SB_S3_SAVE
0xCC SMM_PLATFORM
0xCD SMM_GMCH_MBI
0xCE SMM_FW_BLOCK_SERVICE
0xCF SMM_VARIABLE
0xD0 SMM_IHISI
0xD1 SMM_INT15_MICROCODE
0xD2 SMM_PNP
0xD3 SMM_USB_LEGACY
0xD4 SMM_INT13_HDD
0xD5 SMM_INIT_PPM
0xD6 SMM_OHCI1394
0xD7 SMM_
SECURITY_HDD_PASSWORD_SERVICE
0xD8 SMM_OEM_SERVICE
0xD9 SMM_PPM
0xDA SMM_DIGITAL_THERMAL_SENSOR
Summary of Contents for Aspire 7715Z Series
Page 6: ...VI ...
Page 10: ...X Table of Contents ...
Page 13: ...Chapter 1 3 System Block Diagram ...
Page 30: ...20 Chapter 1 ...
Page 52: ...42 Chapter 2 ...
Page 74: ...64 Chapter 3 4 Disconnect the following four cables from the Mainboard A B C D ...
Page 87: ...Chapter 3 77 4 Using both hands lift the Thermal Module clear of the Mainboard ...
Page 89: ...Chapter 3 79 4 Lift the CPU Fan clear of the Mainboard as shown ...
Page 95: ...Chapter 3 85 5 Lift the LCD Panel clear of the module ...
Page 103: ...Chapter 3 93 9 The Antennas and cables appear as shown when correctly installed ...
Page 108: ...98 Chapter 3 2 Replace the four screws and screw caps provided ...
Page 113: ...Chapter 3 103 5 Replace the FFC and press down as indicated to secure it to the Upper Cover ...
Page 124: ...114 Chapter 3 17 Replace the two screws securing the LCD Module to the Lower Cover ...
Page 132: ...122 Chapter 3 ...
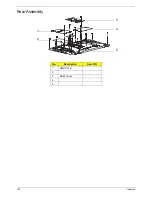
Page 164: ...154 Chapter 6 Rear Assembly No Description Acer P N 1 HDD Cover 2 3 RAM Cover 4 5 1 2 3 4 5 ...
Page 174: ...Appendix A 164 Model Definition and Configuration Appendix A ...
Page 196: ...186 Appendix C ...
Page 200: ...190 ...

