Machine Maintenance Procedures
3-27
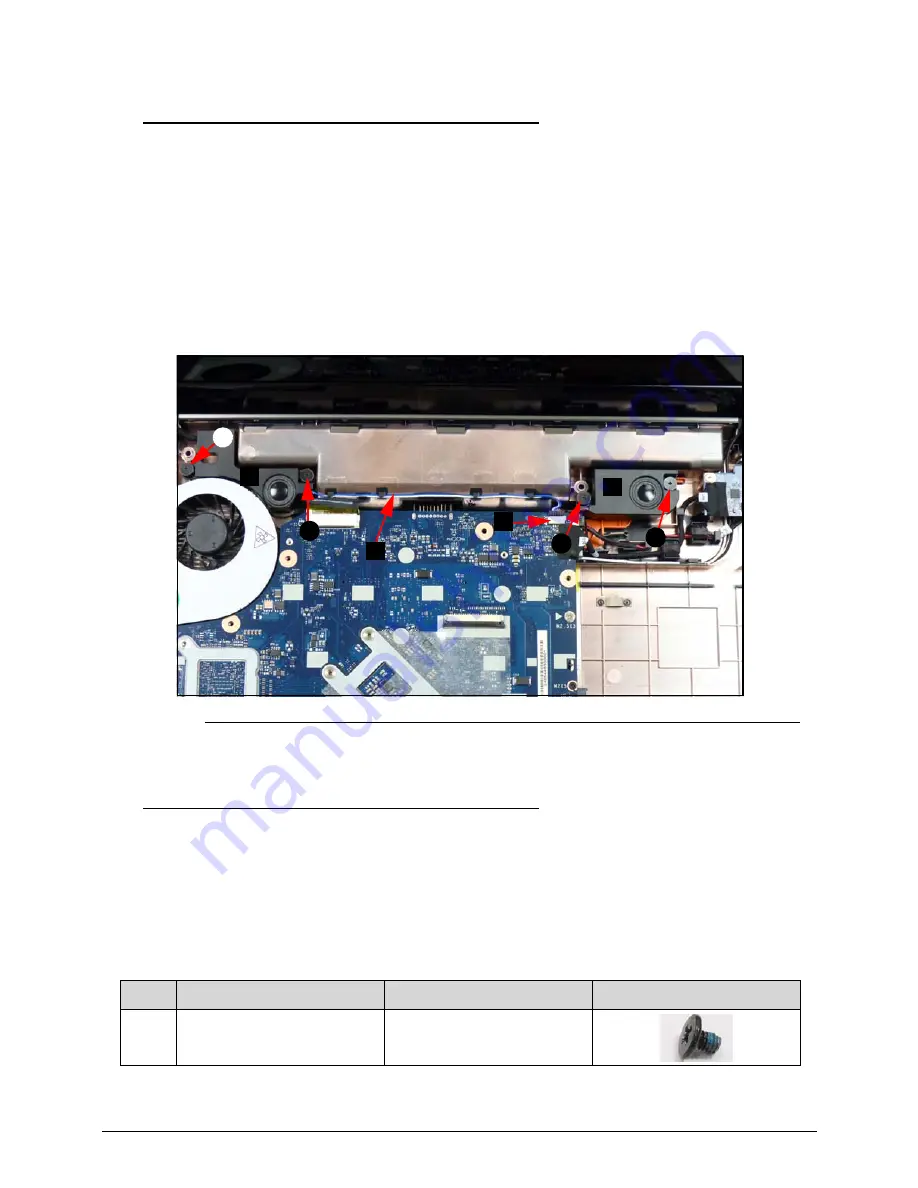
Speakers Removal
0
Prerequisite:
Upper Cover Removal
1.
Disconnect cable (B) from mainboard connector (C).
2.
Release cables from cable clasps and remove from cable channel.
3.
Remove two (2) screws (D) from right speaker (A1).
4.
Remove two (2) screws (D) from left speaker (A2).
5.
Remove speakers from lower cover.
Figure 3-22.
Speakers
Speakers Installation
0
1.
Install speakers into lower cover.
2.
Install and secure two (2) screws (D) to right speaker (A1) and left speaker (A2) (Figure
3-22).
3.
Place cable (B) into cable guides and connect to mainboard (Figure 3-24).
4.
Install upper cover.
ID
Size
Quantity
Screw Type
D
M2*3
4
A2
A1
D
D
B
C
D
D
Summary of Contents for Aspire 7750
Page 1: ...Aspire 7750 7750G SERVICEGUIDE ...
Page 10: ...x ...
Page 11: ...CHAPTER 1 Hardware Specification ...
Page 14: ...1 4 ...
Page 56: ...1 46 Hardware Specifications and Configurations ...
Page 57: ...CHAPTER 2 System Utilities ...
Page 79: ...CHAPTER 3 Machine Maintenance ...
Page 82: ...3 4 ...
Page 122: ...3 44 Machine Maintenance Procedures ...
Page 123: ...CHAPTER 4 Troubleshooting ...
Page 149: ...CHAPTER 5 Jumper and Connector Locations ...
Page 156: ...5 8 Jumper and Connector Locations ...
Page 157: ...CHAPTER 6 FRU List ...
Page 158: ...6 2 Exploded Diagrams 6 4 FRU List 6 6 Screw List 6 23 ...
Page 180: ...6 24 FRU Field Replaceable Unit List ...
Page 181: ...CHAPTER 7 Model Definition and Configuration ...
Page 182: ...7 2 Aspire 7750 7750G 7 3 ...
Page 253: ...CHAPTER 8 Test Compatible Components ...
Page 254: ...8 2 Microsoft Windows 7 Environment Test 8 4 ...
Page 270: ...8 18 Test Compatible Components ...
Page 271: ...CHAPTER 9 Online Support Information ...
Page 272: ...9 2 Introduction 9 3 ...
Page 274: ...9 4 Online Support Information ...


