154
Chapter 4
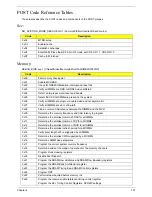
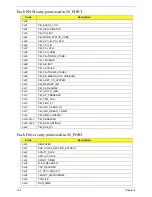
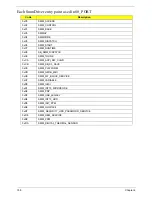
Each PEIM entry point used in 80_PORT
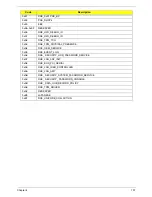
Each Driver entry point used in 80_PORT
Code
Description
0x00
0x01
PEI_EVENT_LOG
0x02
PEI_OEM_SERVICE
0x03
PEI_SIO_INIT
0x04
PEI_MONO_STATUS_CODE
0x05
PEI_CPU_IO_PCI_CFG
0x06
PEI_CPU_IO
0x07
PEI_PCI_CFG
0x08
PEI_CPU_PEIM
0x09
PEI_PLATFORM_STAGE1
0x0A
PEI_VARIABLE
0x0B
PEI_SB_INIT
0x0C
PEI_CAPSULE
0x0D
PEI_PLATFORM_STAGE2
0x0E
PEI_SB_SMBUS_ARP_DISABLED
0x0F
PEI_HOST_TO_SYSTEM
0x10
PEI_MEMORY_INIT
0x11
PEI_S3_RESUME
0x12
PEI_CLOCK_GEN
0x13
PEI_OP_PRESENCE
0x14
PEI_TPM_TCG
0x15
PEI_FIND_FV
0x16
PEI_H2O_DEBUG_IO
0x17
PEI_H2O_DEBUG_COMM
0x18
PEI_SMM_CONTROL
0x19~0x1F
PEI_RESERVED
0x20~0x2E
PEI_OEM_DEFINED
0x2F
PEI_DXE_IPL
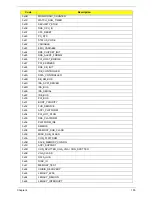
Code
Description
0x30
RESERVED
0x31
DXE_CRC32_SECTION_EXTRACT
0x32
SCRIPT_SAVE
0x33
ACPI_S3_SAVE
0x34
SMART_TIMER
0x35
JPEG_DECODER
0x36
PCX_DECODER
0x37
HT_CPU / MP_CPU
0x38
LEGACY_METRONOME
0x39
FTWLITE
0x3A
RUN_RIME
Summary of Contents for Aspire One AO531h
Page 6: ...VI ...
Page 10: ...X Table of Contents ...
Page 30: ...20 Chapter 1 ...
Page 48: ...38 Chapter 2 ...
Page 63: ...Chapter 3 53 8 Disconnect the FFC and remove the Keyboard ...
Page 69: ...Chapter 3 59 4 Remove the board from the Upper Cover ...
Page 82: ...72 Chapter 3 5 Disconnect the Bluetooth cable from the module ...
Page 89: ...Chapter 3 79 4 Lift the CPU Fan clear of the Mainboard ...
Page 101: ...Chapter 3 91 4 Lift up the bezel and remove it from the LCD Module ...
Page 107: ...Chapter 3 97 7 Disconnect the cable from the LCD panel as shown ...
Page 138: ...128 Chapter 3 6 Insert the FFC in to the Button Board and close the locking latch ...
Page 202: ...192 Appendix B ...
Page 204: ...194 Appendix C ...
Page 208: ...198 ...

