158
Chapter 4
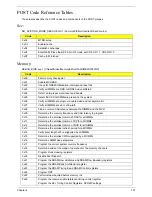
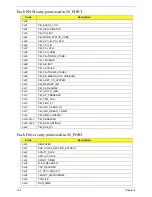
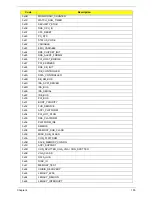
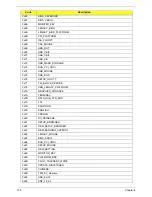
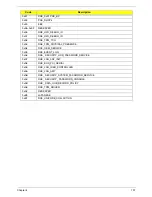
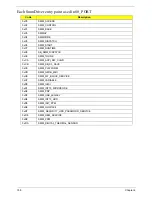
Each SmmDriver entry point used in 80_PORT
Code
Description
0xC0
SMM_ACCESS
0xC2
SMM_CONTROL
0xC1
SMM_BASE
0xC3
SMMAP
0xC4
SMMCORE
0xC5
SMM_DISPATCH
0xC6
SMM_START
0xC7 SMM_RUNTIME
0xC8 SB_SMM_DISPATCH
0xC9 SMM_THUNK
0xCA SMM_ACPI_SW_CHILD
0xCB SMM_SB_S3_SAVE
0xCC SMM_PLATFORM
0xCD SMM_GMCH_MBI
0xCE SMM_FW_BLOCK_SERVICE
0xCF SMM_VARIABLE
0xD0 SMM_IHISI
0xD1 SMM_INT15_MICROCODE
0xD2 SMM_PNP
0xD3 SMM_USB_LEGACY
0xD4 SMM_INT13_HDD
0xD5 SMM_INIT_PPM
0xD6 SMM_OHCI1394
0xD7 SMM_
SECURITY_HDD_PASSWORD_SERVICE
0xD8 SMM_OEM_SERVICE
0xD9 SMM_PPM
0xDA SMM_DIGITAL_THERMAL_SENSOR
Summary of Contents for Aspire One AO531h
Page 6: ...VI ...
Page 10: ...X Table of Contents ...
Page 30: ...20 Chapter 1 ...
Page 48: ...38 Chapter 2 ...
Page 63: ...Chapter 3 53 8 Disconnect the FFC and remove the Keyboard ...
Page 69: ...Chapter 3 59 4 Remove the board from the Upper Cover ...
Page 82: ...72 Chapter 3 5 Disconnect the Bluetooth cable from the module ...
Page 89: ...Chapter 3 79 4 Lift the CPU Fan clear of the Mainboard ...
Page 101: ...Chapter 3 91 4 Lift up the bezel and remove it from the LCD Module ...
Page 107: ...Chapter 3 97 7 Disconnect the cable from the LCD panel as shown ...
Page 138: ...128 Chapter 3 6 Insert the FFC in to the Button Board and close the locking latch ...
Page 202: ...192 Appendix B ...
Page 204: ...194 Appendix C ...
Page 208: ...198 ...

