162
Chapter 5
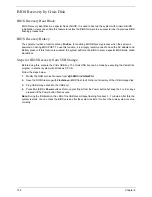
BIOS Recovery by Crisis Disk
BIOS Recovery Boot Block:
BIOS Recovery Boot Block is a special block of BIOS. It is used to boot up the system with minimum BIOS
initialization. Users can enable this feature to restore the BIOS firmware to a successful one if a previous BIOS
flashing process fails.
BIOS Recovery Hotkey:
The system provides a function hotkey:
Fn+Esc
, for enabling BIOS Recovery process when the system is
powered on during BIOS POST. To use this function, it is strongly recommended to have the AC adapter and
Battery present. If this function is enabled, the system will force the BIOS to enter a special BIOS block, called
Boot Block.
Steps for BIOS Recovery from USB Storage:
Before doing this, prepare the Crisis USB key. The Crisis USB key can be made by executing the Crisis Disk
program in another system with Windows XP OS.
Follow the steps below:
1.
Modify the ROM archive file name from
Zg5 BIOS
to
ZG5ia32.fd
.
2.
Save the ROM file along with
Flashit.exe
(BIOS flash tool) to the root directory of the USB storage disk.
3.
Plug USB storage disk into the USB port.
4.
Press
Fn + ESC + Power
buttons. Remove your finger from the Power button but keep the Fn + Esc keys
pressed till the Power button flashes once.
Note:
During the first iteration, the LED of the USB disk will keep flashing for about 3 - 7 minutes. After this, the
system restarts. You can check the BIOS version after the system restarts. If correct, the crisis system is set up
correctly.
Summary of Contents for Aspire One AO531h
Page 6: ...VI ...
Page 10: ...X Table of Contents ...
Page 30: ...20 Chapter 1 ...
Page 48: ...38 Chapter 2 ...
Page 63: ...Chapter 3 53 8 Disconnect the FFC and remove the Keyboard ...
Page 69: ...Chapter 3 59 4 Remove the board from the Upper Cover ...
Page 82: ...72 Chapter 3 5 Disconnect the Bluetooth cable from the module ...
Page 89: ...Chapter 3 79 4 Lift the CPU Fan clear of the Mainboard ...
Page 101: ...Chapter 3 91 4 Lift up the bezel and remove it from the LCD Module ...
Page 107: ...Chapter 3 97 7 Disconnect the cable from the LCD panel as shown ...
Page 138: ...128 Chapter 3 6 Insert the FFC in to the Button Board and close the locking latch ...
Page 202: ...192 Appendix B ...
Page 204: ...194 Appendix C ...
Page 208: ...198 ...

