background image


36

Connector Information                                                          

The following figure shows the connector locations on the monitor: 
D-SUB connector 


Chapter 5

Summary of Contents for B203W

Page 1: ...1 Acer B203W Service Guide ...

Page 2: ...2 Service Guide Version and Revision Version Release Date Revision History TPV model A00 Apr 2 2008 Initial Release TA7AM6D8W7AYDN TA7AM6D8W7AYHN ...

Page 3: ...buyer and not Acer Incorporated its distributor or its dealer assumes the entire cost of all necessary servicing repair and any incidental or consequential damages resulting from any defect in the software Intel is a registered trademark of Intel Corporation Pentium and Pentium II III are trademarks of Intel Corporation Other brand and product names are trademarks and or registered trademarks of t...

Page 4: ...erference in a residential installation This equipment generates uses and can radiate radio frequency energy and if not installed and used in accordance with the instructions may cause harmful interference to radio communications However there is no guarantee that interference will not occur in a particular installation If this equipment does cause harmful interference to radio or television recep...

Page 5: ...ose of the grounded plug z Unplug the unit during a lightning storm or when it will not be used for long periods of time This will protect the monitor from damage due to power surges z Do not overload power strips and extension cords Overloading can result in fire or electric shock z Never push any object into the slot on the monitor cabinet It could short circuit parts causing a fire or electric ...

Page 6: ...ftware Flow chart 16 Main Board Layout 18 Installation 19 Attaching Removing the base 20 Chapter 2 Operating Instructions 22 External Controls 22 Front Panel Controls 22 eColor Management OSD 23 How to Adjust a Setting 24 LOGO 27 Chapter 3 Machine Disassembly 28 Chapter 4 Troubleshooting 31 Chapter 5 Connector Information 37 Chapter 6 FRU Field Replacement Unit List 38 Exploded Diagram 38 Chapter ...

Page 7: ...ide a performance oriented product with no radiation This will alleviate the growing health concerns It is also a space saving design allowing more desktop space and comparing to the traditional CRT monitor it consumes less power and gets less weight in addition MTBF target is 50k hours or more Chart of B203W Panel M201EW02 V80C SZ AUO Signal Interface D Sub 15 pin DVI 24 pin Sync Type Separate Co...

Page 8: ...der user mode which allows that the brightest two of 32 linear distributed gray scales 0 700mv can be distinguished Picture position and size Factory preset value Viewing angle 90 H and V AC Supply voltage 230V 5 50 3Hz Ambient temperature 20 5 Humidity 65 20 Display mode 1680x1050 60 Hz all white e color mode Set to User mode Measurement systems The units of measure stated in this document are li...

Page 9: ...e 1680 x 1050 60Hz ON Mode 49W EPA ENERGY STAR OFF Mode 1W Contrast control Set to The value under user mode which allows that the brightest two of 32 linear distributed gray scales 0 700mv can be distinguished Power Source 90 V 240 V 50 3Hz 60 3Hz Environmental Considerations Operating Temp 0 to 40 C Storage Temp 30 to 65 C Operating Humidity 0 to 90 Storage Humidity 0 to 90 Peak surge current 10...

Page 10: ... LCD Module M201EW02 The display supports the WSXGA 1680 H x 1050 V screen format and 16 7M colors RGB 6 bits Hi RFC data All input signals are 2 Channel LVDS interface compatible This module does not contain an inverter card for backlight General Specifications Functional Block Diagram ...

Page 11: ...11 Electrical Characteristics TFT LCD Module Power Specification Backlight Unit ...

Page 12: ...12 Optical Specifications ...

Page 13: ...7 P 40 000 800x600 72Hz 1040 x 666 48 077 P 72 188 P 50 000 SVGA 800x600 75Hz 1056x625 46 875 P 75 000 P 49 500 1024x768 60Hz 1344x806 48 363 N 60 004 N 65 000 1024x768 70Hz 1328x806 56 476 N 70 069 N 75 000 XGA 1024x768 75Hz 1312x800 60 023 P 75 029 P 78 750 VESA 1152x864 75Hz 1600X900 67 5khz P 75 P 108 000 1280x1024 60Hz 1688x1066 63 981 P 60 020 P 108 000 1280x1024 75Hz 1688x1066 79 976 P 75 0...

Page 14: ...nel control logic brightness control logic and DDC The power board will provide AC to DC Inverter voltage to drive the backlight of panel and the main board chips each voltage Inverter Board include adapter Flat Panel and CCFL backlight Main Board Key board Input D SUB Signal CCFL Drive AC IN 90V 264V Input DVI Signal ...

Page 15: ...15 Main Board Diagram U401 Scalar IC TSUM5PFHL LF Include MCU ADC OSD D Sub Connector CN101 H sync V sync RGB LCD Interface CN301 Key Board Control CN402 Crystal X401 14 31818MHZ DVI Connector CN102 ...

Page 16: ...16 Software Flow Chart N Y 1 2 N Y 5 Y N 10 Y N 12 Y N 7 Y N 6 4 3 8 9 14 11 13 Y N 15 Y N 16 17 19 Y N 18 ...

Page 17: ... set it to green color Scalar initializes 10 In standby mode 11 Update the lifetime of back light 12 Check the analog port are there any signals coming 13 Does the scalar send out an interrupt request 14 Wake up the scalar 15 Are there any signals coming from analog port 16 Display No connection Check Signal Cable message And go into standby mode after the message disappears 17 Program the scalar ...

Page 18: ...cription CN402 WAFER CN102 DVI 24PIN CONNECTOR CN701 WAFER 9P RIGHT ANELE PITCH U103 U104 U105 U106 U107 IC AZC099 04S SOT23 6L CN301 CONNECTOR U403 IC M24C04 WMN6TP SO8 CN101 D SUB 15PIN U402 SST25LF020A 33 4C SAE U401 IC TSUM5PFHL LF U701 AP1117E33LA ...

Page 19: ...e sure both the monitor and computer are switched off 2 Connect one end of the 24 pin DVI cable to the back of the monitor and the other end to the computer s port 2 Connect the power cord Connect the power cord to the monitor then to a properly grounded AC outlet 3 Turn on the monitor and computer Turn on the monitor first then the computer This sequence is very important 4 If the monitor does no...

Page 20: ...ckwise Tighten the screw clockwise Remove Reverse the steps to remove the base Screen Position Adjustment In order to optimize the best viewing position you can adjust the height tilt swivel pivot of the monitor Height Adjustment After pressing the top of the monitor push the lock button towards right then you can adjust the height of the monitor ...

Page 21: ... example of the tilt range Swivel With the built in pedestal you can swivel the monitor for the most comfortable viewing angle Monitor Pivot Adjust height to the top position before rotation the monitor Rotate clockwise until the monitor stops at 90 ...

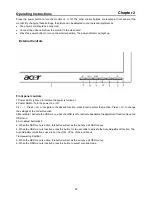
Page 22: ...n or off 3 4 Press or to navigate to the desired function press Enter to select the function Press or to change the settings of the current function 5 Menu Enter Activate the OSD menu when the OSD is off or activate deactivate the adjustment function when the OSD is on 6 Auto adjust button Exit a When the OSD menu is active this button will act as the exit key exit OSD menu b When the OSD menu is ...

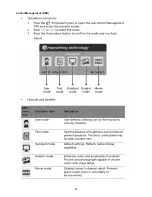
Page 23: ...23 eColor Management OSD ...

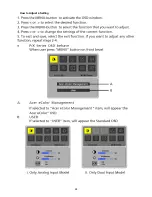
Page 24: ...24 How to Adjust a Setting ...

Page 25: ...25 Adjusting the picture ...

Page 26: ...26 ...

Page 27: ...here is no video input signal present When there is no video input signals this monitor following a time out period will automatically switch to an OFF mode This reduces the monitor s internal power supply consumption After the video input signal is restored full power is restored and the display is automatically redrawn The appearance is similar to a Screen Saver feature except the display is com...

Page 28: ...pter contains step by step procedures on how to disassemble the monitor for maintenance Disassembly Procedure 1 Remove the HINGE ASSEMBLY as the following indicator Fig 1 Fig 1 2 Remove the back cover and bezel Fig 2 Fig 2 Chapter 3 ...

Page 29: ...e the lamp connectors and the screw Fig 3 4 Fig 3 Fig 4 4 Remove the screws to remove the panel Put attention to the LVDS cable Fig 5 Fig 5 5 Remove the screws to remove the main board and power board Fig 6 Fig 6 ...

Page 30: ...r 4 No power Press power key and look if the picture is normal Please reinsert and make sure the AC of 100 240 is normal Reinsert or check the power section Check if X401 oscillate waveforms are normal Measure U701 Pin2 3 3V OK OK NG NG NG Measure CN701 Replace U401 Replace X401 NG Replace U701 OK OK ...

Page 31: ...rmal Replace U401 Replace X401 Measure U701 Pin2 3 3V Check Correspondent component Replace U401 Check X401 oscillate waveform is normal Replace U701 OK OK OK OK OK NG NG NG NG Check reset circuit of U401 is normal Check HS VS from CN101 is normal Replace X401 Check Correspondent component NG NG OK ...

Page 32: ...ase is low level X401 oscillate waveform is normal Check CN301 is solder and Q301 Q302 is OK Check Correspondent component Replace PANEL Check Correspondent component Replace U401 OK OK OK Replace X401 OK NG NG NG NG Check reset circuit of U401 is normal ...

Page 33: ...ard OSD is unstable or not working Is Key Pad Board connecting normally Connect Key Board Is Button Switch normally Replace Button Switch Y NG NG Is Key Pad Board normally Replace Key Board Y NG Y Check Main Board ...

Page 34: ...volt 120V or 220V Change F901 Check BD901 L901 IC901 Check the voltage of C905 Check bridge retified circuit Check start voltage for the Pin2 of IC901 Change IC901 OK Check the auxiliary voltage is smaller than 20V OK NG No power NG NG OK Check T901 D906 D907 Q903 ZD921 ZD922 IC904 IC903 Check IC901 NG OK NG ...

Page 35: ... board Check IC801 pin12 12V Change Q805 Q808 or Q810 Check the pin9 10 of IC801 have PWM wave Change Q801 Q804 Q811 Q812 Replace IC801 Check the resonant wave of pin3 pin7 for T801 Check the output of T801 T802 Check Q802 Q803 Check connecter lamp OK Change T801 T802 OK OK OK OK OK NG NG NG NG NG NG OK ...

Page 36: ...36 Connector Information The following figure shows the connector locations on the monitor D SUB connector Chapter 5 ...

Page 37: ...37 DVI Connector ...
Page 38: ... a part number change is made it will not be noted in the printed Service Guide For ACER AUTHORIZED SERVICE PROVIDERS your Acer office may have a DIFFERENT part number code from those given in the FRU list of this printed Service Guide You MUST use the local FRU list provided by your regional Acer office to order FRU parts for repair and service of customer machines NOTE To scrap or to return the ...

Page 39: ...39 Part List Above picture show the description of the following component Item Picture Description 1 HINGE ASSEMBLY 2 Main Frame 3 Panel ...

Page 40: ...40 4 Power Board 5 Main Board 6 FFC CABLE ...

Page 41: ...1 16W 5 候綼 U101 C107 1000pF ESD_VCC DSUB_5V 候綼 U106 MVCC RXCN DVI_HPD V_Sy nc R123 NC U106 AZC099 04S 1 2 3 4 5 6 I O1 GND I O2 I O3 VDD I O4 C116 NC R132 10R 1 16W 5 DSUB_B 2 RXCP 2 VCC3 3 RX2P 2 DVI_HPD R118 100R 1 16W 5 候綼 U103 DSUB_H 2 D109 BAT54C 3 1 2 DDC_WP 2 R128 10R 1 16W 5 H_Sy nc VGA_G C102 0 047uF RX1P 2 R102 0R05 1 10W 5 ZD105 RLZ5 6B ESD_VCC C117 NC DVI_5V V_Sy nc U103 AZC099 04S 1 2...

Page 42: ...ge the type of resistor R301 from 0805 to 1206 LVBCKM RXOC D PA5 PA 0 9 2 LVB1M LVB1P PB7 PB0 Q301 AO3401 R303 10K 1 16W 5 LVACKM RXO3 LVACKP LVA0P LVA1M LVA2M PANEL_VCC PA4 RXO0 LVB2M LVB0M PB8 R301 330 OHM 1 4W R304 47K 1 16W 5 C304 NC RXE1 R305 0 OHM 5 1 8W LVA3M LVB2P CN301 CONN 1 2 3 4 5 6 7 8 9 10 11 12 13 14 15 16 17 18 19 20 21 22 23 24 25 26 27 28 29 30 LVA2M LVA1P R302 4K7 1 16W 5 LVB3P ...

Page 43: ...TK PS on_BACKLIGHT 2 BKLT EN 223 D702 adj_BACKLIGHT 2 VCC1 8 C709 0 1uF 16V lock type Both 223 and 252 foot print NC FB702 300 OHM NC R701 0R05 1 4W VCC3 3 PANEL_ID D701 SM340A DGND 1 2 3 252 C704 100uF25V 3 3 OHM 2W U701 U701 AP1117E33LA 1 2 3 VSS VOUT VIN MVCC VCC3 3 DSUB_5V Q703 KN2907AS C708 0 1uF 16V R708 NC 223 Mute C705 0 1uF 16V NC R704 4K7 1 16W 5 TSUM5PFHL R709 NC BKLT VBRI R702 10K 1 16...

Page 44: ... PWM2 GPIO_P24 PWM1 GPIO_P25 LVACKM XIN XOUT LVA2P LVA2M LVA1P LVA1M LVA0P LVA0M LVB3P LVB3M LVBCKP LVBCKM LVB2P LVB2M LVB1P LVB1M LVB0P LVB0M LVACKP LVA3M LVA3P GND GND R R G G AVDD_DVI B B CK CK GND GND GND AVDD_ADC VDDP MODE 1 MODE 0 VCTRL VDDC DDCA_SDA RS232_TX DDCA_SCL rs232_RX DDCD_SDA DDCD_SCL PWM0 GPIO_P26 AVDD_DVI VDDP GPIO_P15 PWM0 GPIO_P27 PWM1 GPIO_P12 GPIO_P00 SAR1 GPIO_P01 SAR2 GPIO_...

Page 45: ...52BPS 1 2 3 4 5 6 7 8 GND COMP VCC RT NC CS VCC OUT C938 1500pF 1KV C939 1000uF 16V Q901 2SK2645 54MR R903 680K OHM 1 4W C925 NC R904 300K OHM 1 4W R939 NC GND1 GND 1 2 C929 0 001uF C909 470pF 25V C908 22uF 50V R901 680K OHM 1 4W 钡竲 э CN901 SOCKET 1 2 3 ON OFF C905 100uF 450V R924 150R 1 8W R942 1K 1 10W 1 D906 SP10100 1 2 3 L903 1 1uH L901 4 0mH 1 2 4 3 D901 FR103 C912 0 001uF D903 LL4148 D907 NC...

Page 46: ...15 0 0022uF C823 0 0022uF R861 130K OHM 1 1 10W D804 BAV99 3 1 2 Q805 PDTC144WK T801 POWER X FMR 1 4 8 3 7 9 6 2 5 C838 1500pF C822 1uF 25V Q812 PMBS3906 1 2 3 Q803 AM9945N T1 PF 1 2 3 4 8 7 6 5 S G S G D D D D R804 100R 1 8W Q806 PMBS3904 C802 470uF 25V R802 NC R822 1K 1 10W 1 Q801 PMBS3904 14V IC801 TL494IDR 1 2 3 4 5 6 7 8 9 10 11 12 13 14 15 16 1IN 1IN FEEDBACK DTC CT RT GND C1 E1 E2 C2 VCC OU...

Page 47: ... C615 NC R616 1K 1 10W 5 5V_Audio ROUT C610 100pF CN604 NC CONN 1 2 3 4 change R609 R610 R611 R612 add R616 C613 100uF 25V C616 NC C607 0 47uF 16V R607 10K 1 10W 5 MUTE EAR ROUT LOUT EAR LOUT SEL BTL CN601 CONN 1 2 3 4 R603 1K 1 10W 5 Lin C606 0 47uF 16V C618 0 47uF 16V Q602 PMBS3904 C605 1uF 25V R610 8 2KOHM 5 1 10W ROUT LOUT 5V_Audio 5V_Audio C602 100uF 25V R609 8 2KOHM 5 1 10W C611 100pF SEL BT...

Page 48: ...D POWER_Key C002 NC LED001 LED 3 4 1 2 MENU 0 V C001 NC POWER_Key LBADC2 VOL LBADC2 C003 NC MENU CONNECTOR GND VOL C004 NC AUTO R003 1K 1 16W 5 LED_BLUE LED_BLUE R002 2K OHM 1 16W add ZD001 and ZD002 for ESD solution ZD002 UDZSNP5 6B 1 2 VOL VOL LBADC1 SW001 JB41 03521 1 2 3 4 5 6 7 8 9 10 11 12 MENU VOL CN001 POWER AUTO ZD001 UDZSNP5 6B 1 2 0 V ...

Reviews: