background image

29

English

Preparing the computer

Prepare the computer as you would normally prepare it for traveling.

What to take with you

Take the following items with you:

AC adapter

Power cords that are appropriate for the country to which you are traveling

Spare, fully-charged battery packs

Additional printer driver files if you plan to use another printer

Proof of purchase, in case you need to show it to customs officials

International Travelers Warranty passport

Special considerations

Follow the same special considerations as when traveling with the computer. 
In addition, these tips are useful when traveling internationally:

When traveling in another country, check that the local AC voltage and the AC 
adapter power cord specifications are compatible. If not, purchase a power 
cord that is compatible with the local AC voltage. Do not use converter kits 
sold for appliances to power the computer.

If you are using the modem, check if the modem and connector are 
compatible with the telecommunications system of the country you are 
traveling in.

Securing your computer

Your computer is a valuable investment that you need to take care of. Learn how to 
protect and take care of your computer.

Security features include hardware and software locks — a security notch 
and passwords.

Using a computer security lock

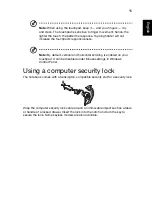
The notebook comes with a Kensington-compatible security slot for a security lock.

Wrap a computer security lock cable around an immovable object such as a table 
or handle of a locked drawer. Insert the lock into the notch and turn the key to 
secure the lock. Some keyless models are also available.

Summary of Contents for BRCM1050

Page 1: ...Aspire One Series Generic User Guide ...

Page 2: ..._____ Serial number _____________________________________ Date of purchase __________________________________ Place of purchase _________________________________ 2011 All Rights Reserved Aspire One Series Generic User Guide Original Issue 06 2011 ...

Page 3: ...ugging all power cords from the power supplies CAUTION for Accessibility Be sure that the power outlet you plug the power cord into is easily accessible and located as close to the equipment operator as possible When you need to disconnect power to the equipment be sure to unplug the power cord from the electrical outlet CAUTION for bundled dummy cards only for certain models Your computer shipped...

Page 4: ...pack The bottom surface areas around ventilation openings and AC adapter may get hot To avoid injury ensure they do not come in contact with your skin or body Note Reduce the risk of heat induced injury or fire by adhering to the following 1 Do not place the computer or AC adapter on a soft surface such as a bed 2 Do not rest the computer or AC adapter on your lap for extended periods 3 Use the co...

Page 5: ... was purchased Power cords for use in other countries regions must meet the requirements for that country region For more information on power cord requirements contact an authorized reseller or service provider Product servicing Do not attempt to service this product yourself as opening or removing covers may expose you to dangerous voltage points or other risks Refer all servicing to qualified s...

Page 6: ...ed Do not short circuit the battery Accidental short circuiting can occur when a metallic object such as a coin clip or pen causes direct connection of the positive and negative terminals of the battery These look like metal strips on the battery This might happen for example when you carry a spare battery in your pocket or purse Short circuiting the terminals may damage the battery or the connect...

Page 7: ...he hearing aid Do not place credit cards or other magnetic storage media near the device because information stored on them may be erased Medical devices Operation of any radio transmitting equipment including wireless phones may interfere with the functionality of inadequately protected medical devices Consult a physician or the manufacturer of the medical device to determine if they are adequate...

Page 8: ... off your device before boarding an aircraft The use of wireless teledevices in an aircraft may be dangerous to the operation of the aircraft disrupt the wireless telephone network and may be illegal Potentially explosive environments Switch off your device when in any area with a potentially explosive atmosphere and obey all signs and instructions Potentially explosive atmospheres include areas w...

Page 9: ...ers products with the ENERGY STAR mark What is ENERGY STAR Products that are ENERGY STAR qualified use less energy and prevent greenhouse gas emissions by meeting strict energy efficiency guidelines set by the U S Environmental Protection Agency Acer is committed to offering products and services worldwide that help customers save money conserve energy and improve the quality of our environment Th...

Page 10: ...ore comfortable computer use Finding your comfort zone Find your comfort zone by adjusting the viewing angle of the monitor using a footrest or raising your sitting height to achieve maximum comfort Observe the following tips Refrain from staying too long in one fixed posture Avoid slouching forward and or leaning backward Stand up and walk around regularly to remove the strain on your leg muscles...

Page 11: ...eduction filter using a display visor such as a piece of cardboard extended from the display s top front edge Avoid adjusting your display to an awkward viewing angle Avoid looking at bright light sources for extended periods of time Developing good work habits The following work habits make computer use more relaxing and productive Take short breaks regularly and often Perform some stretching exe...

Page 12: ...ll be sent a confirmation email with important data that you should keep in a safe place Your guides To help you use your Acer notebook we have designed a set of guides First off the setup poster helps you get started with setting up your computer The Aspire One Series User Guide contains useful information applying to all models in the Aspire One product range It covers basic topics such as Acer ...

Page 13: ...wing Use the Windows shutdown command click Start then Click Shut Down Use the power button You can also put the computer in sleep mode by pressing the sleep hotkey Fn F4 Note If you cannot power off the computer normally press and hold the power button for more than four seconds to shut down the computer If you turn off the computer and want to turn it on again wait at least two seconds before po...

Page 14: ...ing of all equipment plugged into a single wall outlet should not exceed the fuse rating Taking care of your battery pack Here are some ways to take care of your battery pack Use only batteries of the same kind as replacements Turn the power off before removing or replacing batteries Do not tamper with batteries Keep them away from children Dispose of used batteries according to local regulations ...

Page 15: ...ur battery pack xiv Cleaning and servicing xiv Acer eRecovery Management 1 Creating a recovery backup Optical drive 2 Creating a recovery backup USB flash drive 4 Recovering your system Optical drive 6 To recover your system 6 Types of recovery 6 Recovering pre installed software and drivers 6 Returning to a previous system condition 7 Returning your system to its factory condition 8 Recovering yo...

Page 16: ...ng the computer home 27 Preparing the computer 27 What to take with you 27 Special considerations 27 Setting up a home office 28 Traveling with the computer 28 Preparing the computer 28 What to take with you 28 Special considerations 28 Traveling internationally with the computer 28 Preparing the computer 29 What to take with you 29 Special considerations 29 Securing your computer 29 Using a compu...

Page 17: ...ons and safety notices 36 FCC notice 36 LCD pixel statement 37 Radio device regulatory notice 37 General 37 European Union EU 38 The FCC RF safety requirement 38 Canada Low power license exempt radio communication devices RSS 210 40 LCD panel ergonomic specifications 40 ...

Page 18: ......

Page 19: ...cer eRecovery Management consists of the following functions 1 Backup Create Factory Default Backup Create Drivers and Applications Backup Note Models that do not have a built in ODD will allow you to make backup copies to a USB drive or an external ODD 2 Restore Restore Operating System to Factory Defaults Restore Operating System and Retain User Data Reinstall Drivers or Applications This chapte...

Page 20: ... Start All Programs Acer then click Acer eRecovery Management 2 To create recovery discs for the hard drive s entire original contents including Windows and all factory loaded software and drivers click Create Factory Default Backup OR To create a recovery disc for only the factory loaded software and drivers click Create Drivers and Applications Backup Important We recommend that you create each ...

Page 21: ...ending on the operating system installed 3 Insert a blank disc into the drive indicated in the Backup to list then click Next You will be shown the backup progress on the screen The drive ejects each disc as it completes burning it 4 Remove the disc from the drive and mark it with a permanent marker Important Write a unique descriptive label on each disc such as Windows Recovery Disc 1 of 2 or App...

Page 22: ...efully Important If you are using a USB flash drive ensure it is at least 12 GB and does not contain any previous data 1 Click Start All Programs Acer then click Acer eRecovery Management 2 To create recovery backup for the hard drive s entire original contents including Windows and all factory loaded software and drivers click Create Factory Default Backup OR To create a recovery backup for only ...

Page 23: ...lug in the USB disk then click Start You will be shown the backup progress on the screen 4 Unplug the USB flash drive and mark it with a permanent marker Important Write a unique descriptive label on each backup such as Windows Recovery Backup or Apps Drivers Recovery Backup Make sure you keep the USB flash drive in a safe place that you will remember ...

Page 24: ...orking correctly For instructions see Returning to a previous system condition on page 7 3 Reset your system to its factory condition If nothing else has solved the problem and you want to reset your system to factory condition see Returning your system to its factory condition on page 8 Types of recovery Recovering pre installed software and drivers As a troubleshooting step you may need to reins...

Page 25: ...ems you can return to one of these restore points to get your system running again Windows automatically creates an additional restore point each day and also each time you install software or device drivers Tip For more information about using Microsoft System Restore click Start then click Help and Support Type windows system restore in the Search Help box then press Enter To return to a restore...

Page 26: ...m your recovery discs on page 9 Recovering from within Windows To reinstall Windows and all pre installed software and drivers Click Start All Programs Acer then click Acer eRecovery Management Click the Restore tab then Restore Operating System to Factory Defaults Click Yes then Start A dialog box will display information about the hard drive that the operating system will be recovered to Warning...

Page 27: ...u Press F2 when starting your computer Use the left or right arrow keys to select the Main menu Press the down key until F12 Boot Menu is selected press F5 to change this setting to Enabled Use the left or right arrow keys to select the Exit menu Select Save Changes and Exit and press Enter Select OK to confirm Your computer will restart 2 During startup press F12 to open the boot menu The boot me...

Page 28: ...e problem may be solved by returning your system to a previous state when everything was working correctly For instructions see Returning to a previous system condition on page 11 3 Reset your system to its factory condition If nothing else has solved the problem and you want to reset your system to factory condition see Returning your system to its factory condition on page 12 Types of recovery R...

Page 29: ... restore points In most cases of hard to resolve software problems you can return to one of these restore points to get your system running again Windows automatically creates an additional restore point each day and also each time you install software or device drivers Tip For more information about using Microsoft System Restore click Start then click Help and Support Type windows system restore...

Page 30: ...ckup on page 13 Recovering from within Windows To reinstall Windows and all pre installed software and drivers Click Start All Programs Acer then click Acer eRecovery Management Click the Restore tab then Restore Operating System to Factory Defaults to open the Confirm Restoration dialog box Click Yes then Start A dialog box will display information about the hard drive that the operating system w...

Page 31: ...the F12 Boot Menu Press F2 when starting your computer Use the left or right arrow keys to select the Main menu Press the down key until F12 Boot Menu is selected press F5 to change this setting to Enabled Use the left or right arrow keys to select the Exit menu Select Save Changes and Exit and press Enter Select OK to confirm Your computer will restart 2 During startup press F12 to open the boot ...

Page 32: ...rform selection and execution functions These two buttons are similar to the left and right buttons on a mouse Tapping on the touchpad is the same as clicking the left button Note Illustrations for reference only The exact configuration of your PC depends on the model purchased Function Left button 2 Right button 3 Main touchpad 1 Execute Quickly click twice Tap twice at the same speed as double c...

Page 33: ... vertical and horizontal scrolling is enabled on your touchpad It can be disabled under Mouse settings in Windows Control Panel Using a computer security lock The notebook comes with a Kensington compatible security slot for a security lock Wrap the computer security lock cable around an immovable object such as a table or handle of a locked drawer Insert the lock into the notch and turn the key t...

Page 34: ... F11 When Num Lock is on the embedded keypad is in numeric mode The keys function as a calculator complete with the arithmetic operators and Use this mode when you need to do a lot of numeric data entry A better solution would be to connect an external keypad Note Fn F11 only for certain models Scroll Lock Fn F12 When Scroll Lock is on the screen moves one line up or down when you press the up or ...

Page 35: ...n the Run dialog box T Cycle through programs on the taskbar U Open Ease of Access Center X Open Windows Mobility Center Break Display the System Properties dialog box Shift M Restore minimized windows to the desktop Tab Cycle through programs on the taskbar by using Windows Flip 3 D SPACEBAR Bring all gadgets to the front and select Windows Sidebar CTRL F Search for computers if you are on a netw...

Page 36: ... Alt Gr and then press the 5 key at the upper center of the keyboard Note Some fonts and software do not support the Euro symbol Please refer to www microsoft com typography faq faq12 htm for more information The US dollar sign 1 Open a text editor or word processor 2 Hold Shift and then press the 4 key at the upper center of the keyboard Note This function varies according to the language setting...

Page 37: ...system automatically blanks the screen to save power Press any key to turn the display back on If pressing a key does not turn the display back on three things might be the cause The brightness level might be too low Press Fn increase to adjust the brightness level The display device might be set to an external monitor Press the display toggle hotkey Fn F5 to toggle the display back to the compute...

Page 38: ...tem will be the only option for future recovery operations This recovery process helps you restore the C drive with the original software content that is installed when you purchase your notebook Follow the steps below to rebuild your C drive Your C drive will be reformatted and all data will be erased It is important to back up all data files before using this option Before performing a restore o...

Page 39: ... appear on the screen or the number and sequence in the case of beeps You are required to provide the following information Name ___________________________________________________________________ Address _________________________________________________________________ Telephone number ________________________________________________________ Machine and model type ________________________________...

Page 40: ...means that the battery s performance will diminish with time and use To maximize your battery s life you are advised to adhere to the recommendations set out below Conditioning a new battery pack Before you use a battery pack for the first time there is a conditioning process that you should follow 1 Insert the new battery without turning the computer on 2 Connect the AC adapter and fully charge t...

Page 41: ...from the unit connect the AC adapter if you want to continue using your computer Otherwise turn off the computer first To install a battery pack 1 Align the battery with the open battery bay make sure that the end with the contacts will enter first and that the top surface of the battery is facing up 2 Slide the battery into the battery bay and gently push until the battery locks in place To remov...

Page 42: ...a cool dry place The recommended temperature is 10 C 50 F to 30 C 86 F Higher temperatures cause the battery to self discharge faster Excessive recharging decreases the battery life Look after your AC adapter and battery Battery low warning When using battery power pay attention to the Windows power meter Warning Connect the AC adapter as soon as possible after the battery low warning appears Data...

Page 43: ...se all applications 3 Turn off the computer 4 Replace the battery pack 5 Turn on the computer and resume work The AC adapter or a power outlet is unavailable You have no spare battery pack 1 Save all necessary files 2 Close all applications 3 Turn off the computer Situation Recommended Action ...

Page 44: ...ting room Preparing the computer Before moving the computer close and latch the display cover to place it in Sleep mode You can now safely take the computer anywhere you go within the building To bring the computer out of Sleep mode open the display then press and release the power button If you are taking the computer to a client s office or a different building you may choose to shut down the co...

Page 45: ...ng the computer from your desktop follow these steps to prepare the computer for the trip home Check that you have removed all media and compact discs from the drive s Failure to remove the media can damage the drive head Pack the computer in a protective case that can prevent the computer from sliding around and cushion it if it should fall Caution Avoid packing items next to the top cover of the...

Page 46: ...nce for instance from your office building to a client s office building or traveling locally Preparing the computer Prepare the computer as if you were taking it home Make sure that the battery in the computer is charged Airport security may require you to turn on your computer when carrying it into the gate area What to take with you Take the following items with you AC adapter Spare fully charg...

Page 47: ...C adapter power cord specifications are compatible If not purchase a power cord that is compatible with the local AC voltage Do not use converter kits sold for appliances to power the computer If you are using the modem check if the modem and connector are compatible with the telecommunications system of the country you are traveling in Securing your computer Your computer is a valuable investment...

Page 48: ...IOS utility on page 33 User Password secures your computer against unauthorized use Combine the use of this password with password checkpoints on boot up and resume from Hibernation for maximum security Password on Boot secures your computer against unauthorized use Combine the use of this password with password checkpoints on boot up and resume from Hibernation for maximum security Important Do n...

Page 49: ...ss Enter When the User Password is set and the password on boot parameter is enabled a prompt appears at boot up Type the User Password and press Enter to use the computer If you enter the password incorrectly a warning message appears Try again and press Enter Important You have three chances to enter a password If you fail to enter the password correctly after three tries the system halts Press ...

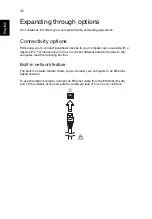
Page 50: ...uld with a desktop PC For instructions on how to connect different external devices to the computer read the following section Built in network feature The built in network feature allows you to connect your computer to an Ethernet based network To use the network feature connect an Ethernet cable from the Ethernet RJ 45 port on the chassis of the computer to a network jack or hub on your network ...

Page 51: ...counter configuration problems you may need to run it To activate the BIOS utility press F2 during the POST while the notebook PC logo is being displayed Boot sequence To set the boot sequence in the BIOS utility activate the BIOS utility then select Boot from the categories listed at the top of the screen Enable disk to disk recovery To enable disk to disk recovery hard disk recovery activate the...

Page 52: ... activity involving one or more of the following devices keyboard mouse hard disk peripherals connected to the computer and video memory If no activity is detected for a period of time called an inactivity timeout the computer stops some or all of these devices in order to conserve energy This computer employs a power management scheme that supports the advanced configuration and power interface A...

Page 53: ...se of action If you still encounter problems after going through the corrective measures please contact your dealer or an authorized service center for assistance Error messages Corrective action CMOS battery bad Contact your dealer or an authorized service center CMOS checksum error Contact your dealer or an authorized service center Disk boot failure Insert a system bootable disk then press Ente...

Page 54: ... the device and receiver Connect the device into an outlet on a circuit different from that to which the receiver is connected Consult the dealer or an experienced radio television technician for help Notice Shielded cables All connections to other computing devices must be made using shielded cables to maintain compliance with FCC regulations Notice Peripheral devices Only peripherals input outpu...

Page 55: ...anufacturing techniques Nevertheless some pixels may occasionally misfire or appear as black or red dots This has no effect on the recorded image and does not constitute a malfunction Radio device regulatory notice Note Below regulatory information is for models with wireless LAN and or Bluetooth only General To prevent radio interference to the licensed service this device is intended to be opera...

Page 56: ...rmany Greece Spain France Ireland Italy Luxembourg the Netherlands Austria Portugal Finland Sweden United Kingdom Estonia Latvia Lithuania Poland Hungary Czech Republic Slovak Republic Slovenia Cyprus Malta Bulgaria and Romania Usage is allowed in the countries of European Union as well as Norway Switzerland Iceland and Liechtenstein This device must be used in strict accordance with the regulatio...

Page 57: ...ntained between the antenna for the integrated wireless LAN Mini PCI Card built in to the screen section and all persons Note The wireless Mini PCI adapter implements a transmission diversity function The function does not emit radio frequencies simultaneously from both antennas One of the antennas is selected automatically or manually by users to ensure good quality radiocommunication 2 An improp...

Page 58: ... intended to be operated indoors and installation outdoors is subject to licensing LCD panel ergonomic specifications Design viewing distance 500 mm Design inclination angle 0 0 Design azimuth angle 90 0 Viewing direction range class Class IV Screen tilt angle 85 0 Design screen illuminance Illuminance level 250 250cosα lx where α 85 Color Source D65 Reflection class of LCD panel positive and nega...

Reviews: