Chapter 3
73
Removing the CPU
1.
See “Removing the Battery Pack” on page 60..
2.
See “Removing the Lower Cover” on page 62..
3.
See “Removing the Heatsink Fan Module” on page 70.
4.
See “Removing the CPU and VGA Heatsink Module” on page 71.
5.
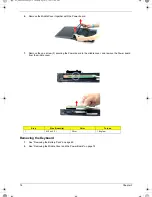
Using a flat screwdriver, turn the CPU socket latch counter-clockwise to release the CPU, then remove
the CPU.
NOTE: When installing the CPU, make sure to install the CPU with PIN 1 at the corner as shown.
Removing the VGA board (for Discrete model only)
1.
See “Removing the Battery Pack” on page 60.
2.
See “Removing the Lower Cover” on page 62.
3.
See “Removing the Heatsink Fan Module” on page 70.
4.
See “Removing the CPU and VGA Heatsink Module” on page 71.
SG_Dallen.book Page 73 Thursday, April 19, 2007 11:08 AM
Summary of Contents for Extensa 5210
Page 6: ...VI SG_Dallen book Page VI Thursday April 19 2007 11 08 AM...
Page 10: ...X Table of Contents SG_Dallen book Page X Thursday April 19 2007 11 08 AM...
Page 14: ...4 Chapter 1 System Block Diagram SG_Dallen book Page 4 Thursday April 19 2007 11 08 AM...
Page 65: ...Chapter 2 55 SG_Dallen book Page 55 Thursday April 19 2007 11 08 AM...
Page 66: ...56 Chapter 2 SG_Dallen book Page 56 Thursday April 19 2007 11 08 AM...
Page 147: ...Chapter 6 137 SG_Dallen book Page 137 Thursday April 19 2007 11 08 AM...
Page 178: ...168 Appendix B SG_Dallen book Page 168 Thursday April 19 2007 11 08 AM...
Page 180: ...170 Appendix C SG_Dallen book Page 170 Thursday April 19 2007 11 08 AM...

